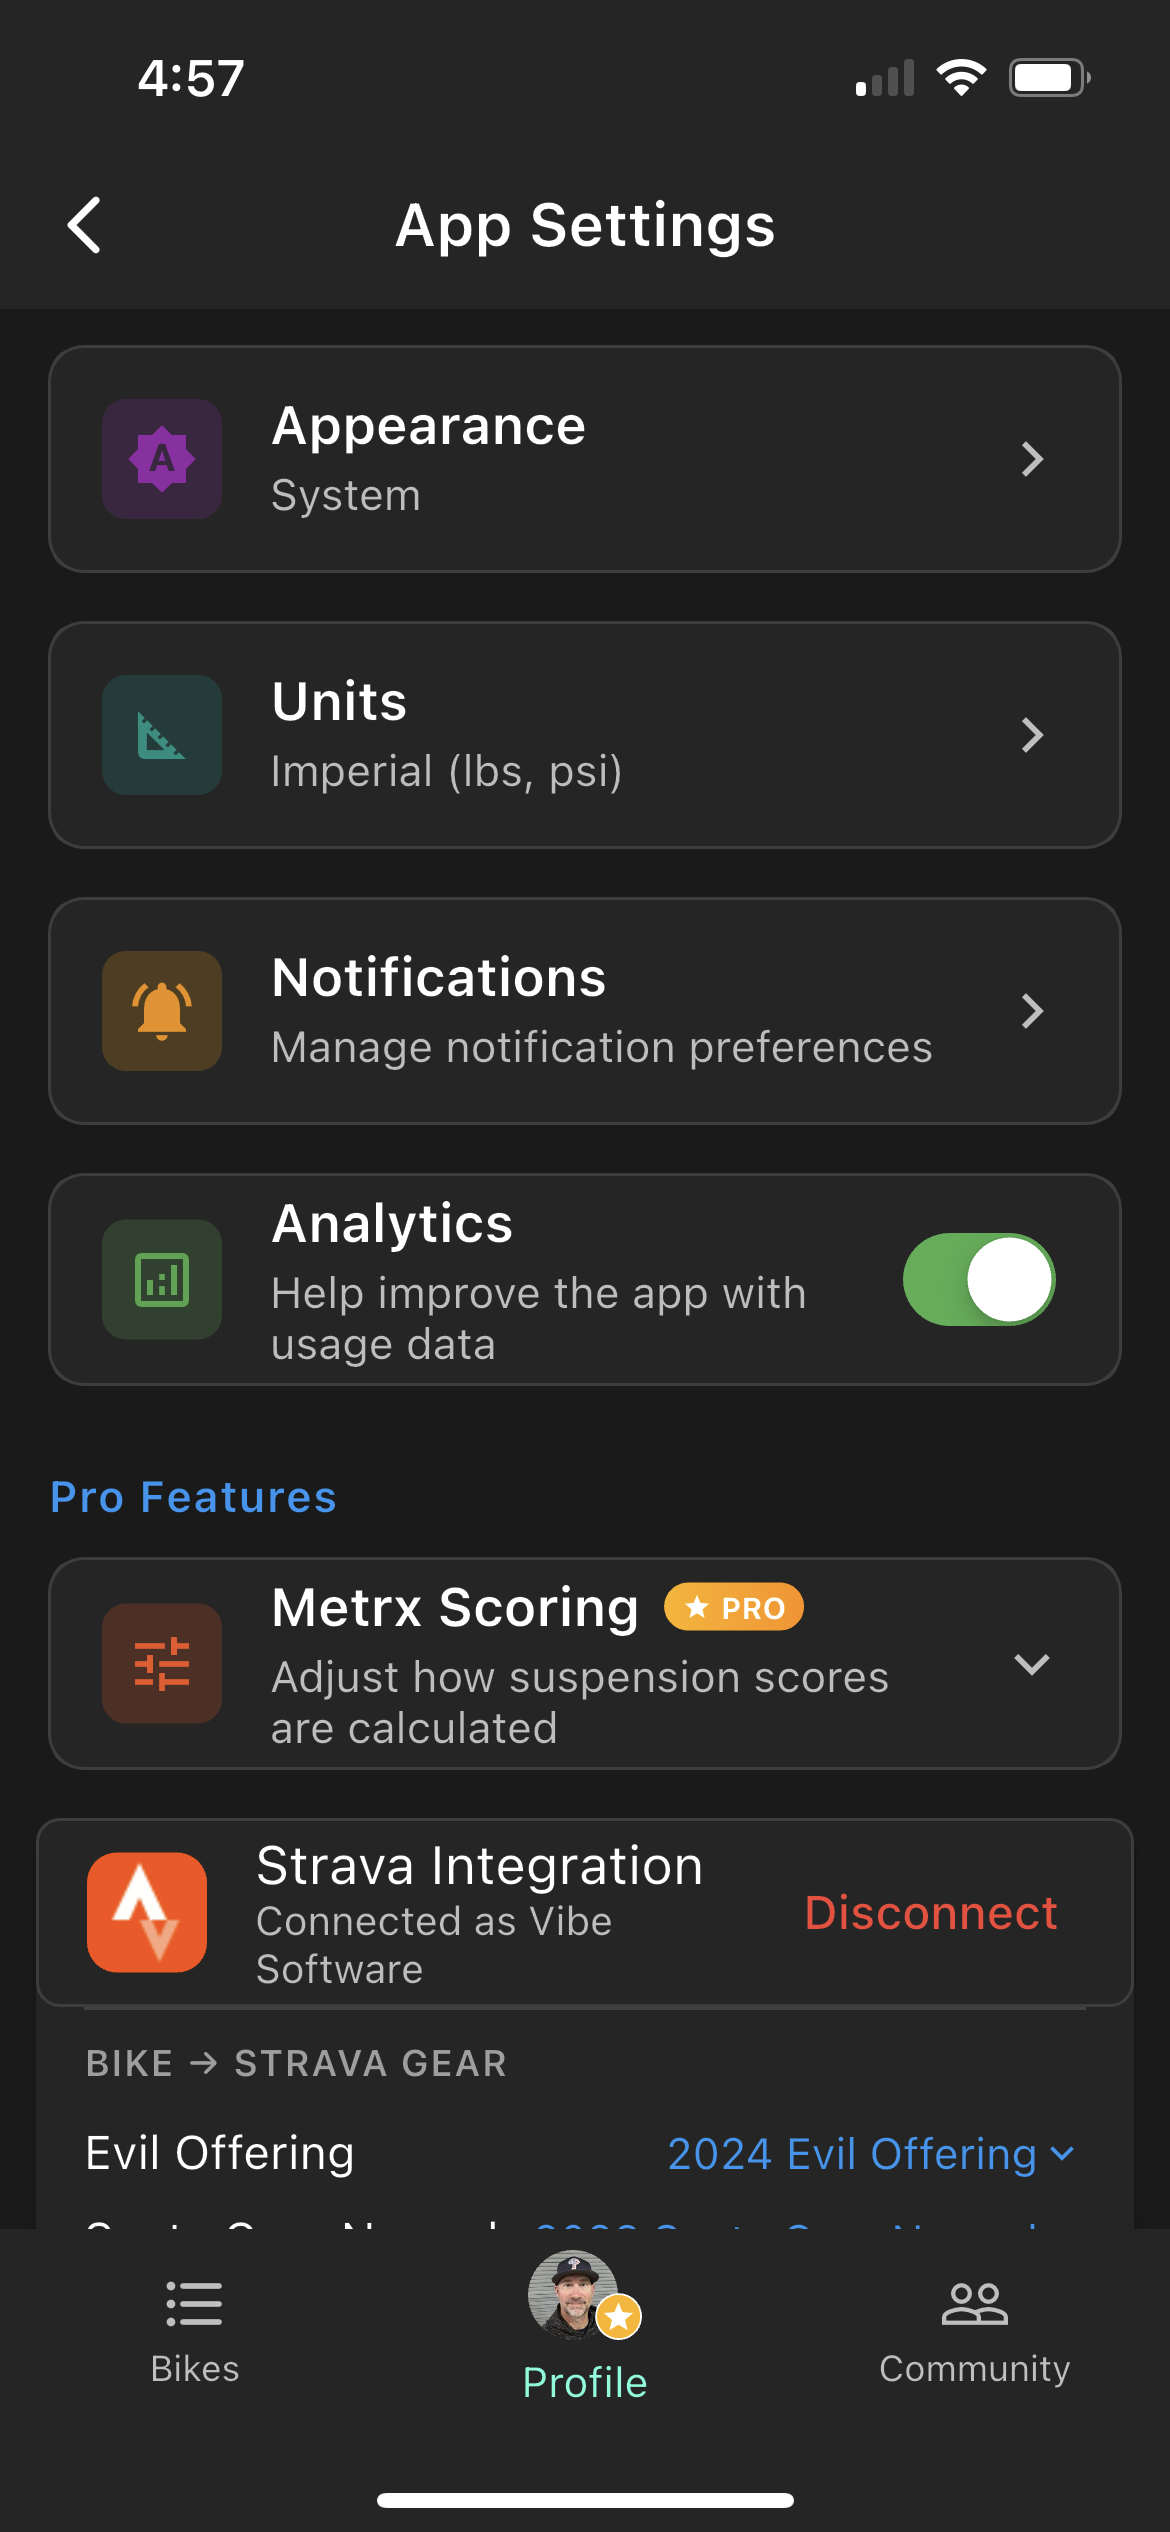
App Settings
Access settings from the Profile tab. Settings are organized into a few logical groups.
Display & Preferences
- Theme — Choose Light, Dark, or System (follows your device setting).
- Units — Switch between Imperial (psi, mph, ft) and Metric (bar, km/h, m) at any time. All existing data re-displays in the new unit immediately.
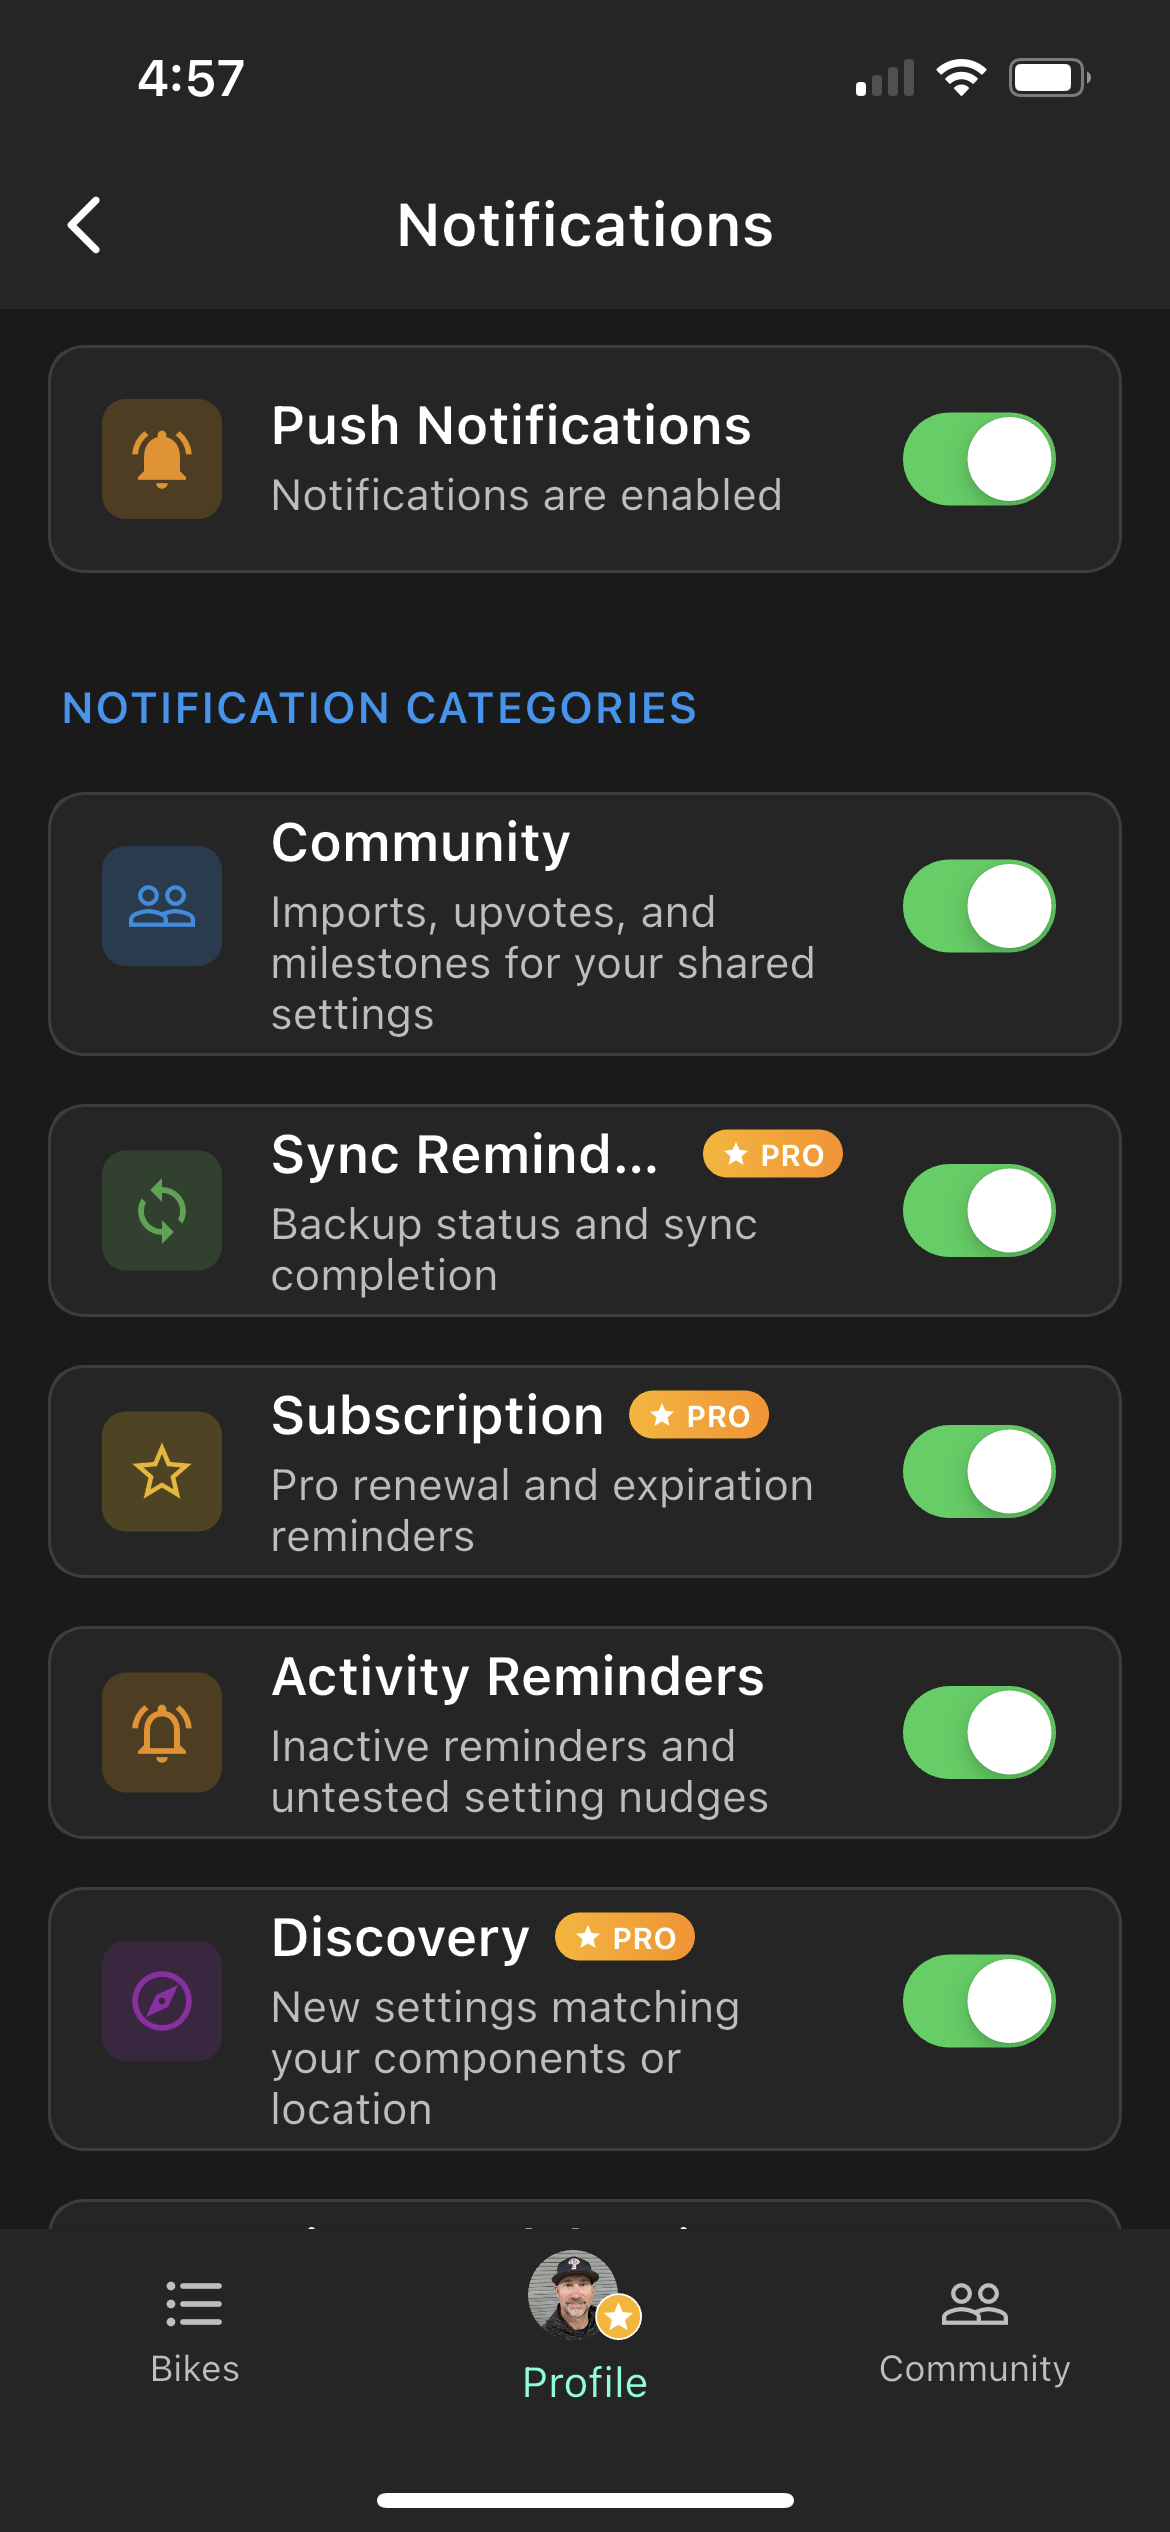
- Notifications — Enable or disable push notifications globally. Individual service reminders still need notification permission to fire alerts.
- Analytics — Allow anonymous usage data to help improve the app. No personal or ride data is included.
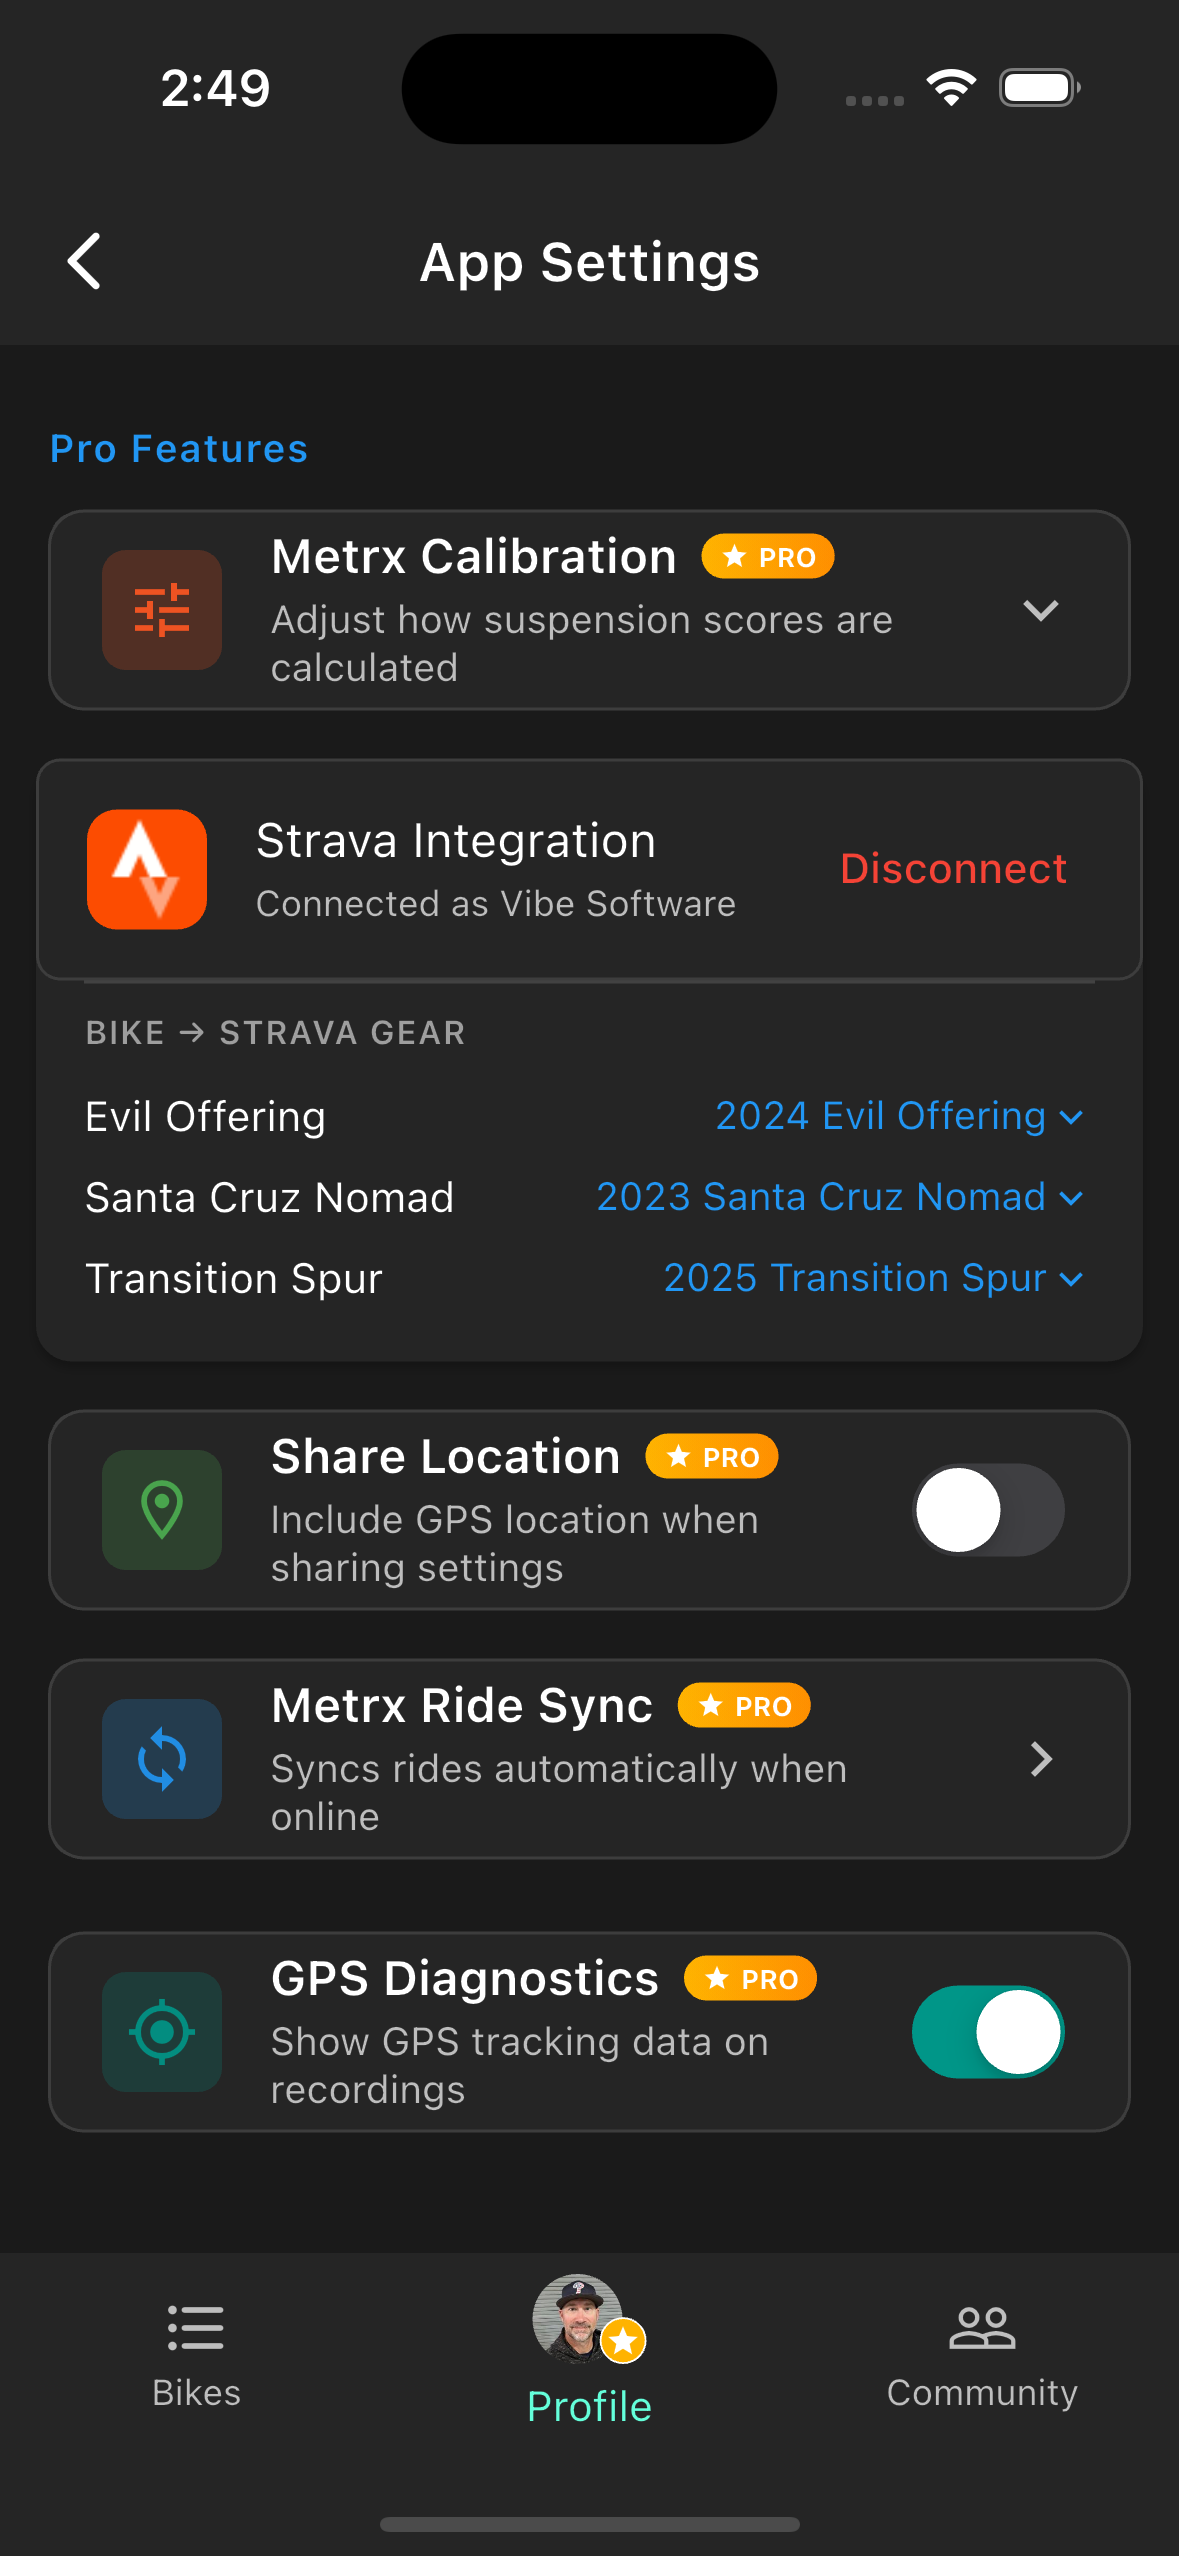
Pro Settings Pro
- Metrx Scoring — Fine-tune accelerometer sensitivity for your specific phone and mount. The default range works well for most setups. Only adjust if your scores consistently look too high or too low. See Metrx Calibration for details.
- Strava Integration — Connect your Strava account to auto-track riding hours for service reminders. See Strava Integration for full setup steps.
- Share Location with Settings — Optionally include your GPS location when sharing a suspension setting to the Community. Useful for trail-specific context.
- Ride Sync Mode — Automatic syncs new rides to the cloud as soon as you're online. Manual lets you trigger syncs yourself from the ride history screen.
Note: Pro settings are hidden for free accounts and unlock automatically upon subscribing — no toggle or restart required.
Settings overview
Notifications
Strava integration
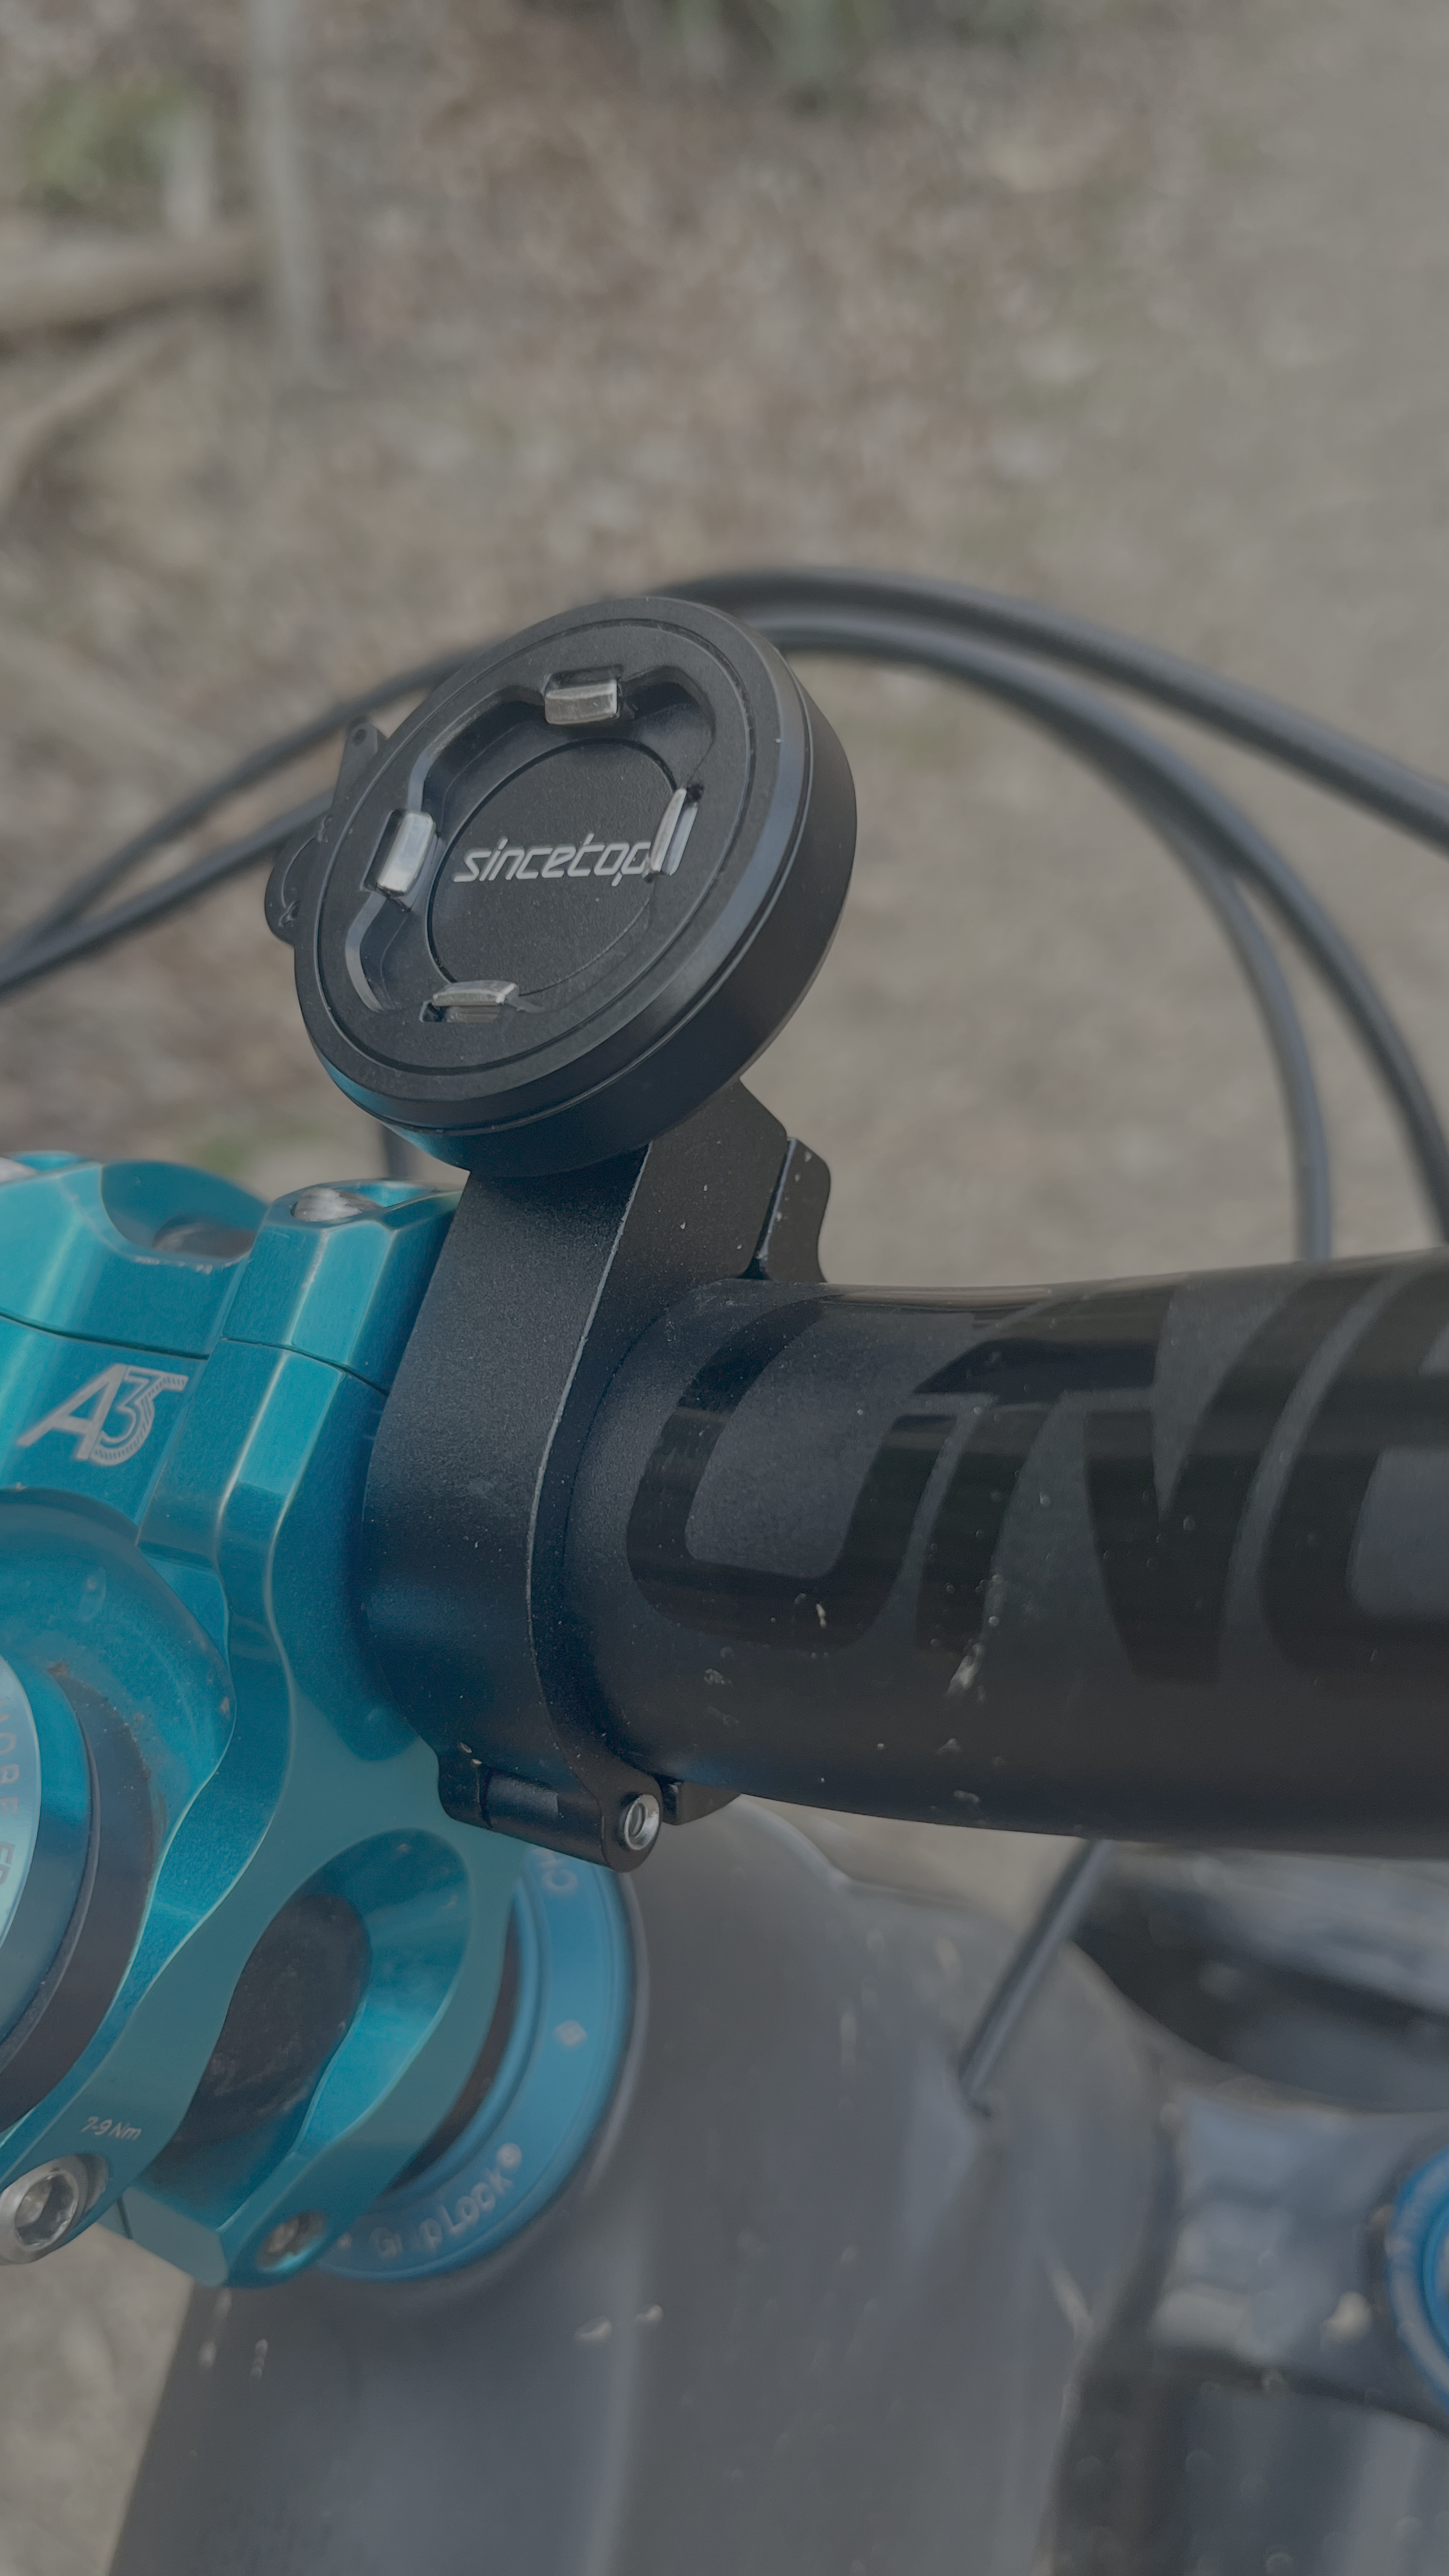
Mounting Your Phone
How you mount your phone directly determines data quality. The app measures vibration transmitted through your suspension — if the phone isn't rigidly attached to the bike, it absorbs the vibration instead of measuring it.
Where to mount
- Stem (recommended) — Closest to the front axle, captures the most meaningful fork data. Most handlebar stem mounts work perfectly here.
- Handlebar clamp — A solid second choice. Slightly more flex than a stem mount but still very effective.
- Top tube / frame — Works for overall ride data but is further from the suspension action. Use if stem/bar options aren't available.
Mount requirements
- Rigid — The mount must not flex, rattle, or wobble. Tighten all clamps firmly.
- Stable angle — Upright or slightly tilted is fine. Avoid extreme angles that make the screen hard to reach.
- Doesn't interfere — Confirm the mount doesn't block brake levers, shifters, or your riding position before you head out.
What not to do
Don't put your phone in a jersey pocket, hydration pack, or hold it in your hand. Your body absorbs the vibration and the data will be meaningless. A loose mount produces the same result — the phone bouncing independently of the bike is not measuring the bike.
Common mounting solutions include Quad Lock, GoPro-style quick-release clamps, and aftermarket stem adapters. Any rigid phone mount designed for cycling will work.
Developer recommendation: SinceTop
The developer of RideMetrx personally uses the SinceTop stem mount system. It locks the phone rigidly to the stem with a case-based adapter, which keeps the phone secure without interfering with the cockpit. Not sponsored — just a genuine recommendation from daily use on the trail.
Stem mount
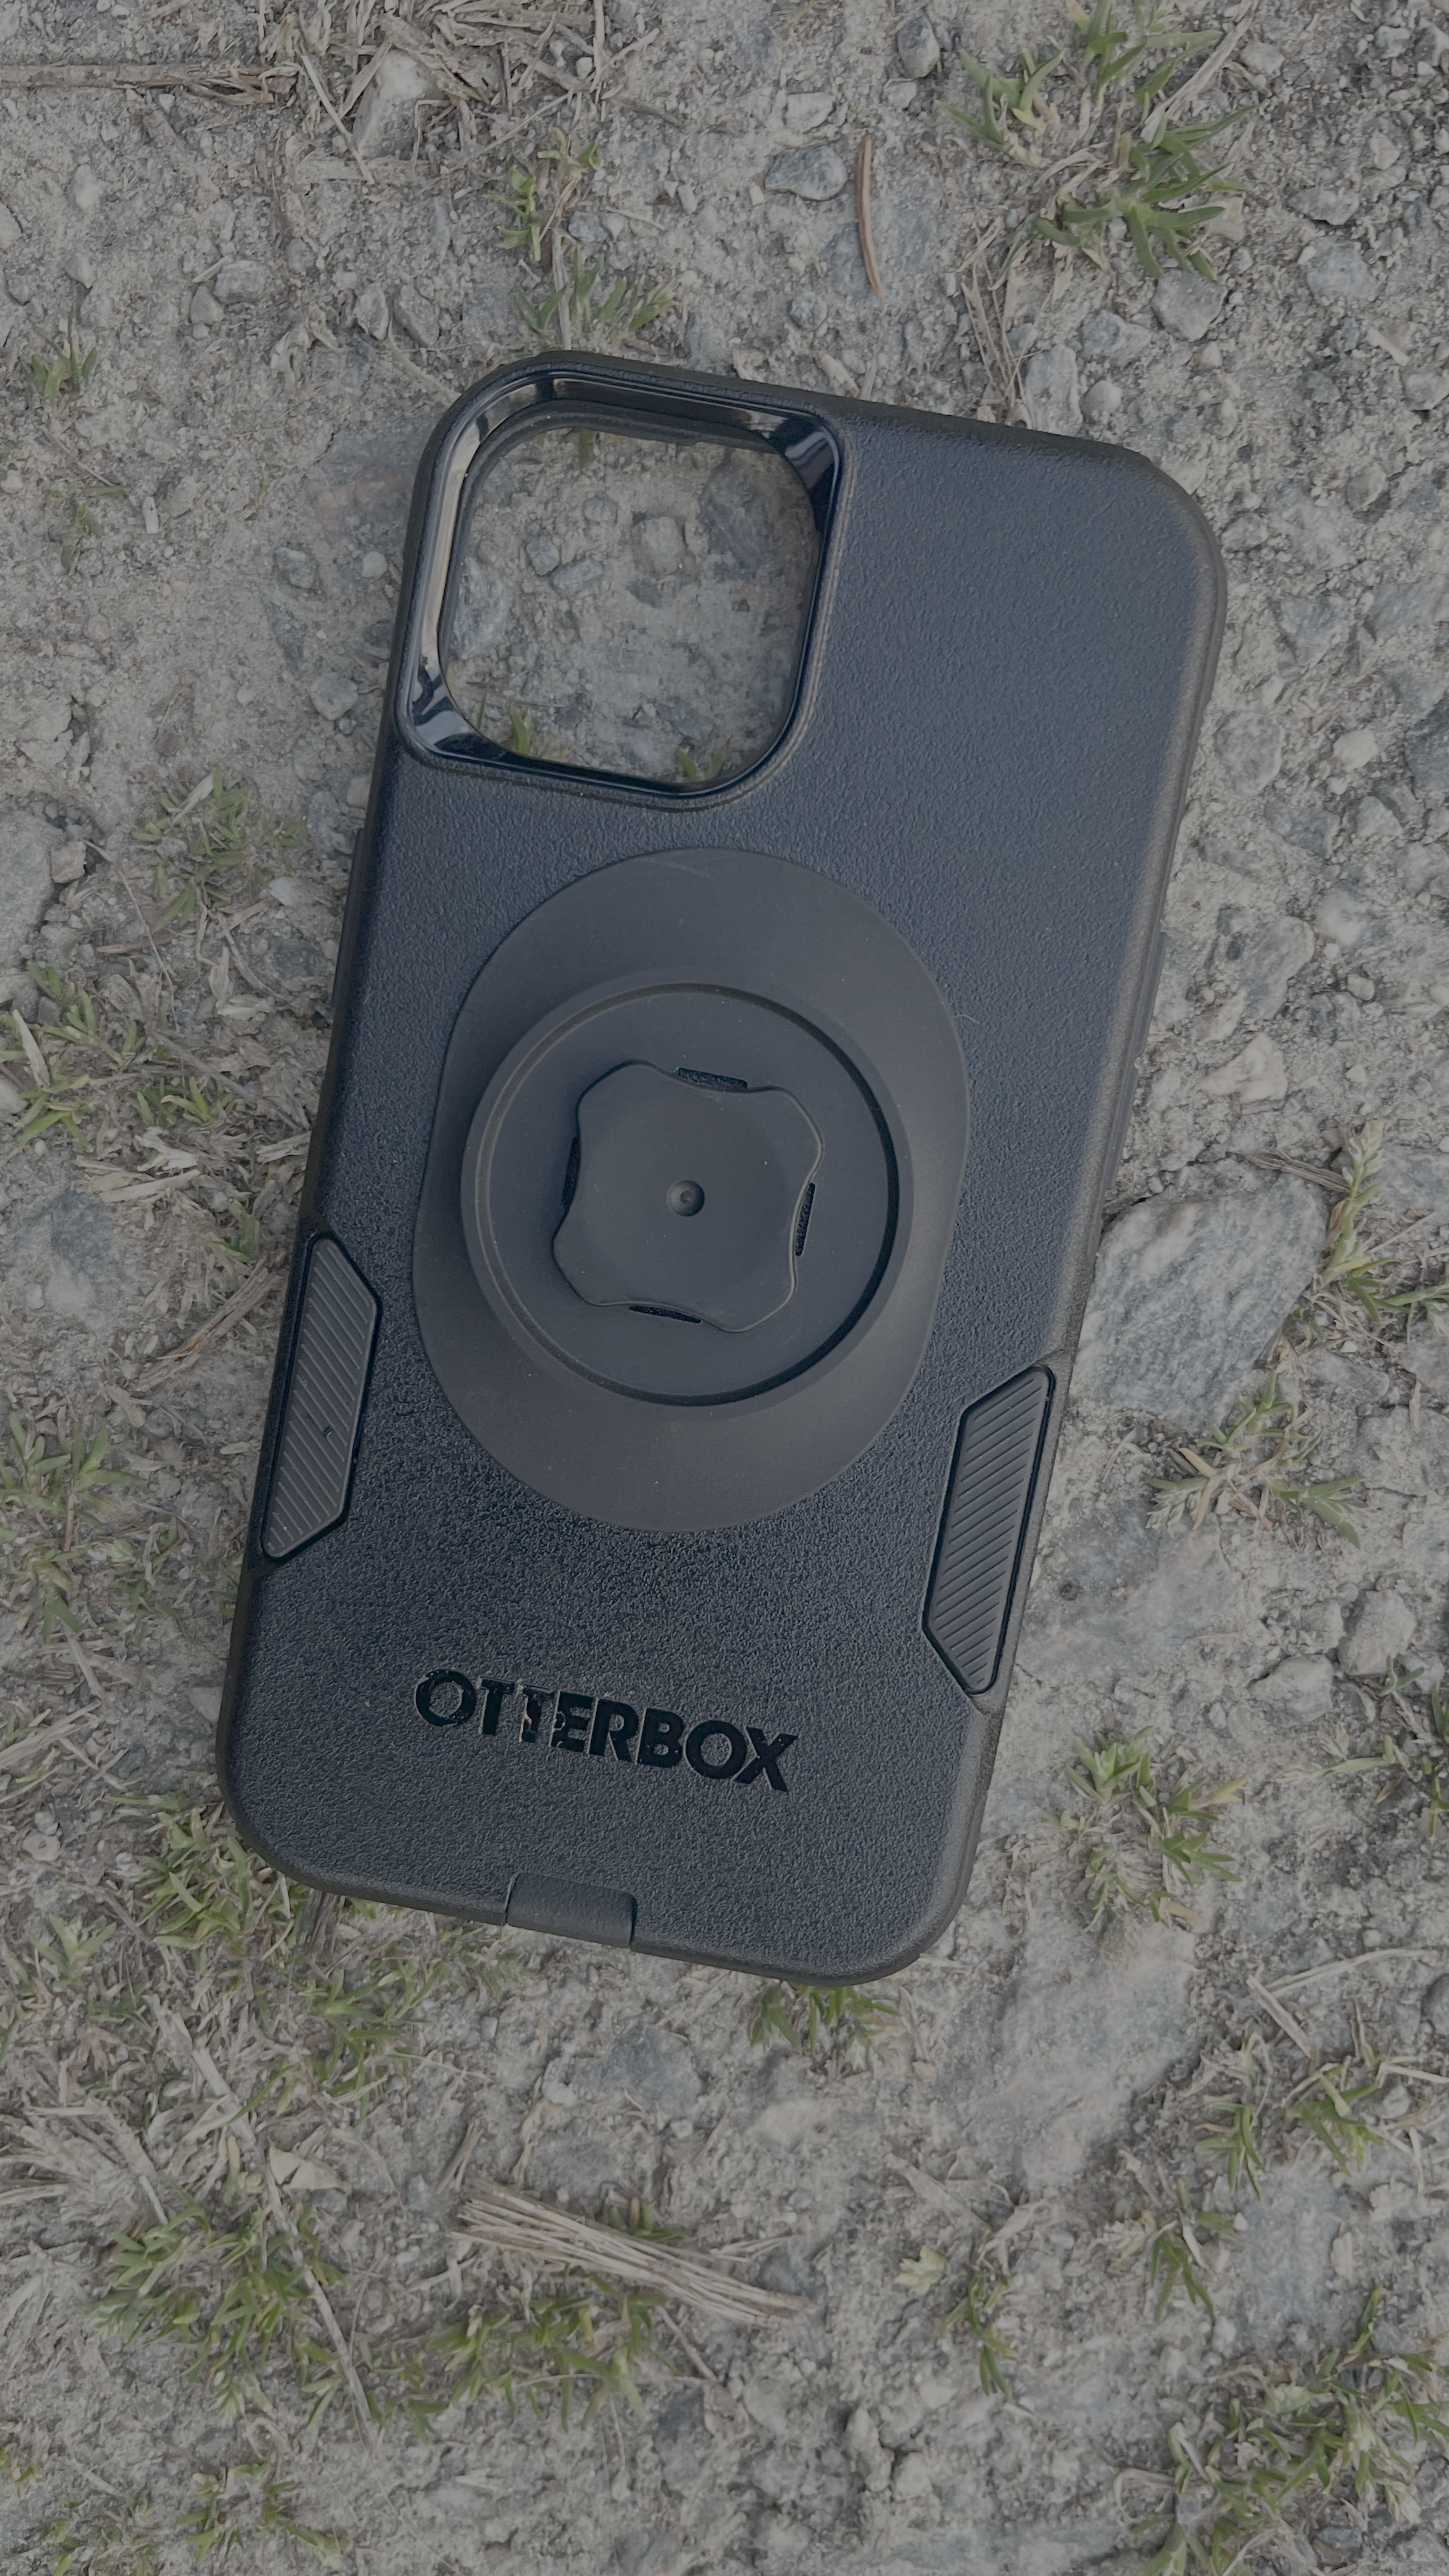
Case adaptor
Handlebar mount
Pre-ride calibration
Metrx Recording Pro
The Metrx records accelerometer and GPS data while you ride and produces a roughness score for each section of trail. Scores are consistent across runs, so you can compare two sessions with different settings on the same trail.
Starting a recording
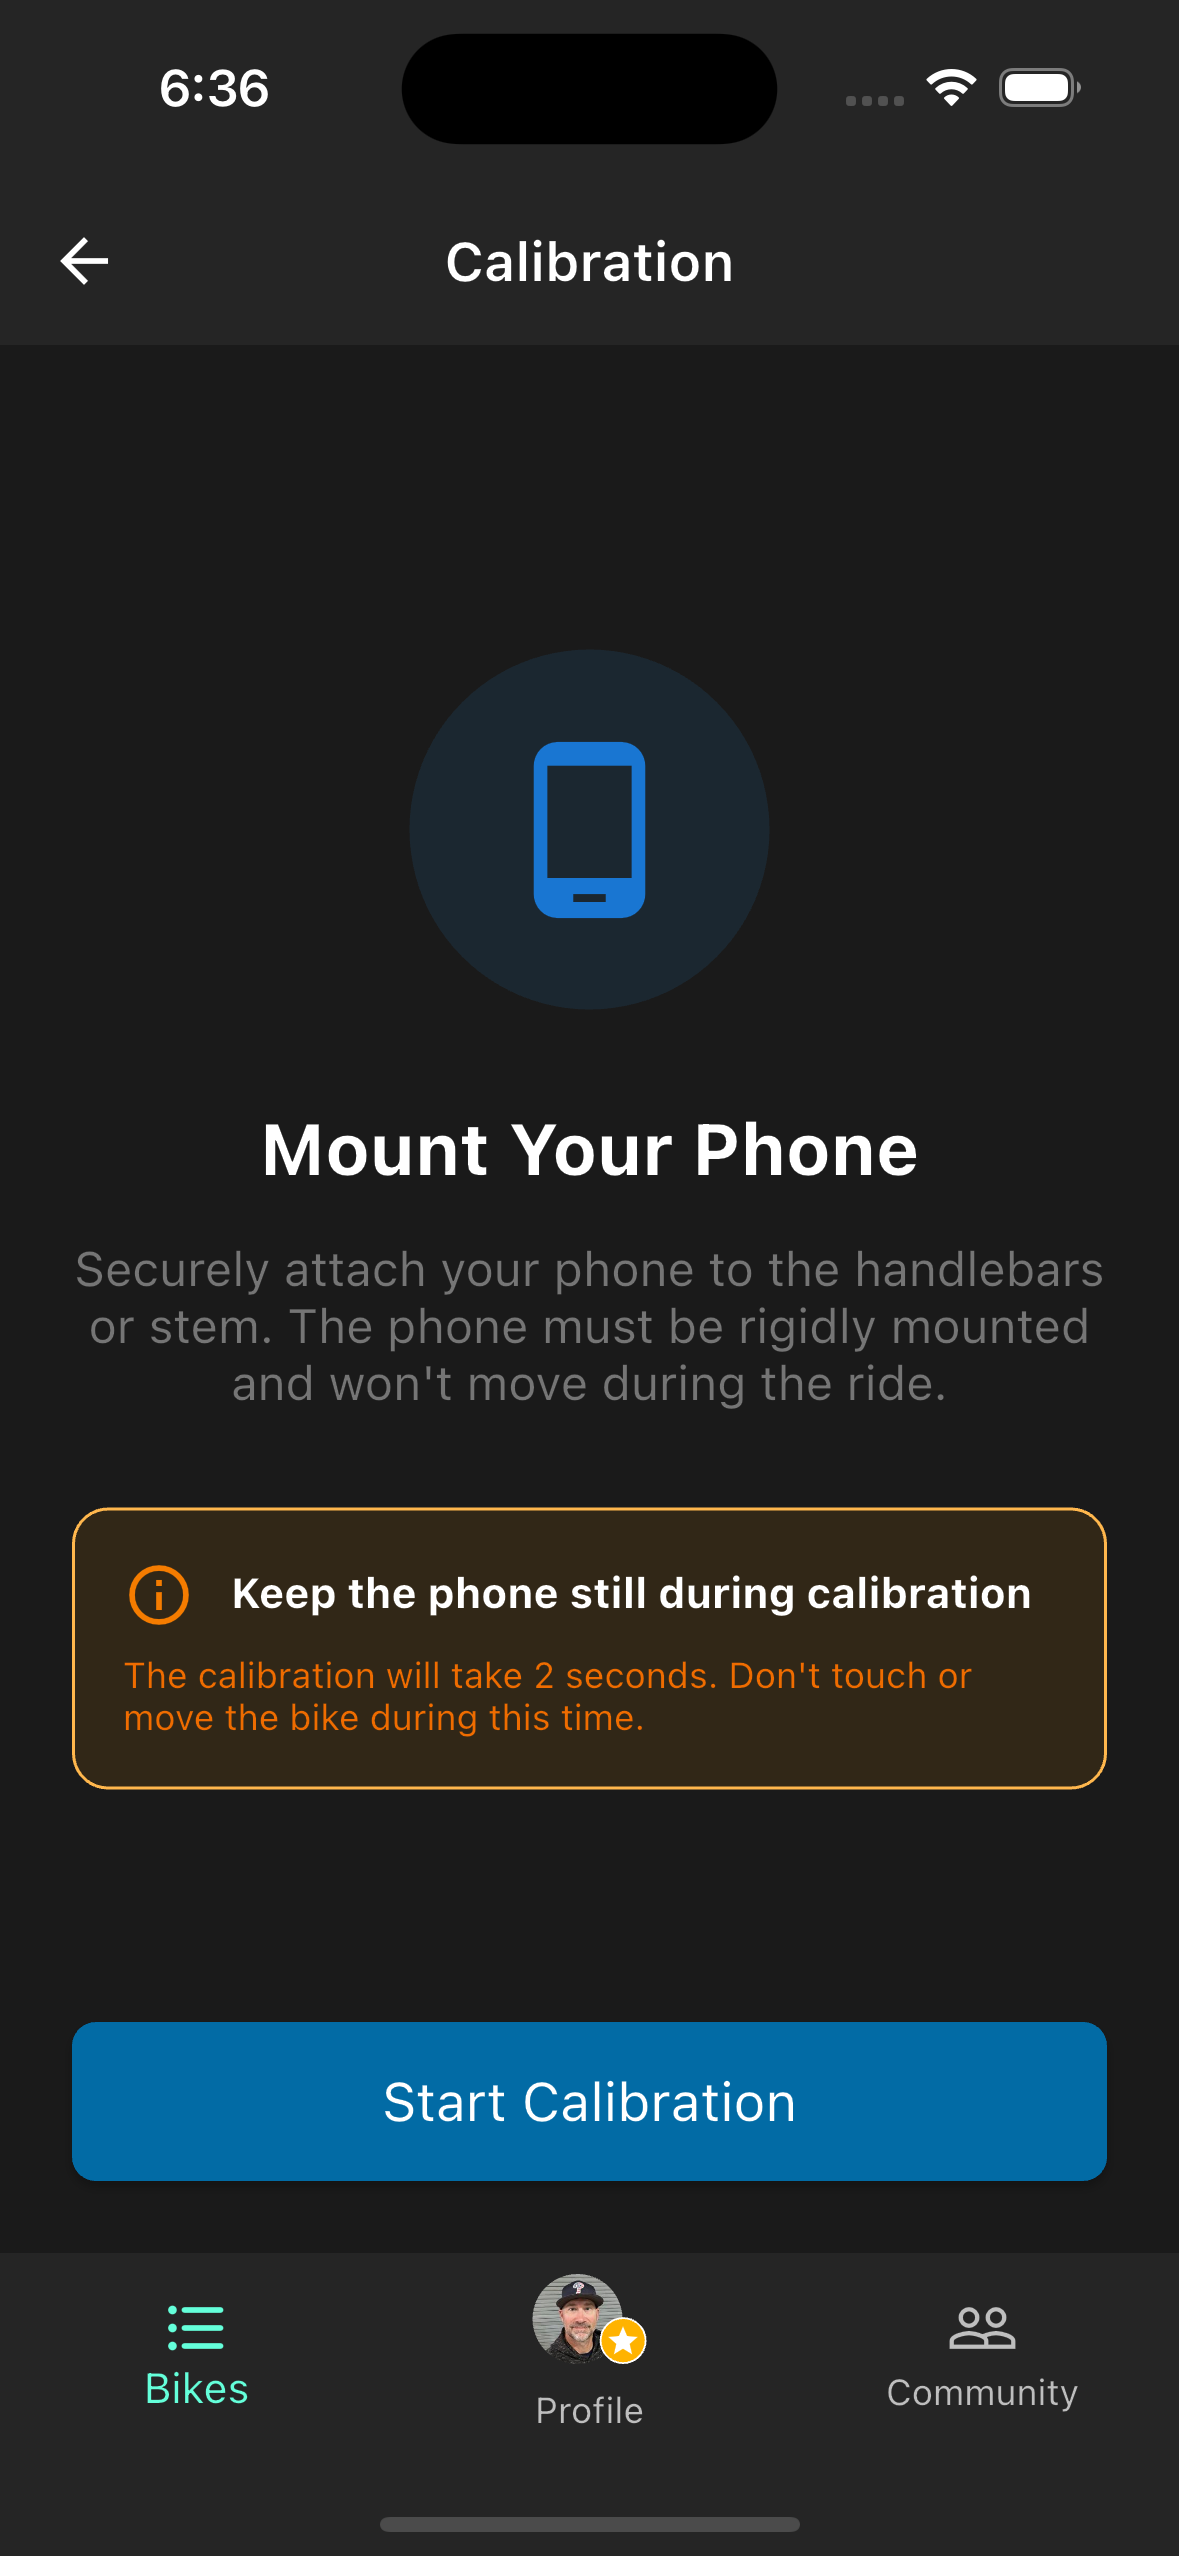
- 1.Tap Metrx in the tab bar, then New Recording.
- 2.Select your bike and, optionally, the suspension setting you're testing.
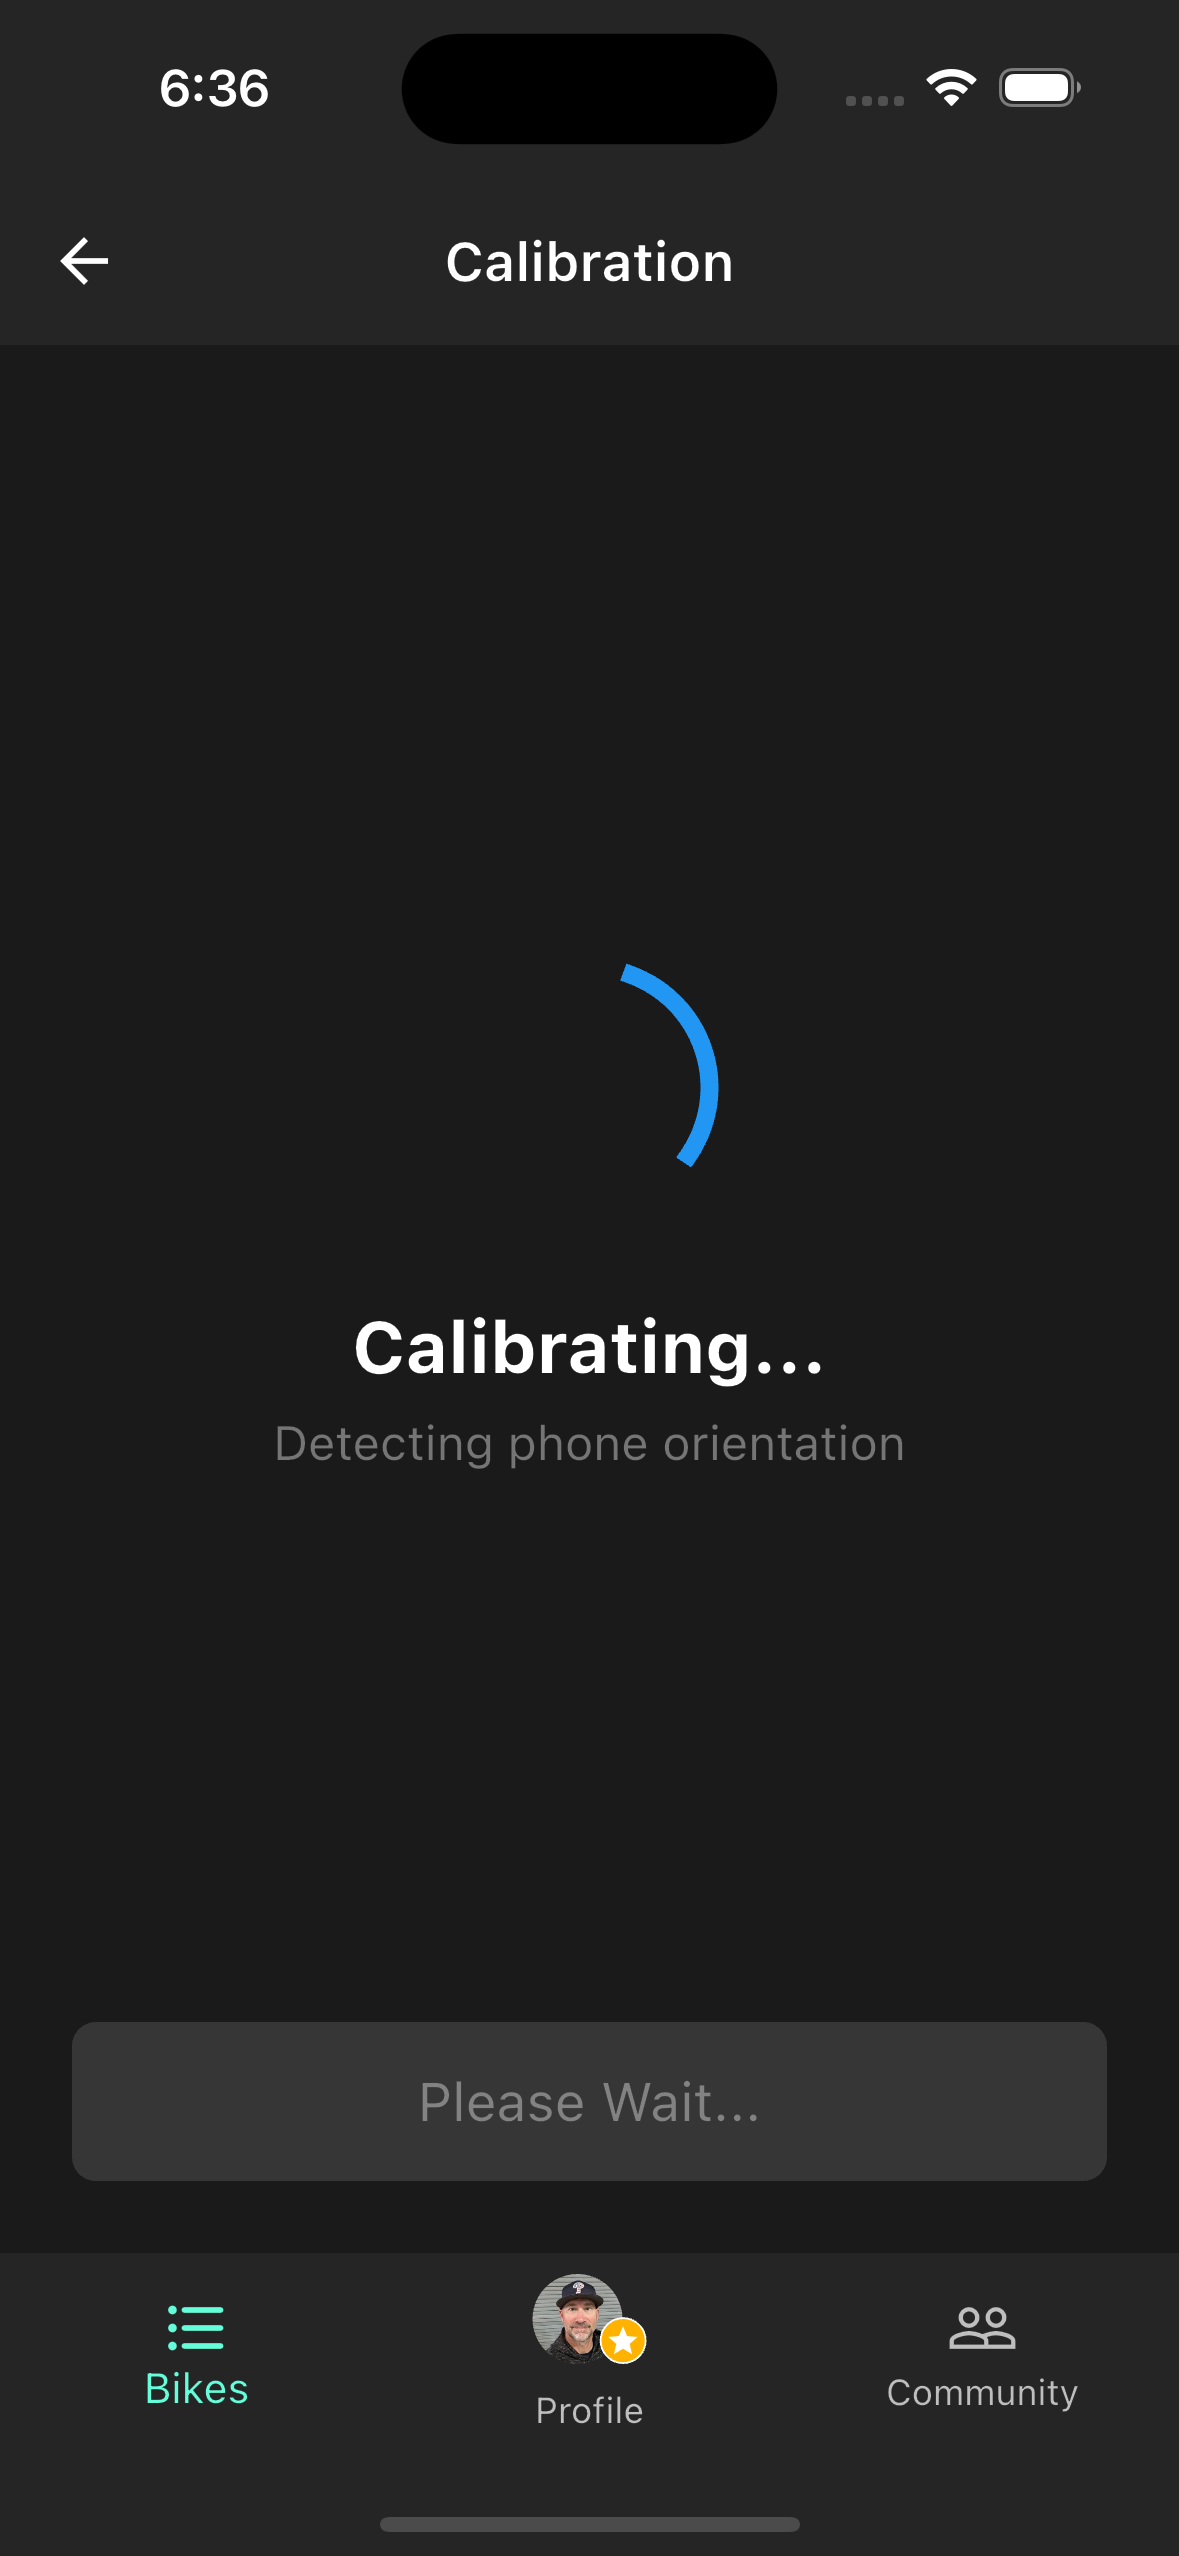
- 3.Mount your phone, then tap through the calibration screen (keep bike still).
- 4.Ride. The screen stays on and shows live duration, distance, speed, and sample count.
- 5.Tap Stop when finished. Results process in a few seconds.
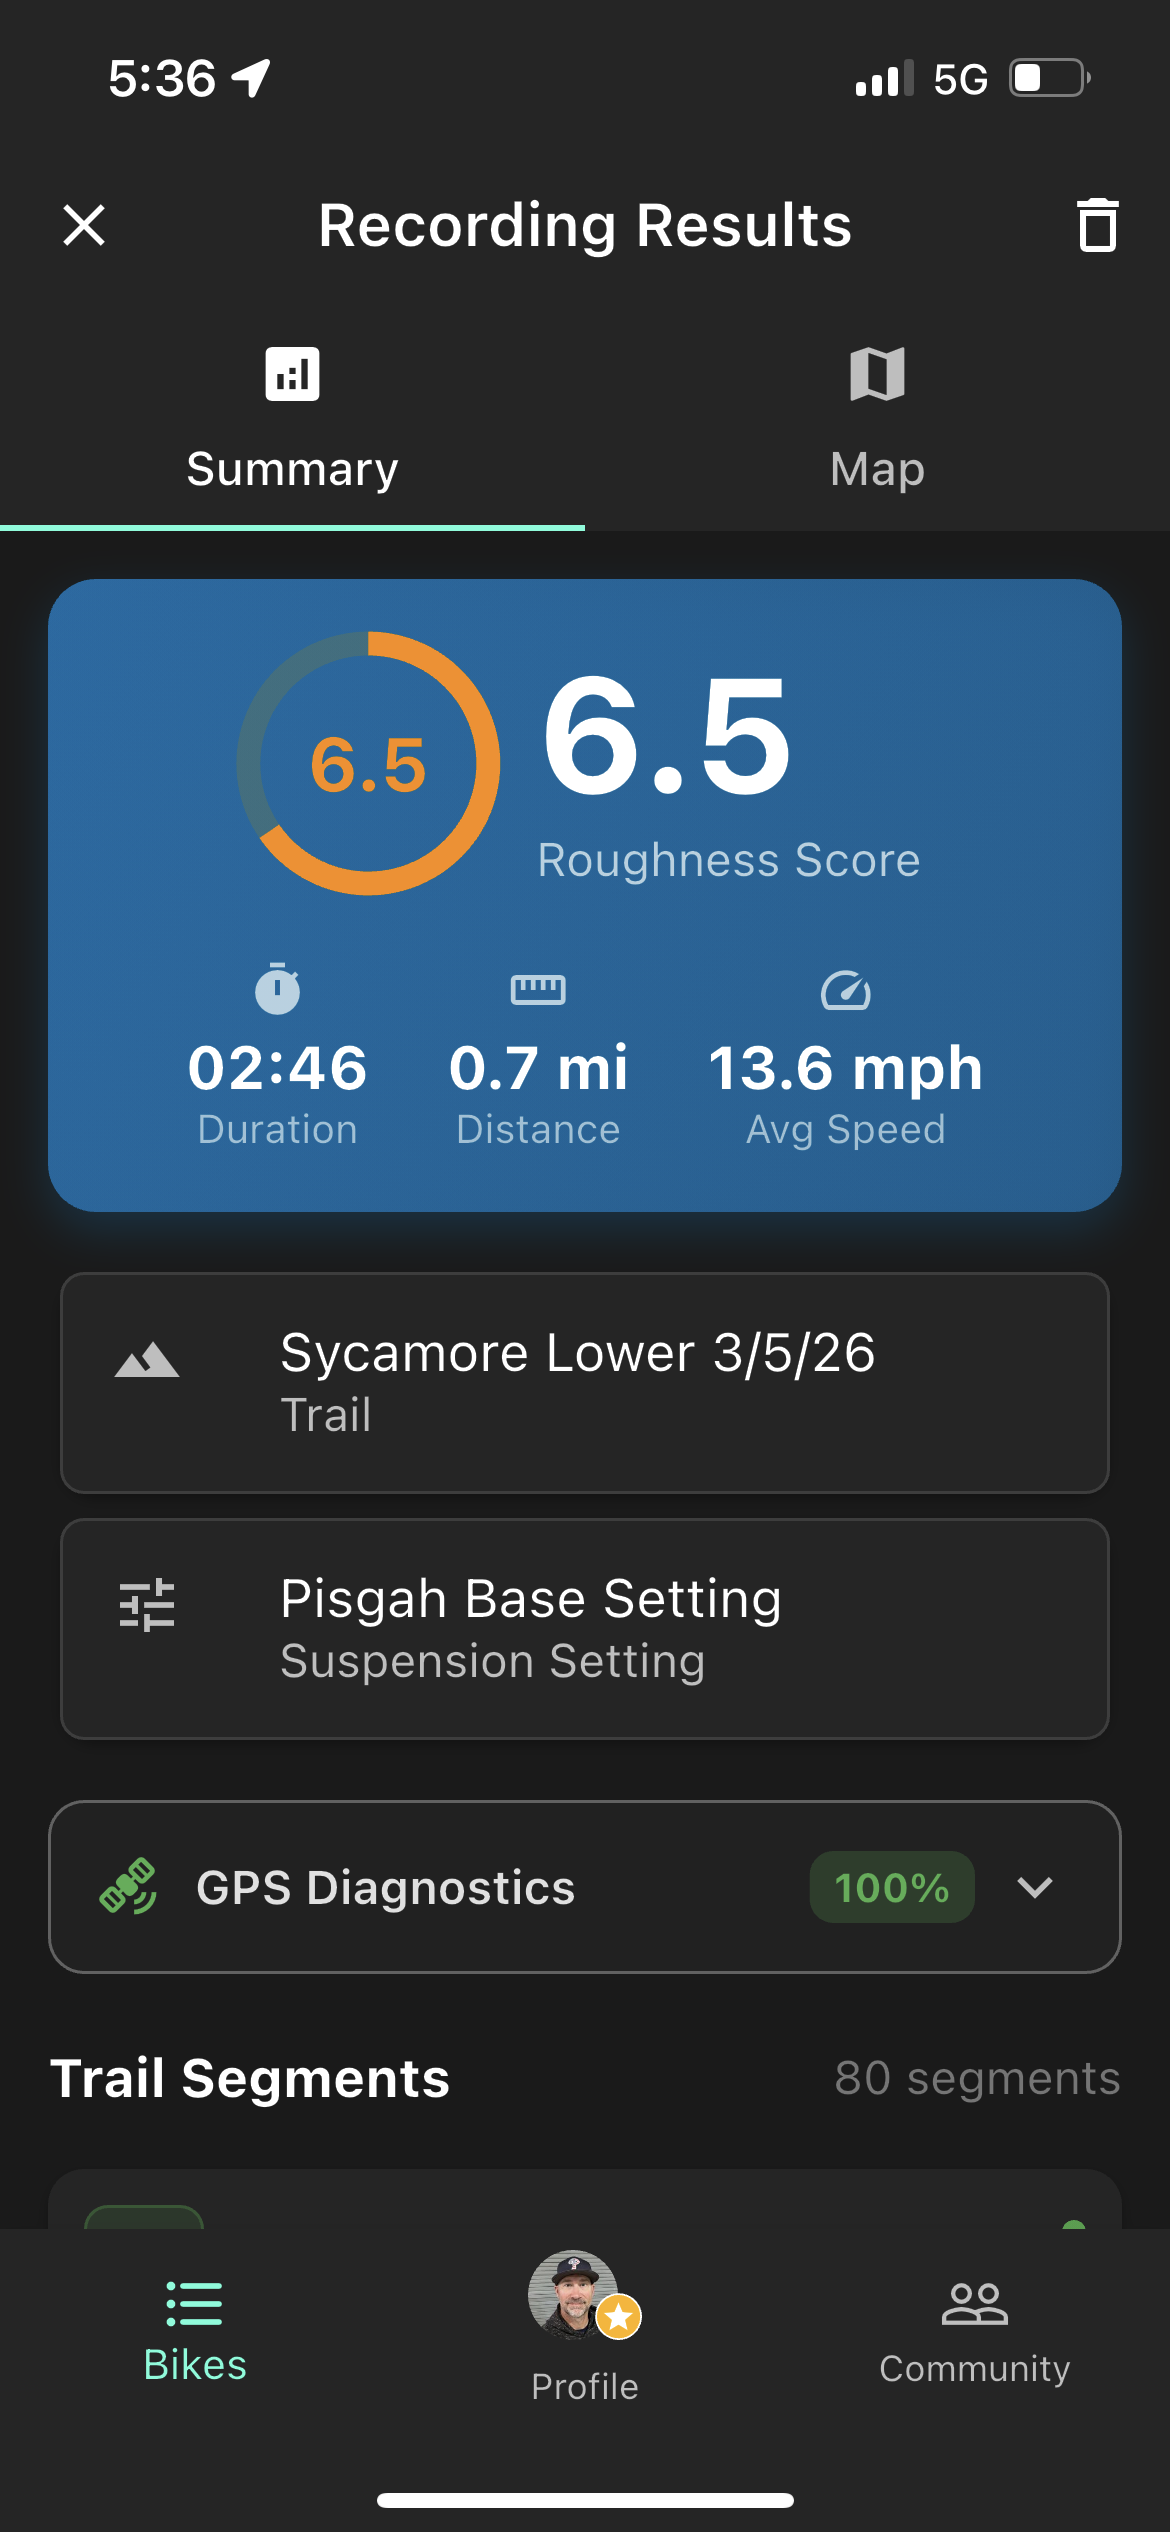
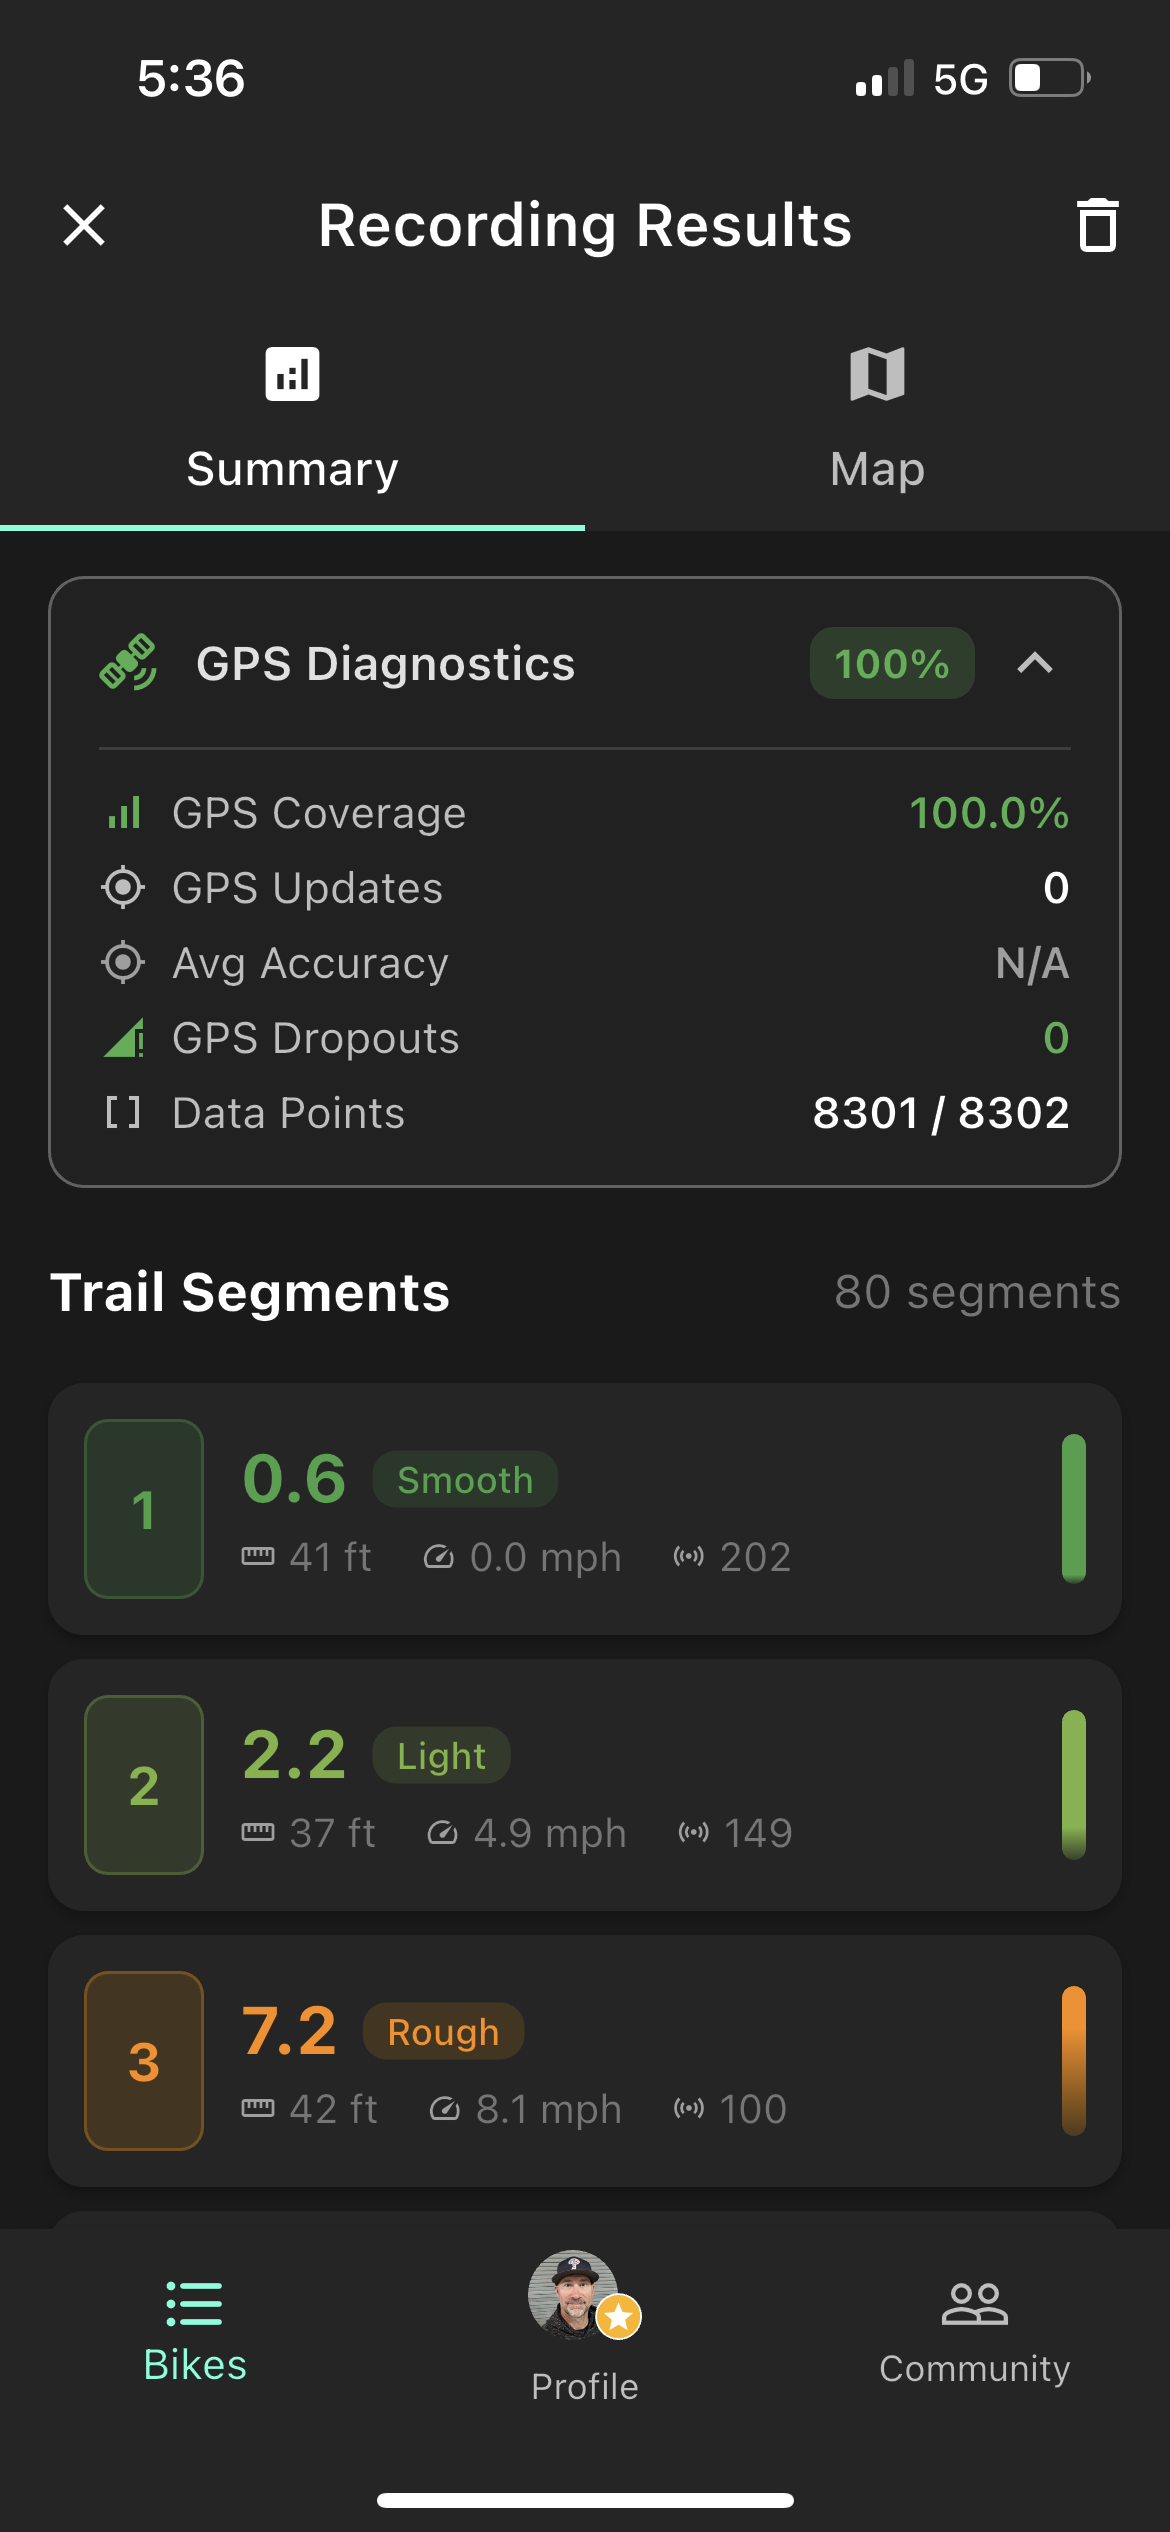
Reading your results
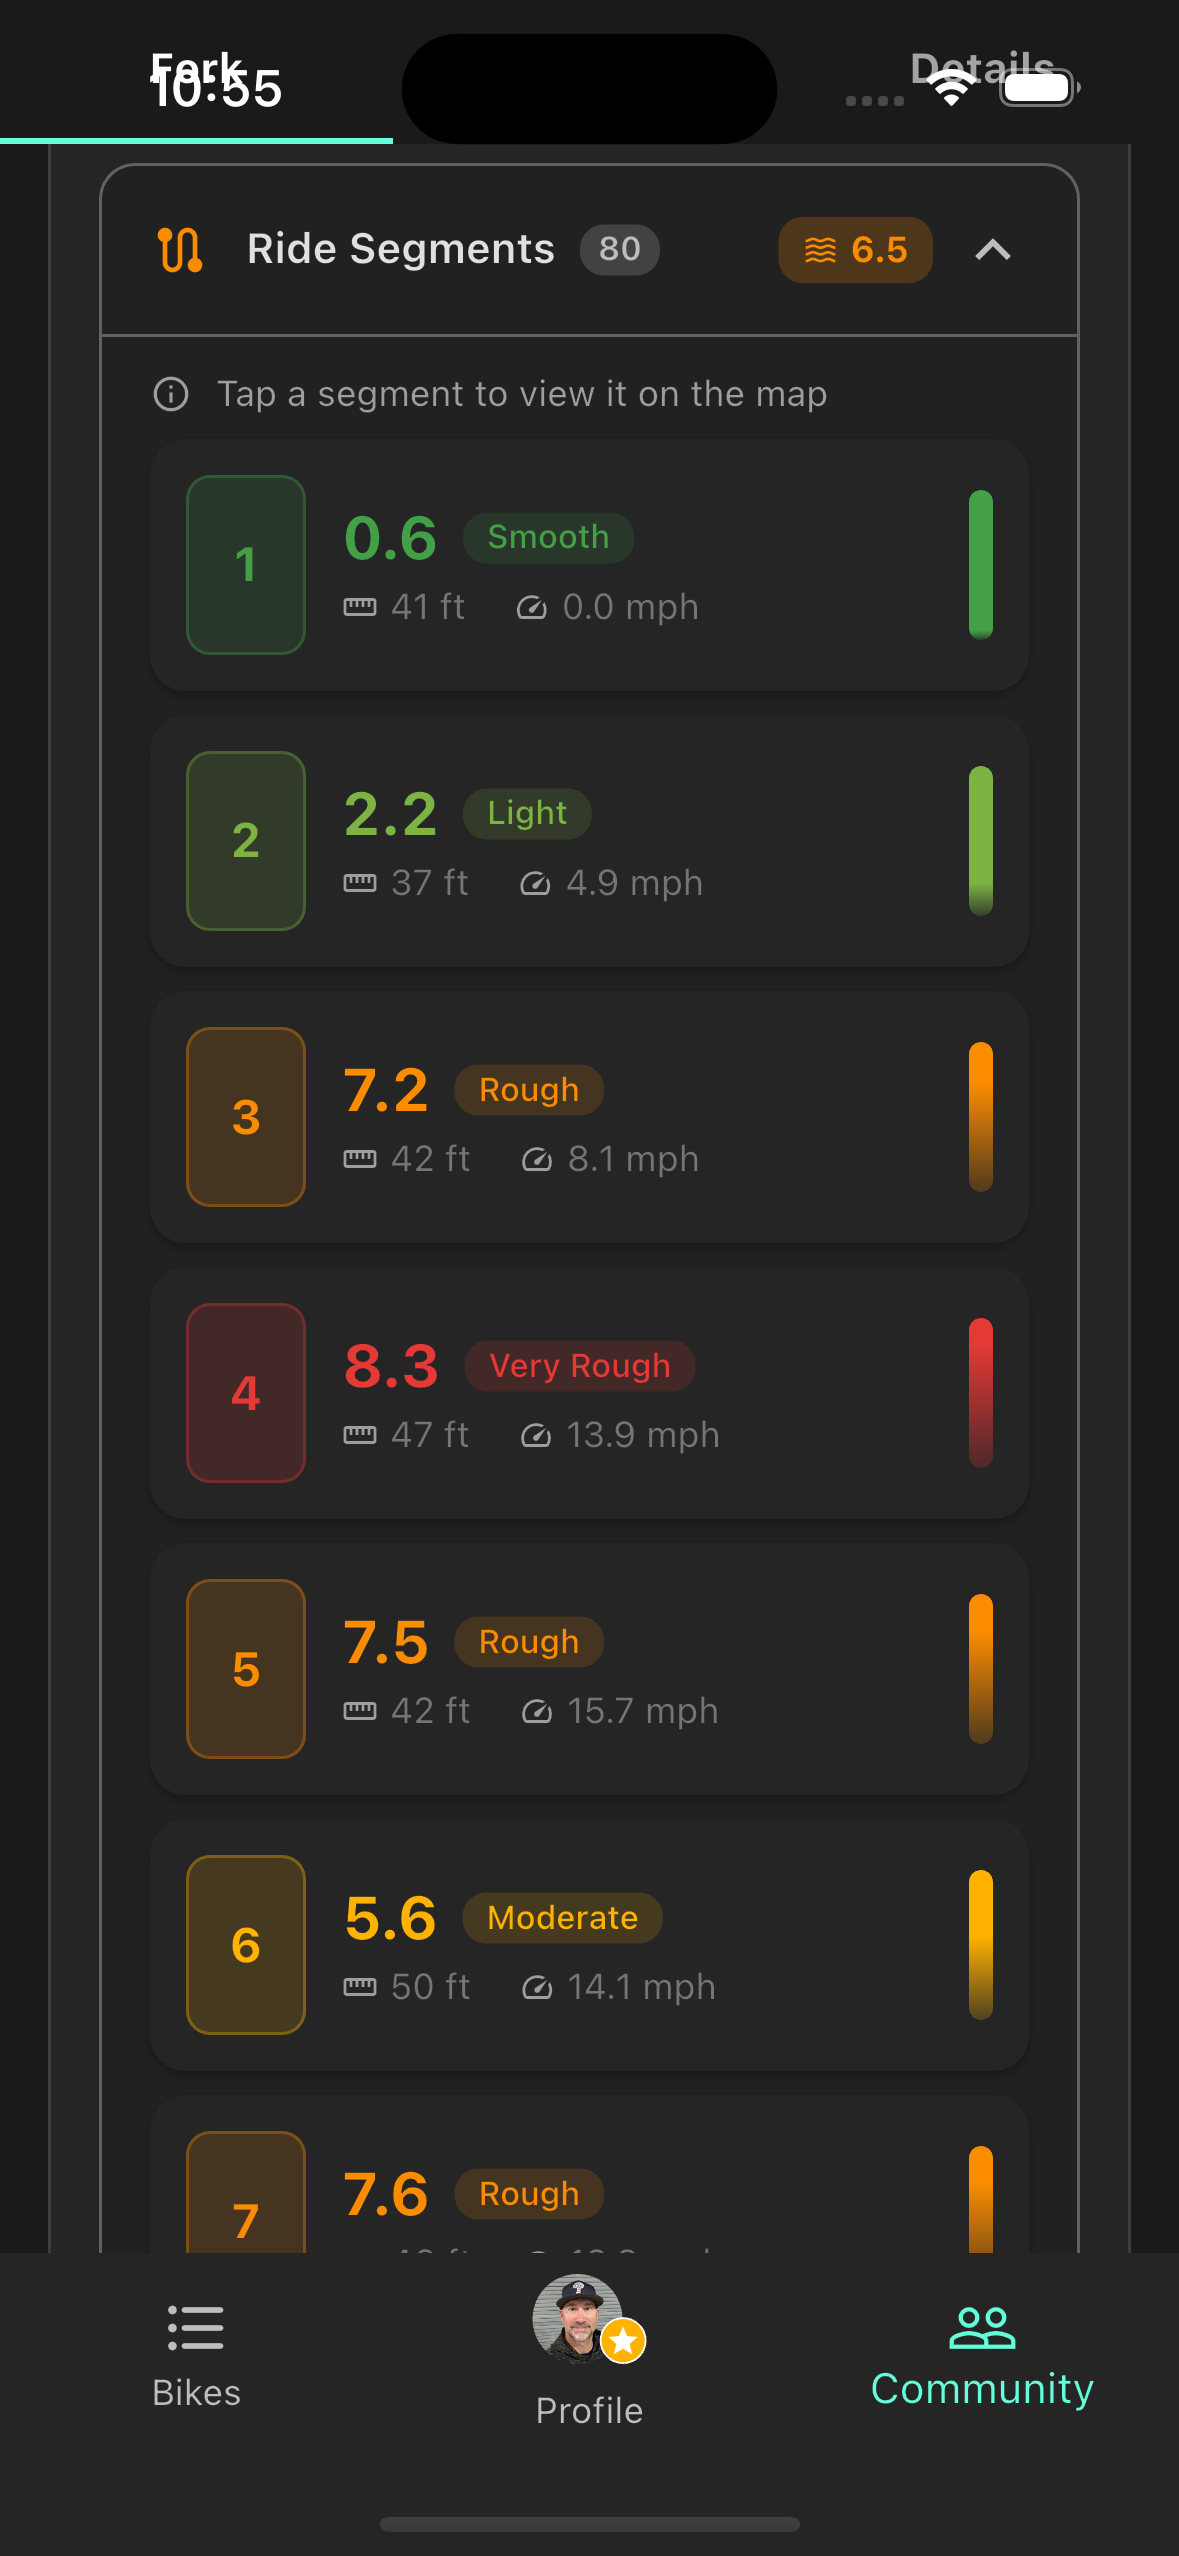
- Roughness Score (0–10) — Overall vibration energy for the run. Lower is smoother. Scores are comparable across runs on the same trail.
- Trail heatmap — Color-coded segments from green (smooth) to red (rough). Tap any segment for speed and roughness detail.
- GPS summary — Total distance, average speed, and a diagnostics view showing GPS signal quality throughout the ride.
Before you ride
- Start with at least 20% battery — recording at 50Hz plus GPS uses roughly 15% per hour.
- Keep the app in the foreground. If the OS pushes it to the background, recording stops.
- Grant Location and Motion & Fitness permissions when prompted — both are required.
Pre-ride calibration
Roughness score summary

Trail heatmap
Segment breakdown
GPS diagnostics

Segments map
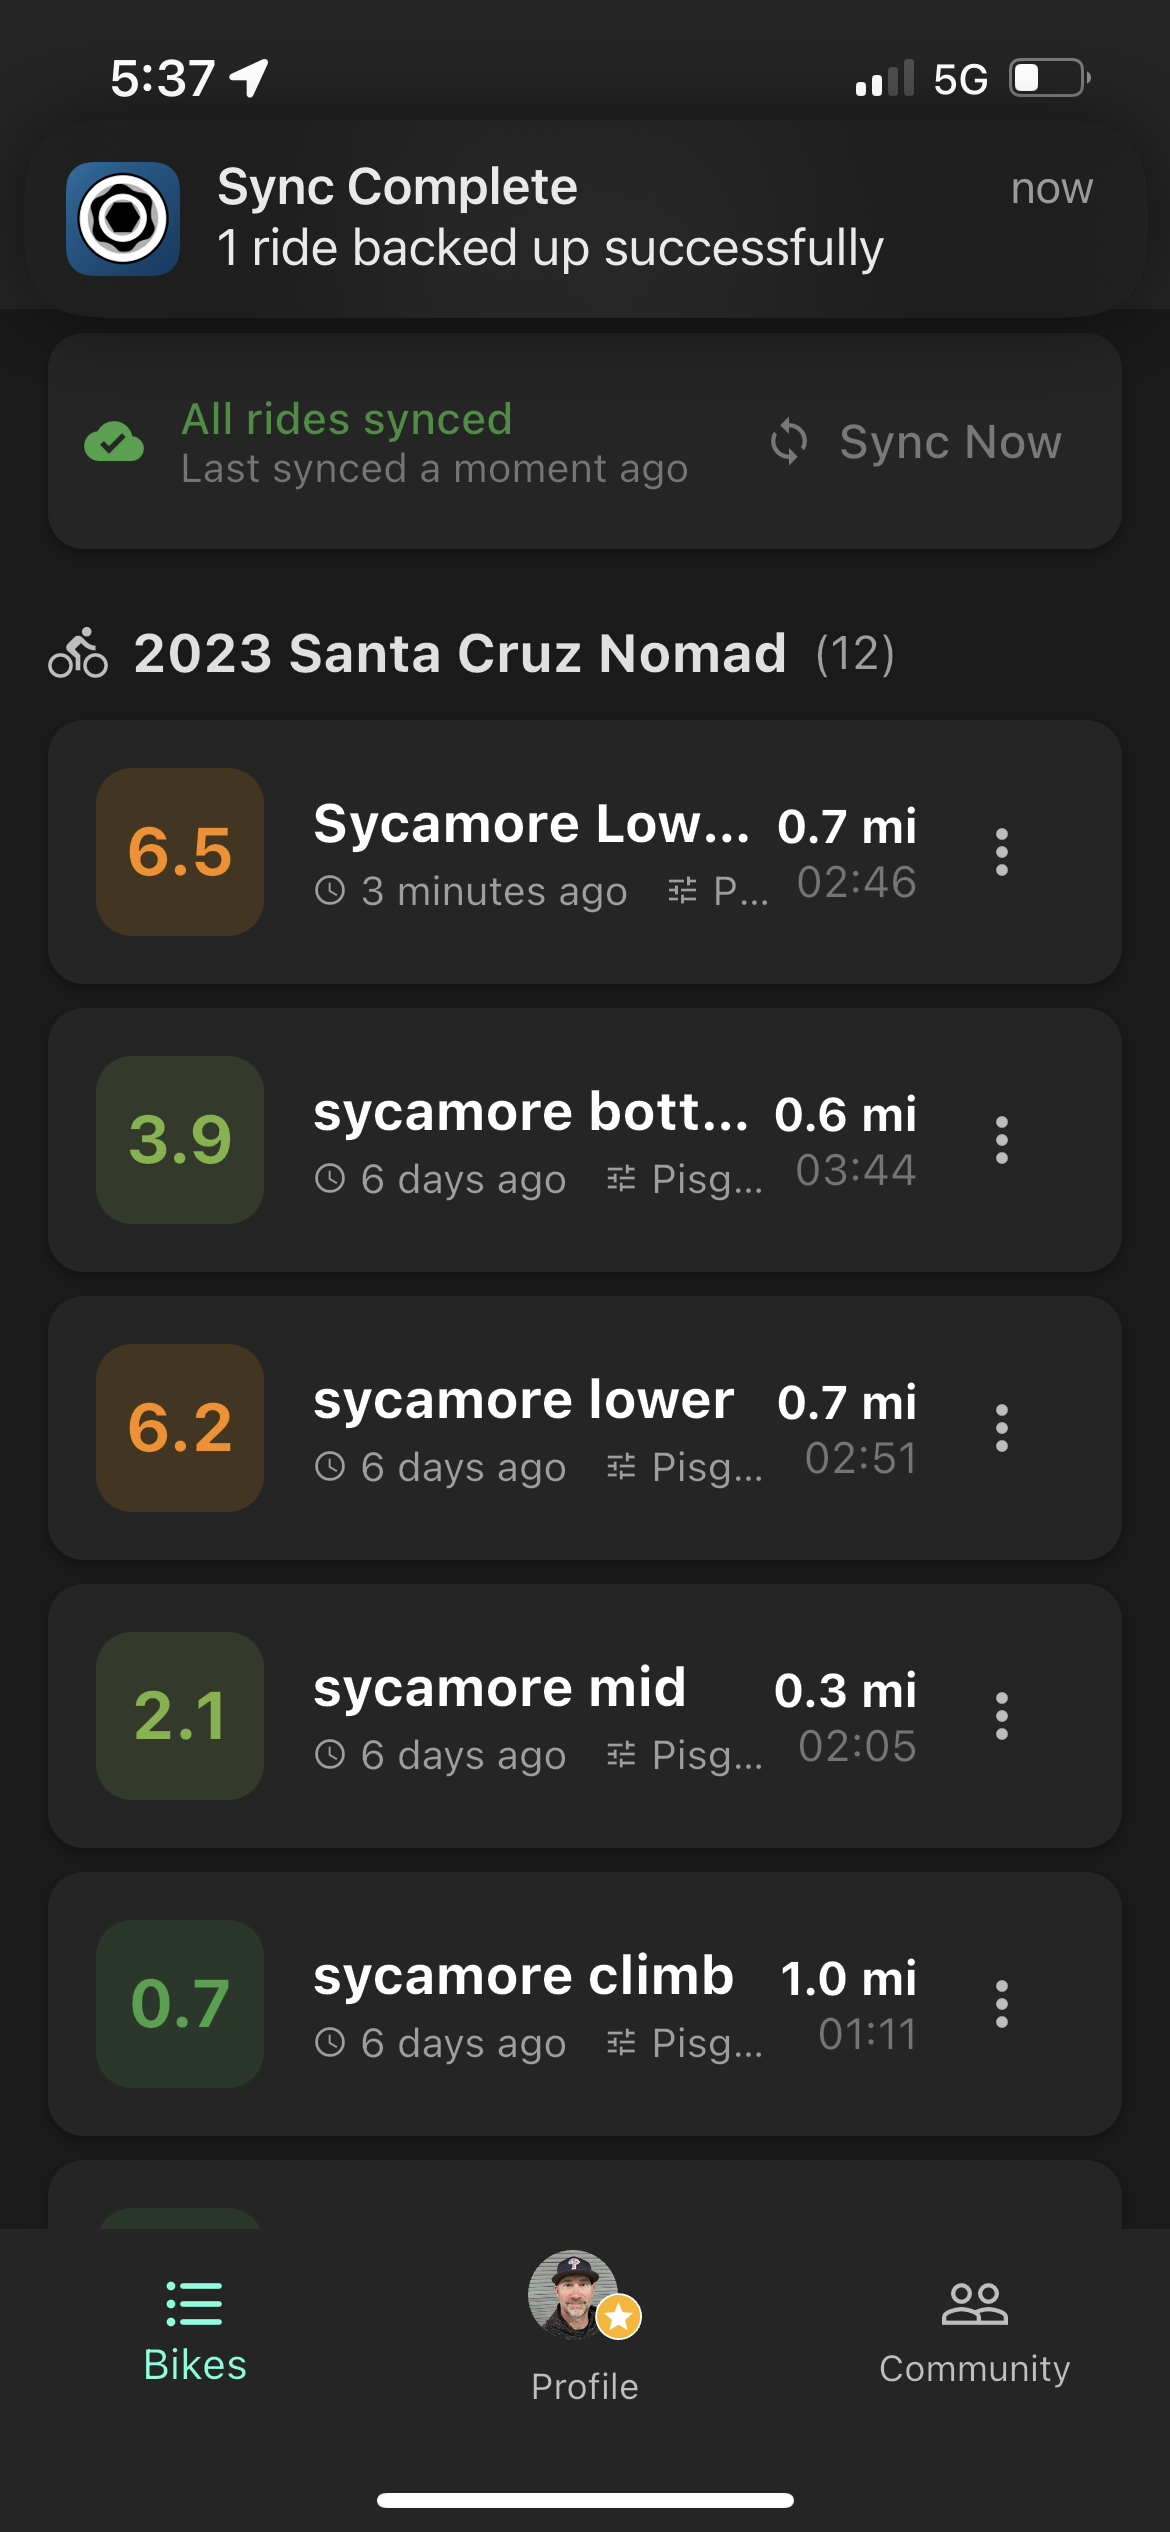
Metrx history
Metrx Calibration Pro
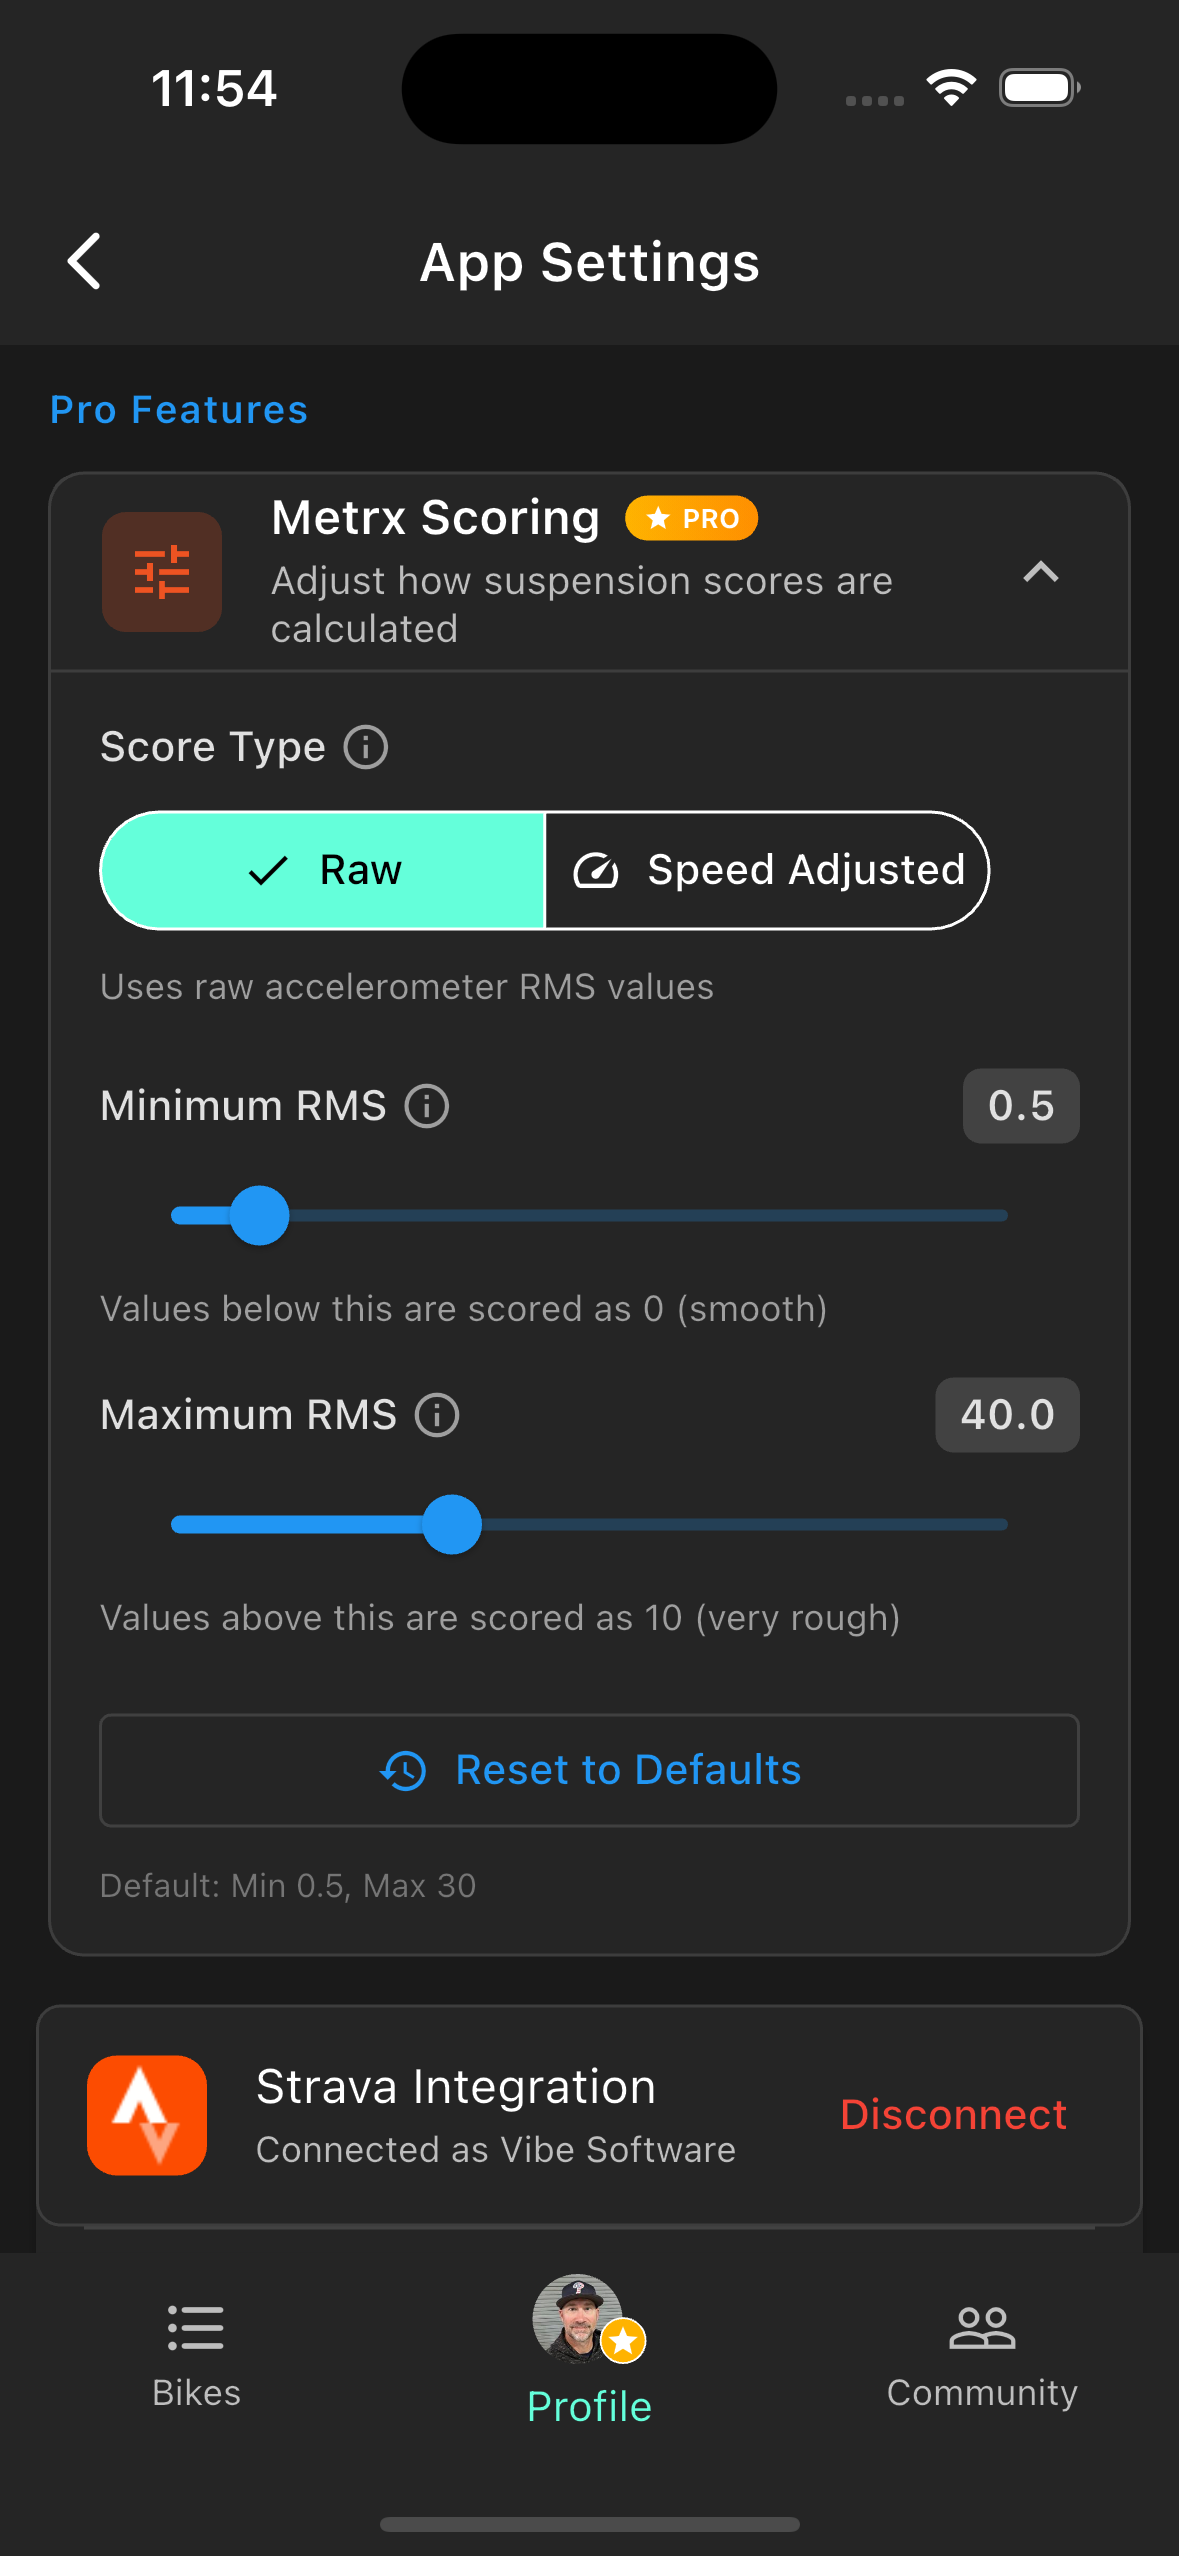
Metrx Calibration controls how raw accelerometer data is converted into the 0–10 roughness score. Found in Profile → App Settings → Pro Features → Metrx Scoring.
Score Type
A toggle at the top of the Metrx Scoring panel lets you choose how scores are calculated:
- Raw — Scores are based purely on accelerometer vibration. Faster riders will generally see higher scores on the same trail regardless of suspension performance.
- Speed Adjusted — Scores are normalized against your speed, so a rougher-feeling section at low speed and a smoother-feeling section at high speed can score more comparably. Useful for A/B testing where your two runs were at different paces.
Minimum RMS
Any accelerometer reading below this value scores as 0 (smooth). The slider range is 0.0–5.0, with a default of 0.5.
- Raise it if your mount or phone has inherent vibration at rest — for example, if smooth pavement consistently scores above 0, increasing the minimum filters out that baseline noise.
- Lower it if you want scores to reflect even very minor surface texture.
Maximum RMS
Any accelerometer reading above this value scores as 10 (very rough). The slider range is 10–100, with a default of 30.
- Lower it if your scores are consistently bunched near zero even on rough trails — a lower maximum makes the scale more sensitive across typical riding conditions.
- Raise it if scores are always pinned at 10 — a higher maximum gives the scale more room to spread across rough terrain.
All values between the minimum and maximum map linearly to 0–10, so narrowing the range increases sensitivity and widening it compresses scores toward the middle.
Things to keep in mind
- Changes apply to future rides only — past recordings are not recalculated.
- After adjusting, do a test run on a familiar trail before drawing conclusions from new scores.
- Scores recorded with different calibration settings are not directly comparable to each other.
- Tap Reset to Defaults to return to Min 0.5 / Max 30 at any time.
Roughness sensitivity range
A/B Testing Pro
A/B testing compares two recorded runs — each with different suspension settings — on the same trail. The app matches overlapping trail segments between both rides and calculates the roughness delta per segment.
Running a comparison
- 1.Record a baseline run with your current settings (e.g., "LSC stock").
- 2.Adjust your suspension, then record a second run on the same trail section.
- 3.Open either ride's results and tap Compare.
- 4.Select the other ride from your history.
- 5.The app aligns segments between the two runs and shows a verdict: Better, Worse, or Similar.
What the comparison shows
- Overall verdict — A clear Better / Worse / Similar banner based on total roughness change.
- Segment-by-segment delta — See which specific sections of trail responded to your changes and which didn't.
- Speed-adjusted results — If you ran one pass noticeably faster, the app accounts for it. More speed at the same roughness is a win.
- Swap button — Flip baseline and comparison to view the result from the opposite direction.
For best results
Run both passes at similar speeds and in similar trail conditions. Rain, heat, and tire pressure all affect roughness independently of your suspension — comparing a dry run to a wet run will show differences that have nothing to do with your settings.
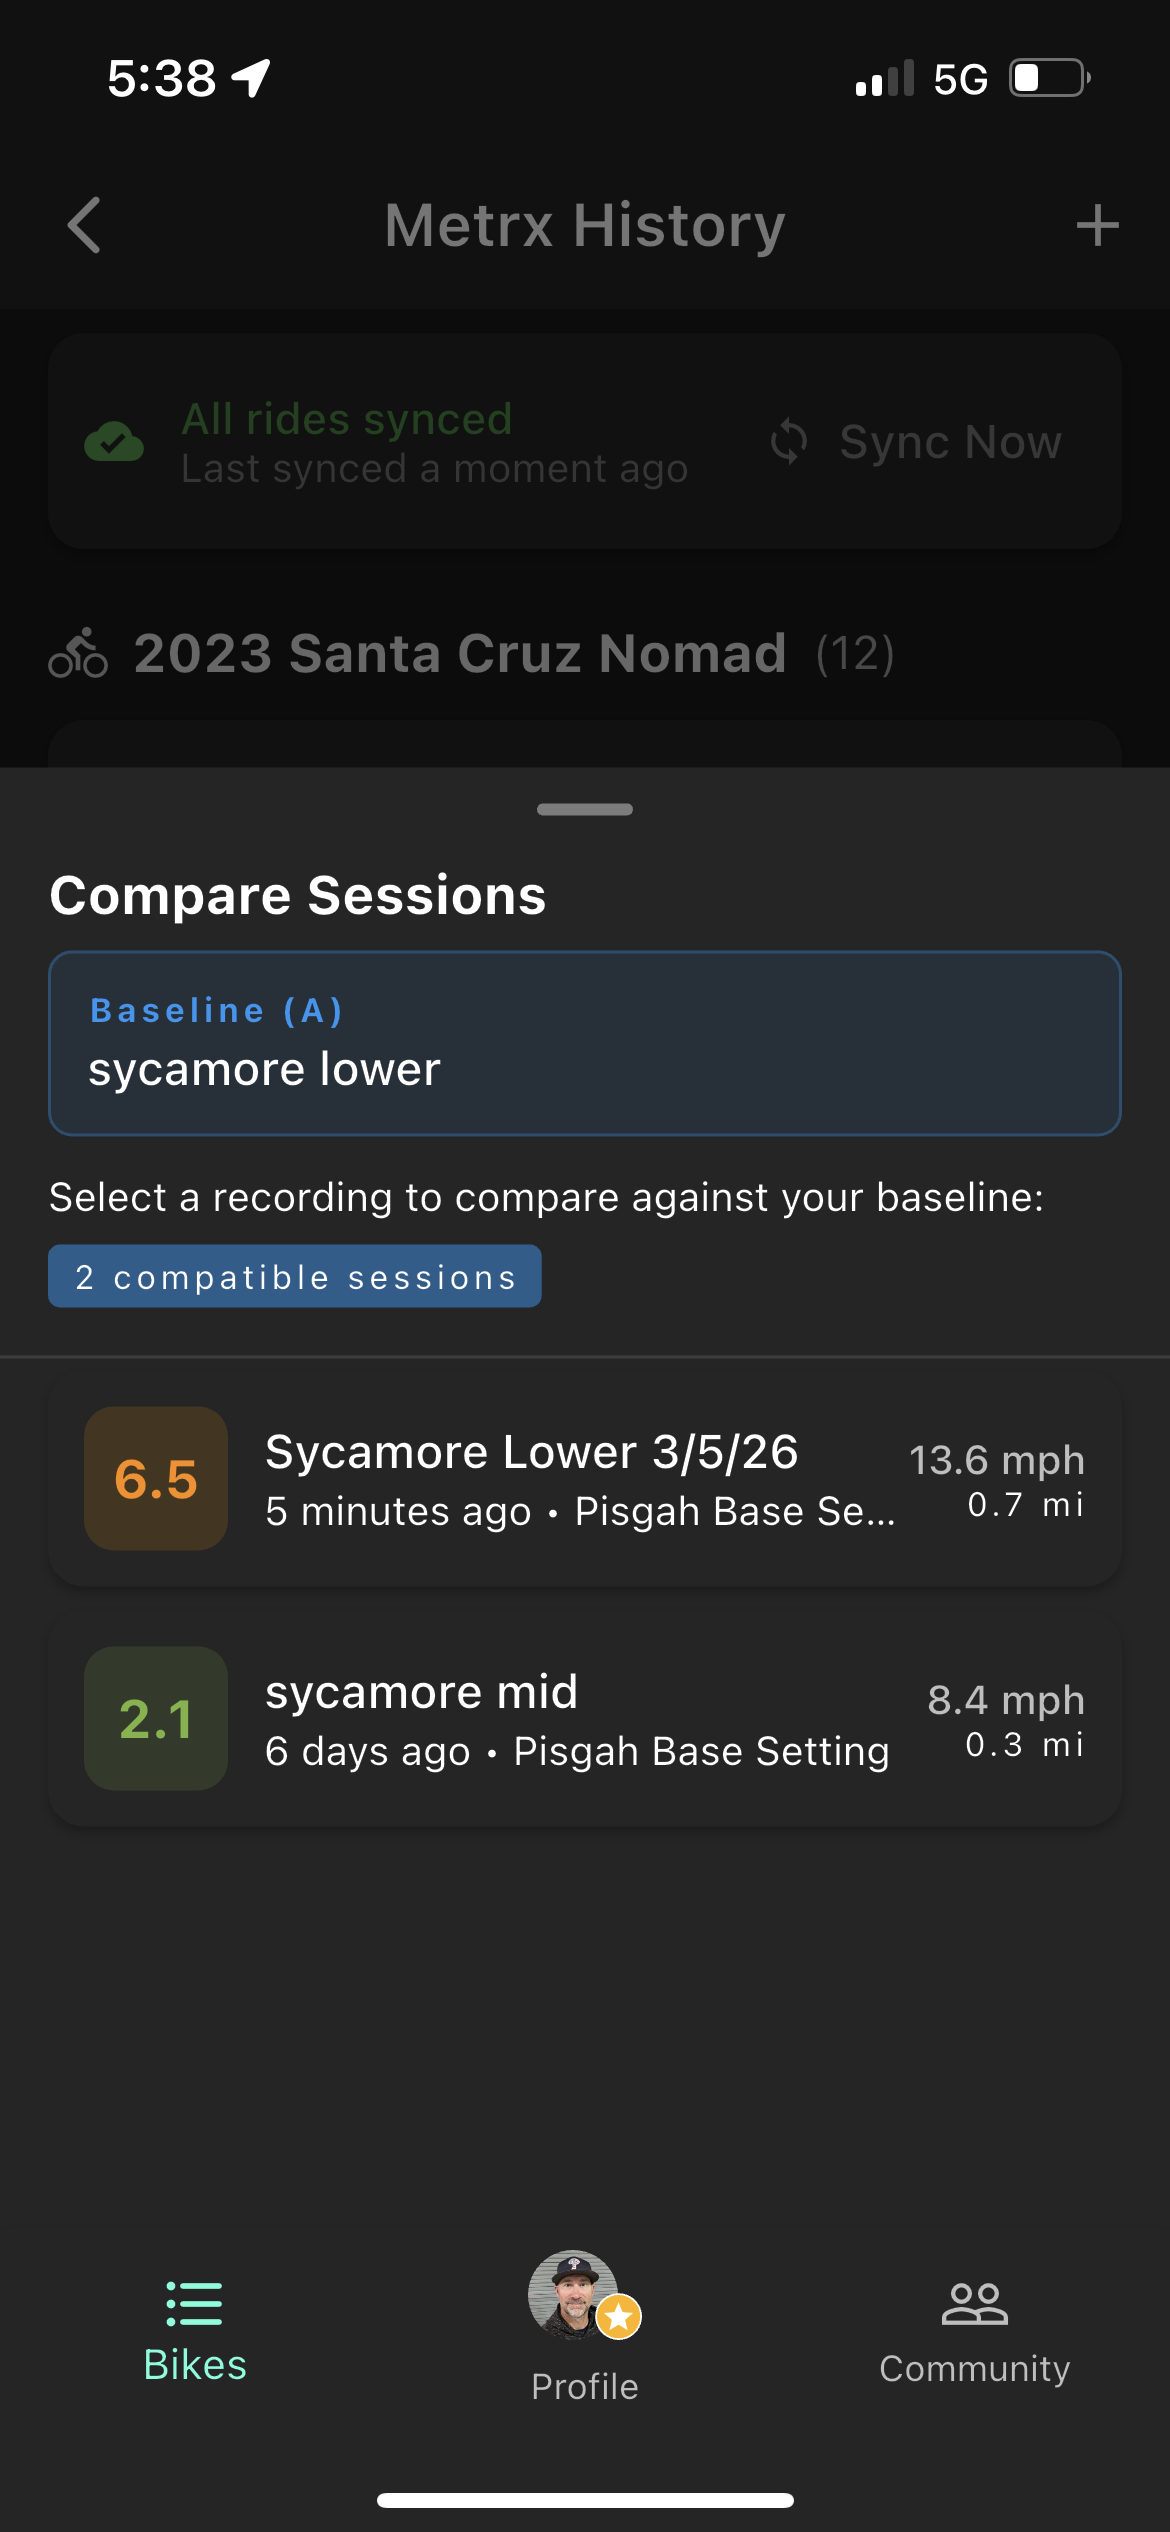
Select sessions to compare
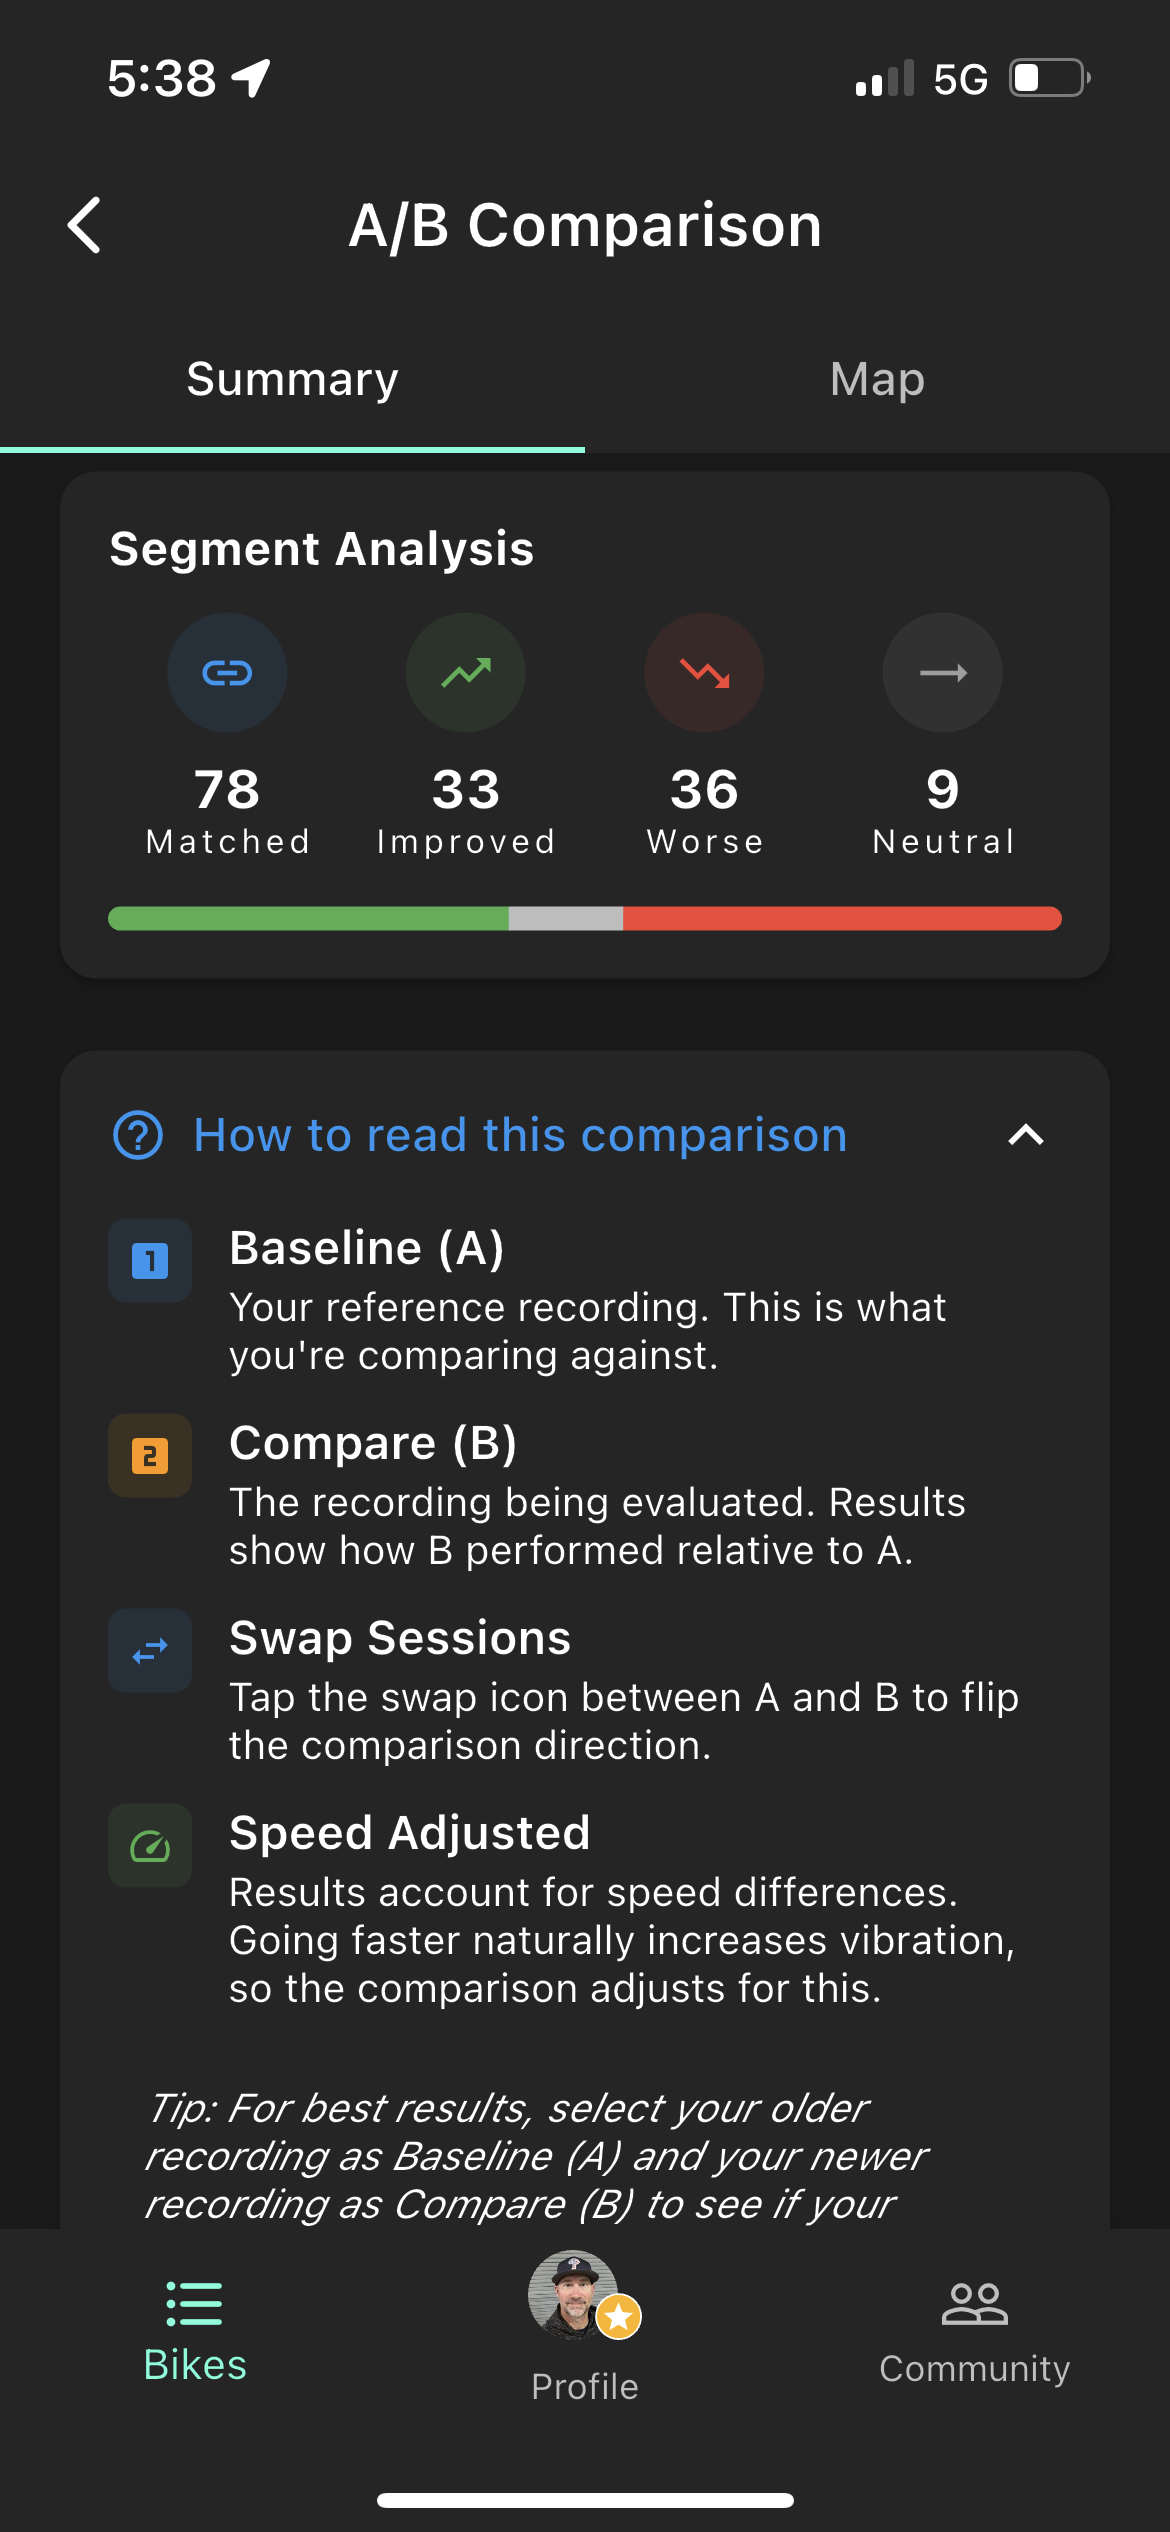
Segment analysis
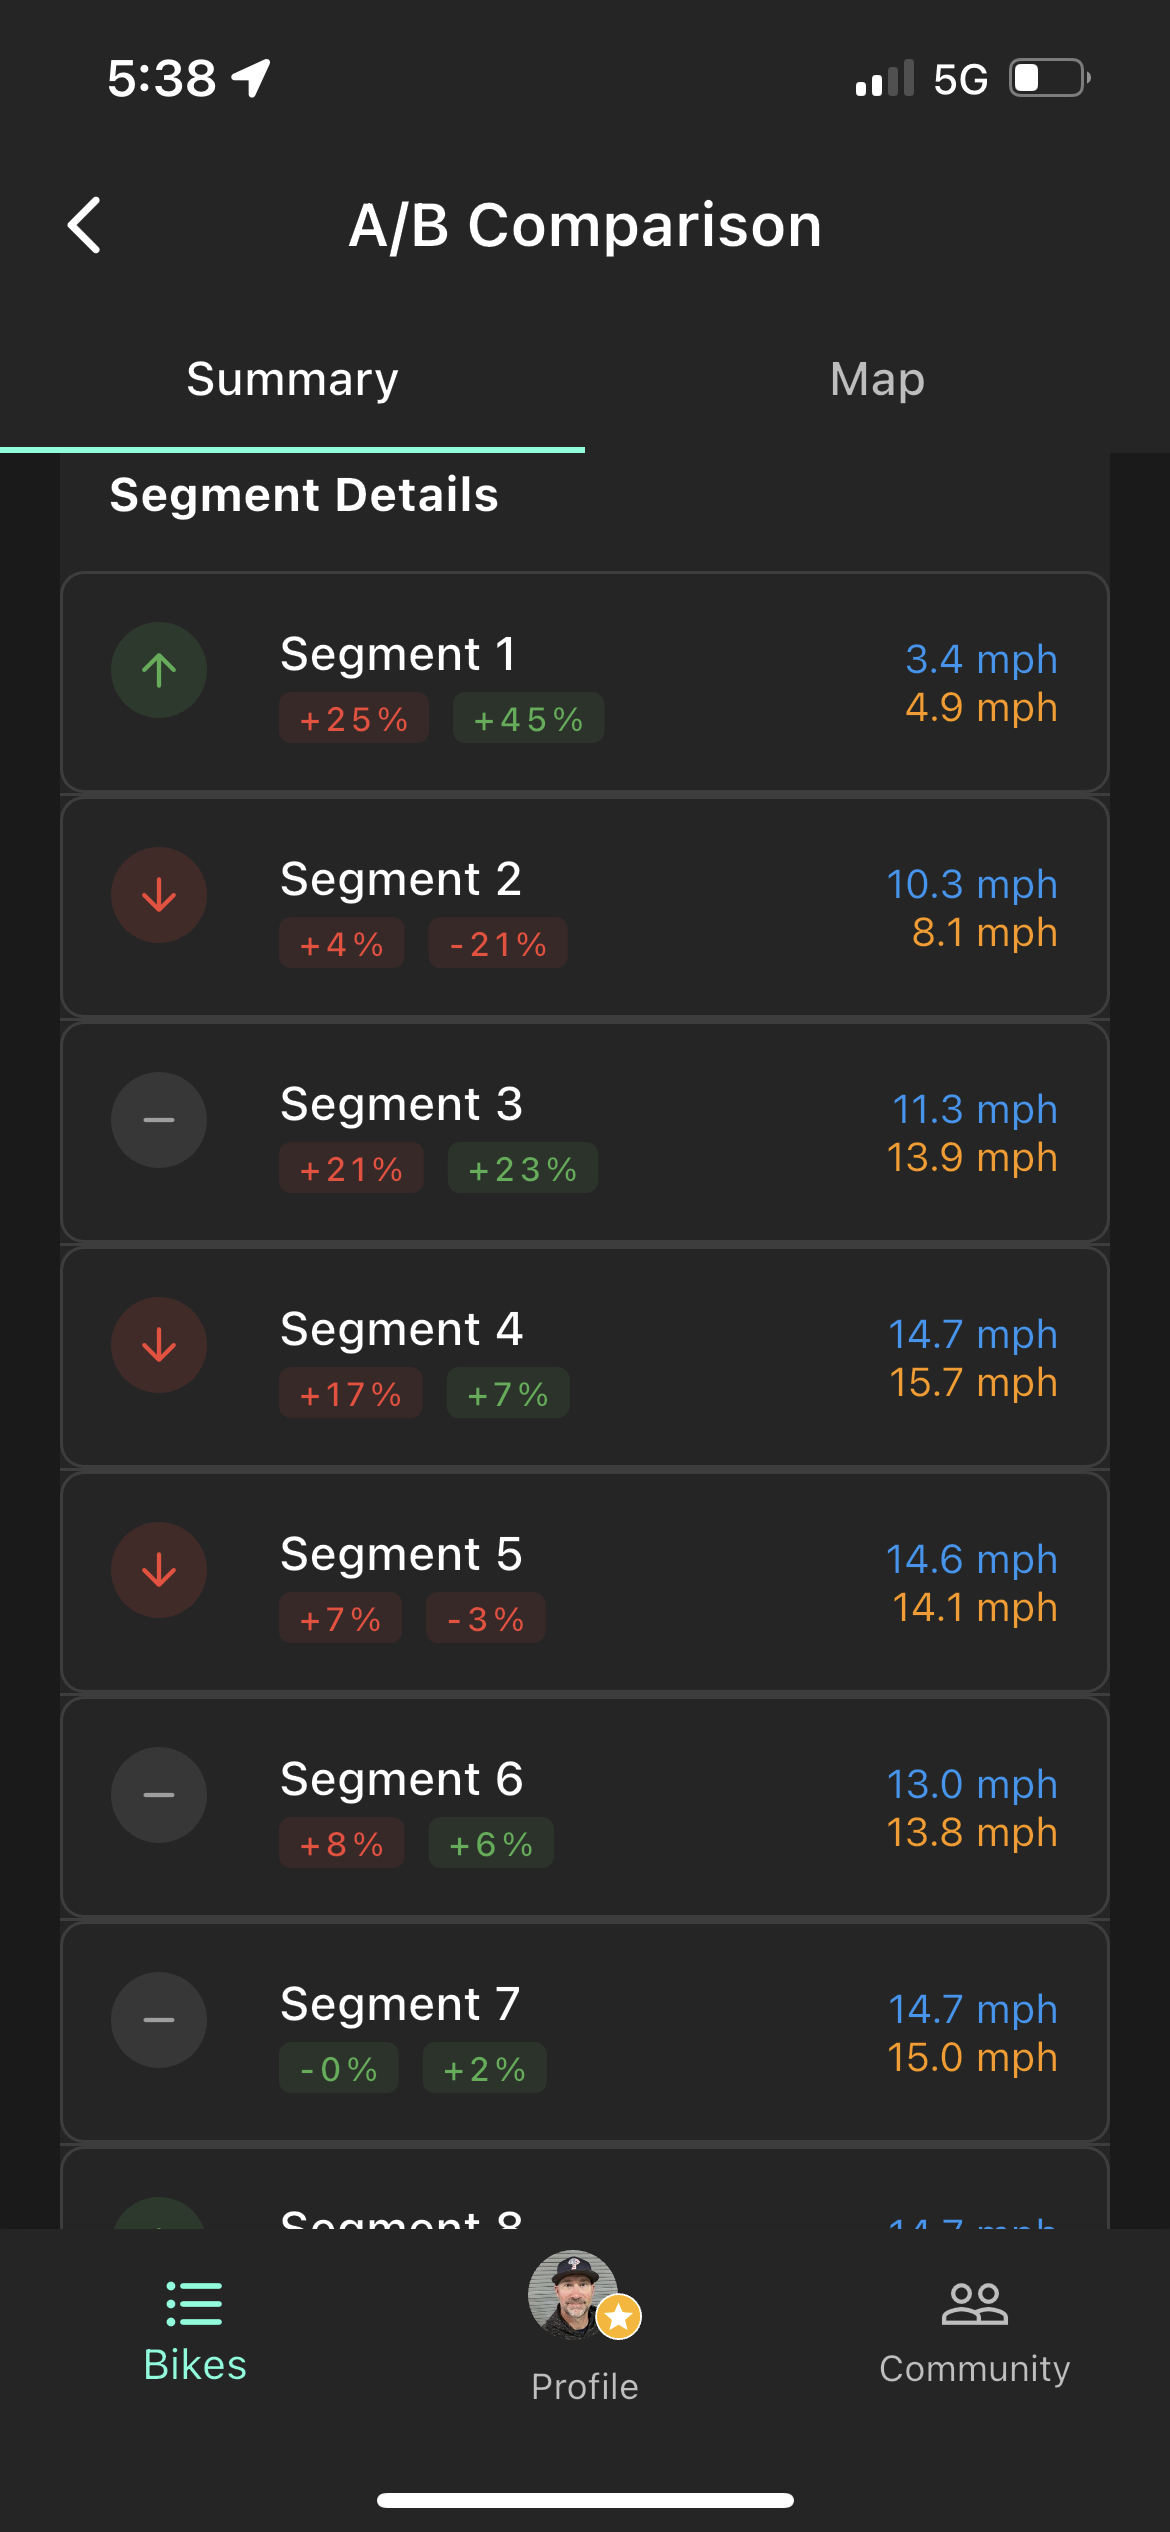
Per-segment delta

Comparison summary
Strava Integration Pro
Connect Strava to automatically pull your riding hours into RideMetrx. Once set up, your service reminders update based on actual Strava activity data — no manual hour logging required.
Setup
- 1.Go to Profile → App Settings → Strava Integration.
- 2.Tap Connect to Strava and authorize read-only access in the browser prompt.
- 3.Map each RideMetrx bike to the corresponding Strava gear (the bike you log your rides on in Strava).
- 4.Tap Sync. The app fetches all MTB activities since your last service date and updates your hour totals.
How hours are counted
The app reads moving time from your Strava activities and adds it to any manual baseline hours you've entered. Manual hours are never overwritten — Strava hours stack on top. Only activities tagged with the mapped gear are counted.
Common gotchas
- Activities must be tagged with gear in Strava — if a ride isn't assigned to a bike, it won't count.
- Strava doesn't count stopped time. A 3-hour ride with 30 minutes of stops counts as 2.5 hours.
- RideMetrx only requests read access — it never writes to or modifies your Strava account.
- If you see "Not Connected," your auth token may have expired. Tap Connect again to re-authenticate.
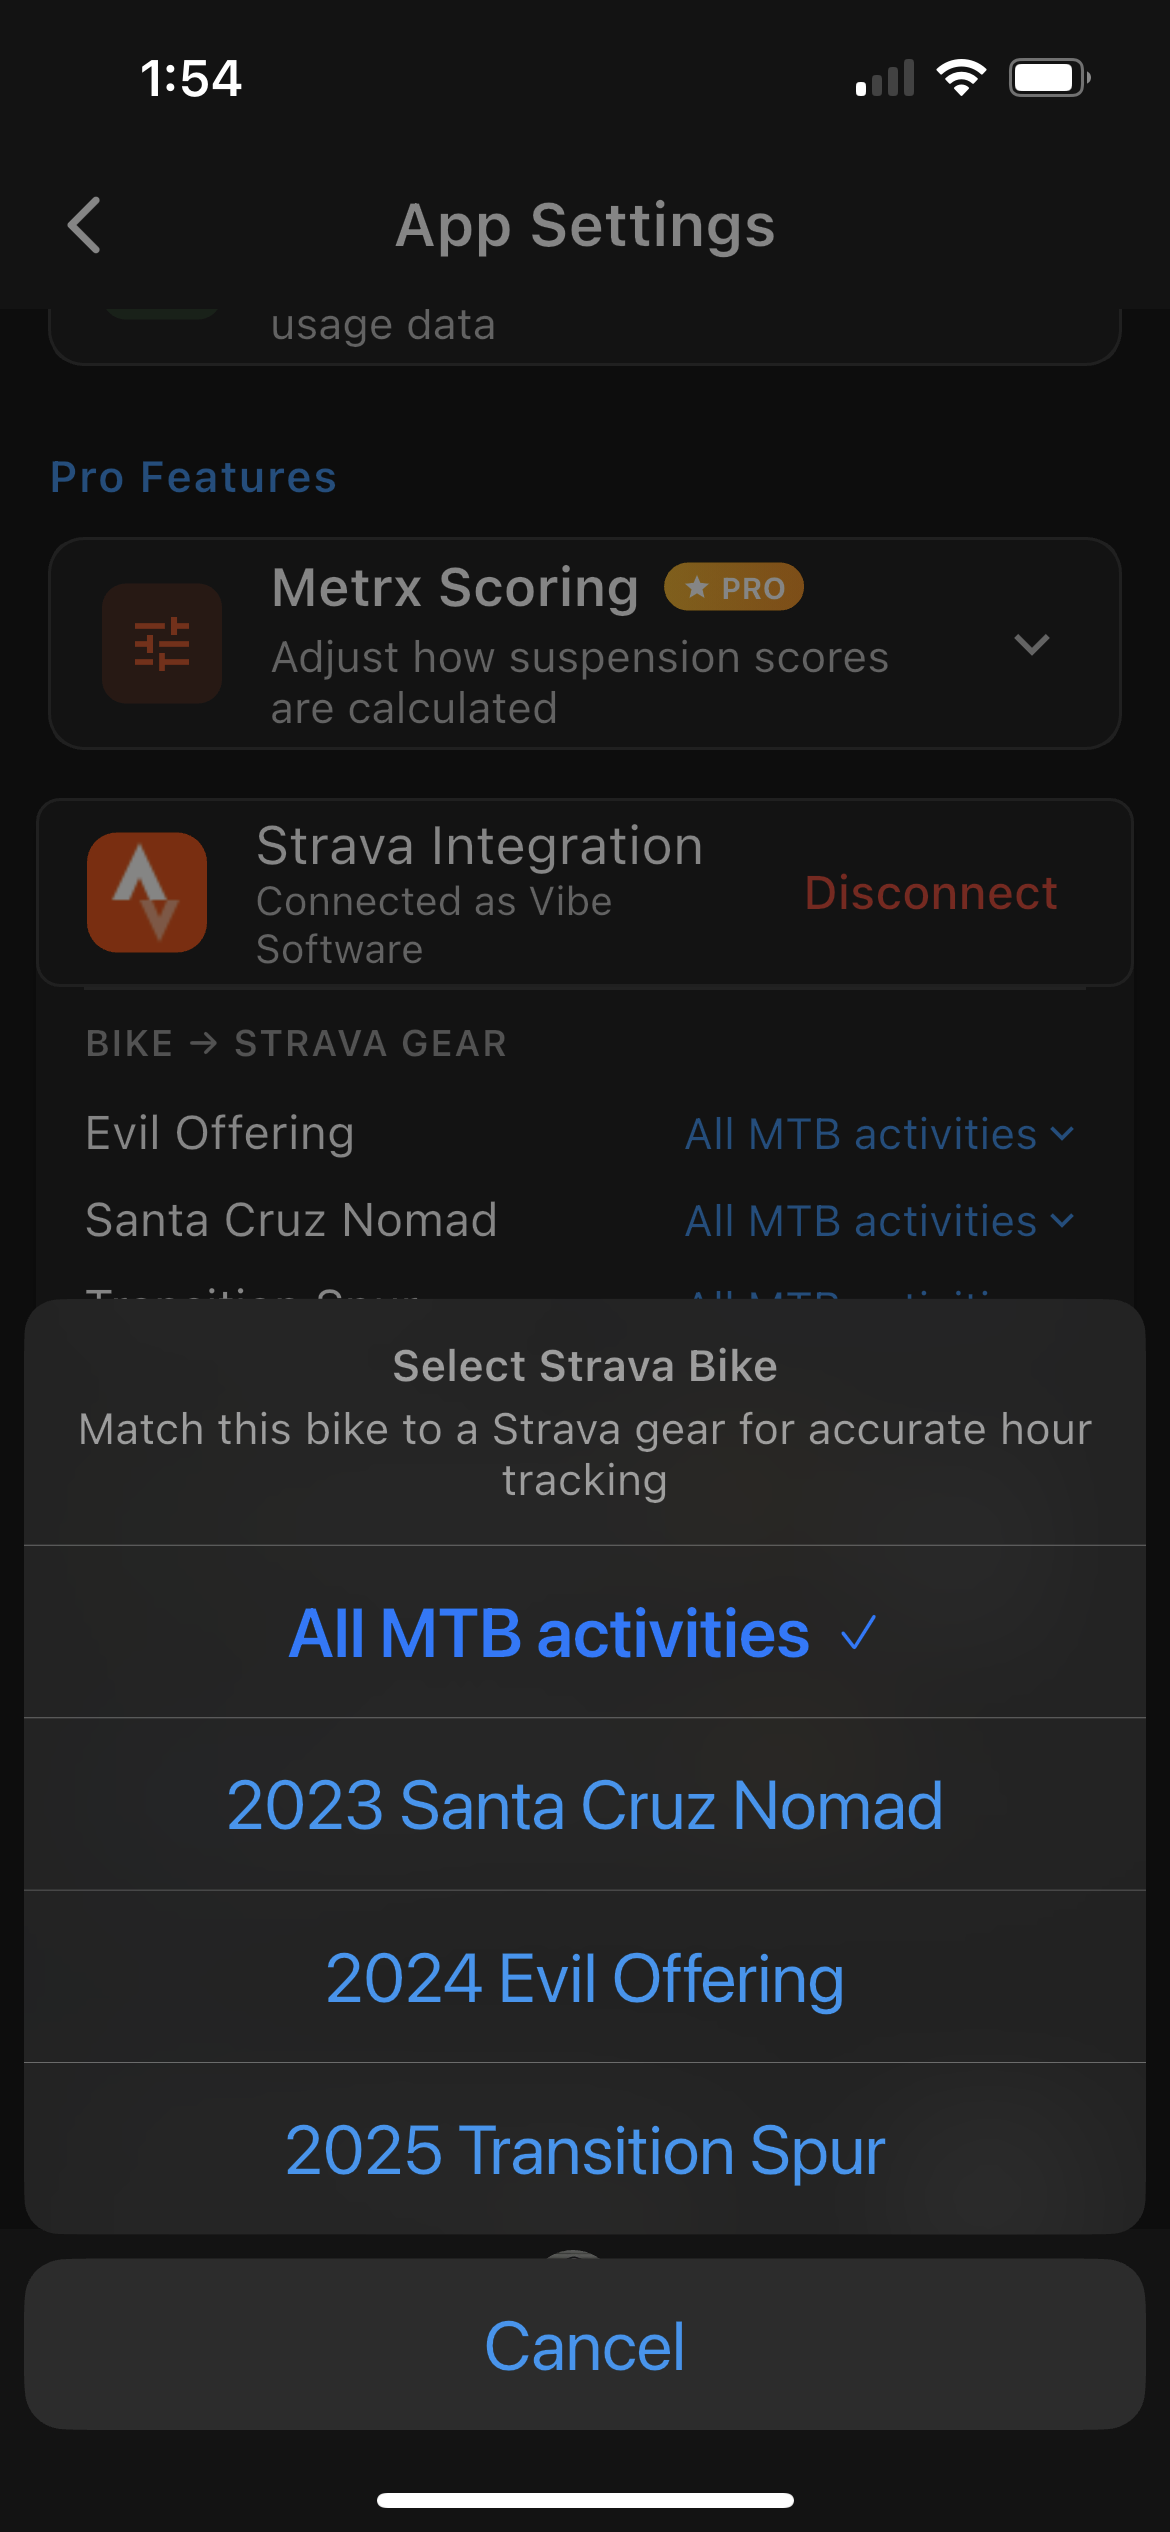
Strava sync in settings
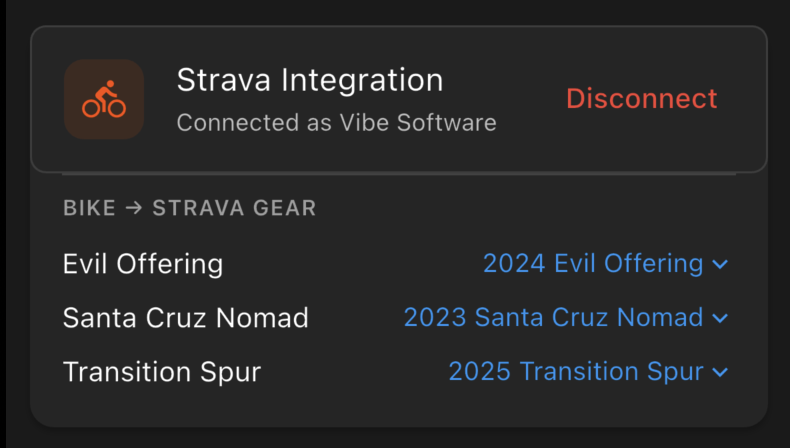
Gear mapping
Service Reminders Pro
Set hour- or month-based maintenance reminders for any component — fork lowers, full rebuilds, drivetrain, brakes, etc. The app tracks progress automatically and sends a notification when service is due.
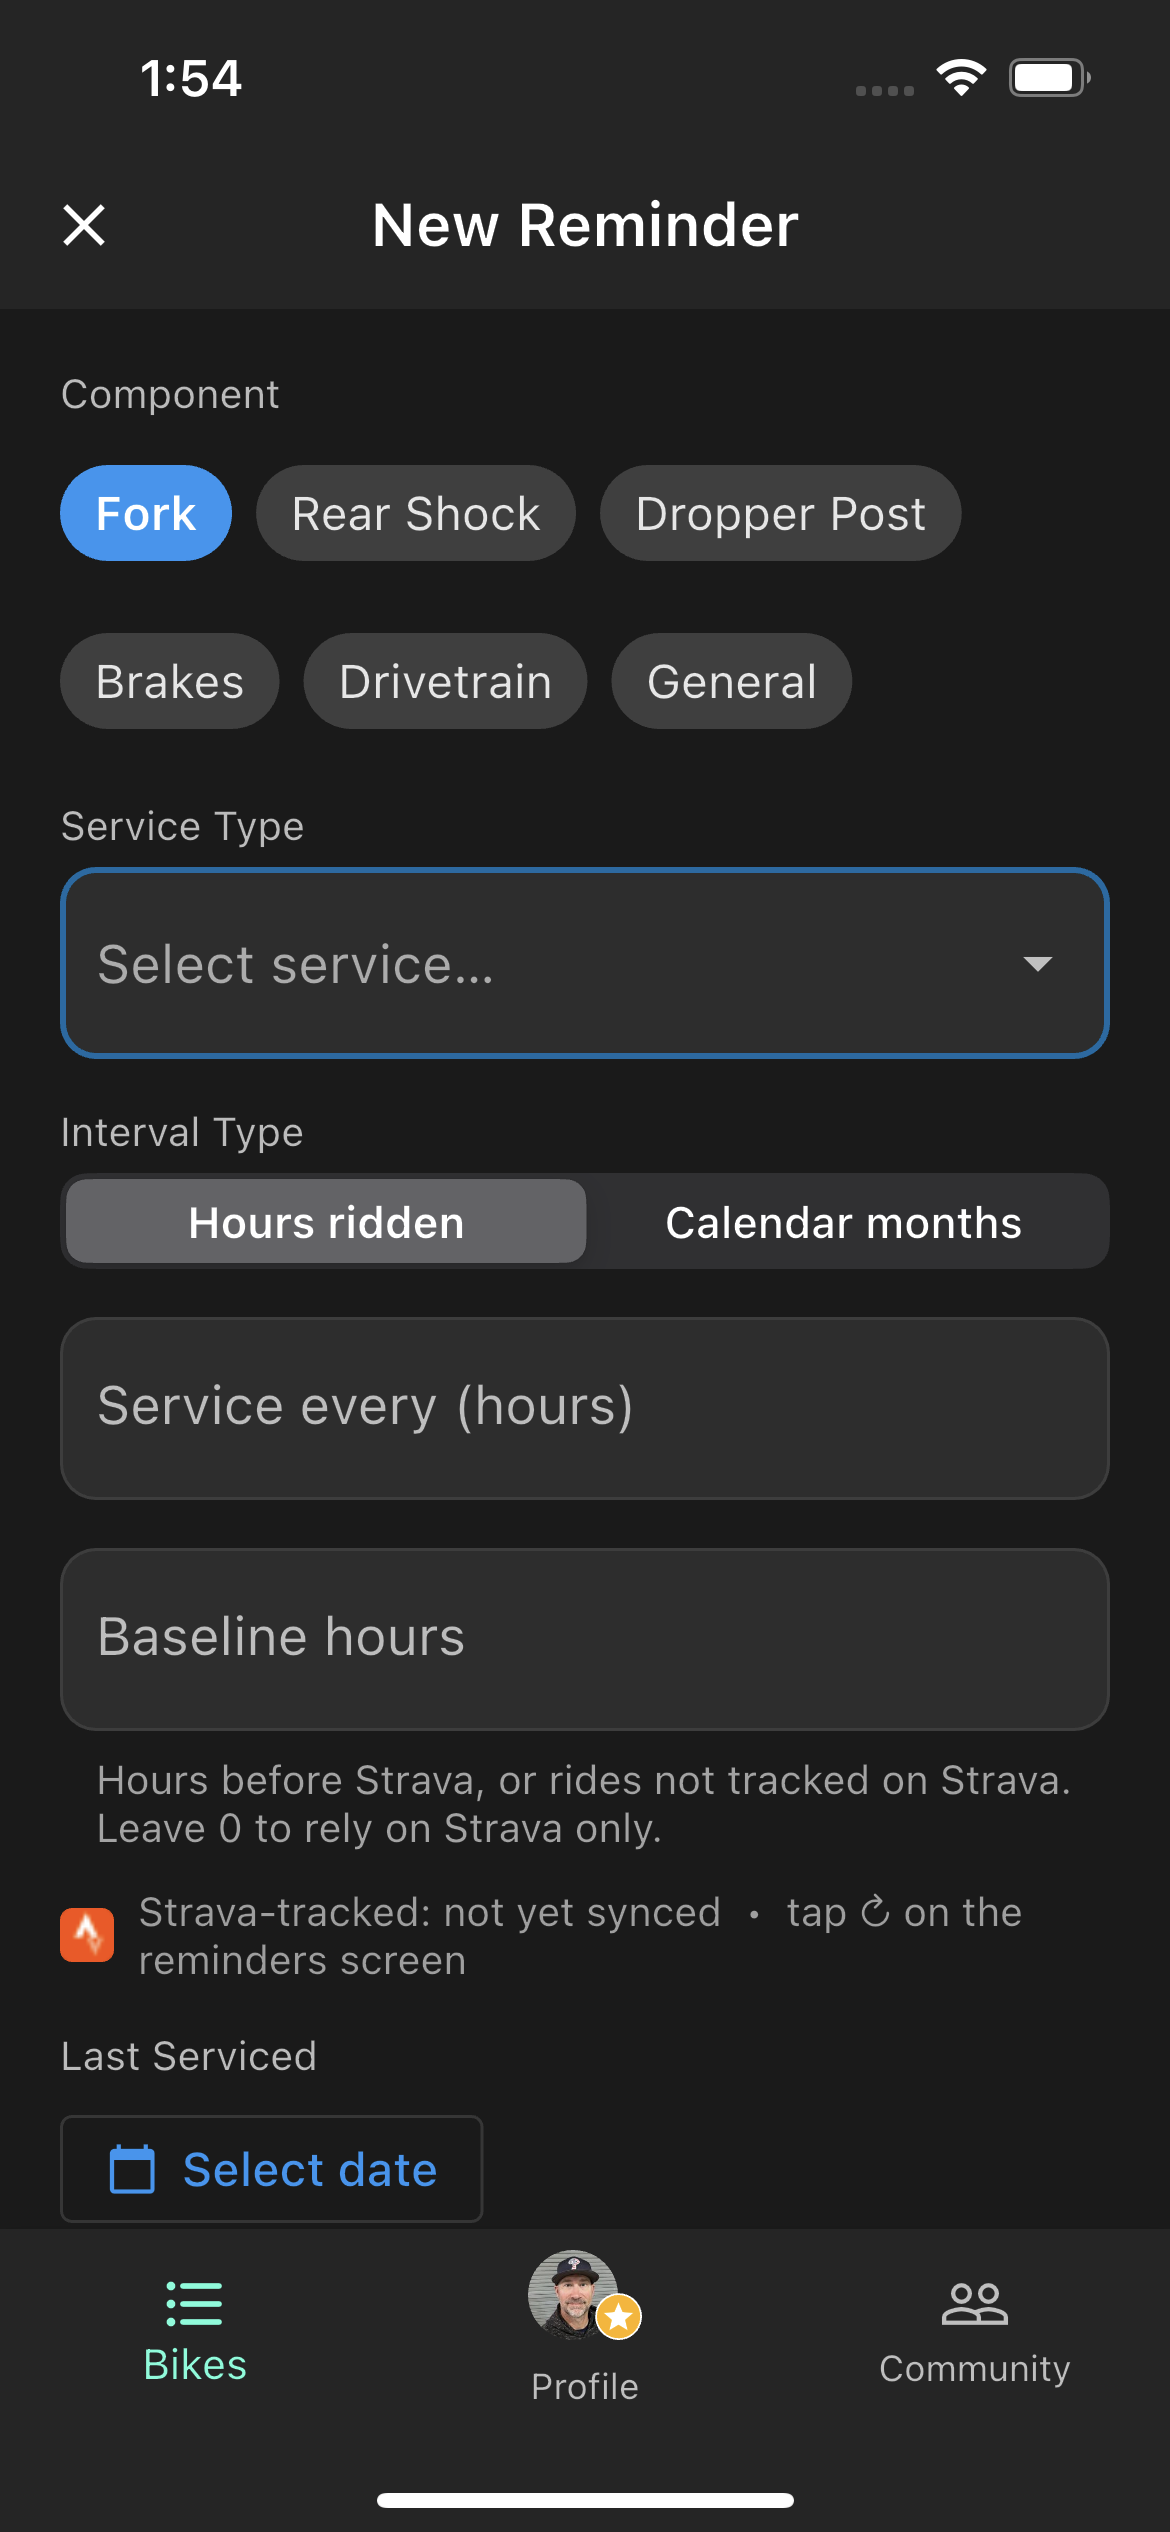
Creating a reminder
- 1.Go to your bike and tap the Service card, or open the Service tab directly.
- 2.Tap Add Reminder and select a component (Fork, Rear Shock, Drivetrain, etc.).
- 3.Choose an interval type: Hours or Months, then enter the interval value (e.g., 50 hours).
- 4.Optionally enter current elapsed hours and a last service date for accurate tracking from day one.
- 5.Add any notes (oil weight, part numbers, service provider) and save.
Tracking progress
Each reminder shows a progress bar, a status label ("15h remaining" / "Due now"), and a color indicator — green while healthy, yellow as you approach the interval, red when due. When a reminder hits its limit, you'll receive a push notification.
After servicing a component, edit the reminder and update the Last Service Date to reset the interval. Hours don't automatically decrement — this step is required.
Free vs. Pro
Free accounts support up to 2 service reminders total and only hour-based intervals. Pro unlocks unlimited reminders per bike, month-based intervals, and automatic hour syncing from Strava.
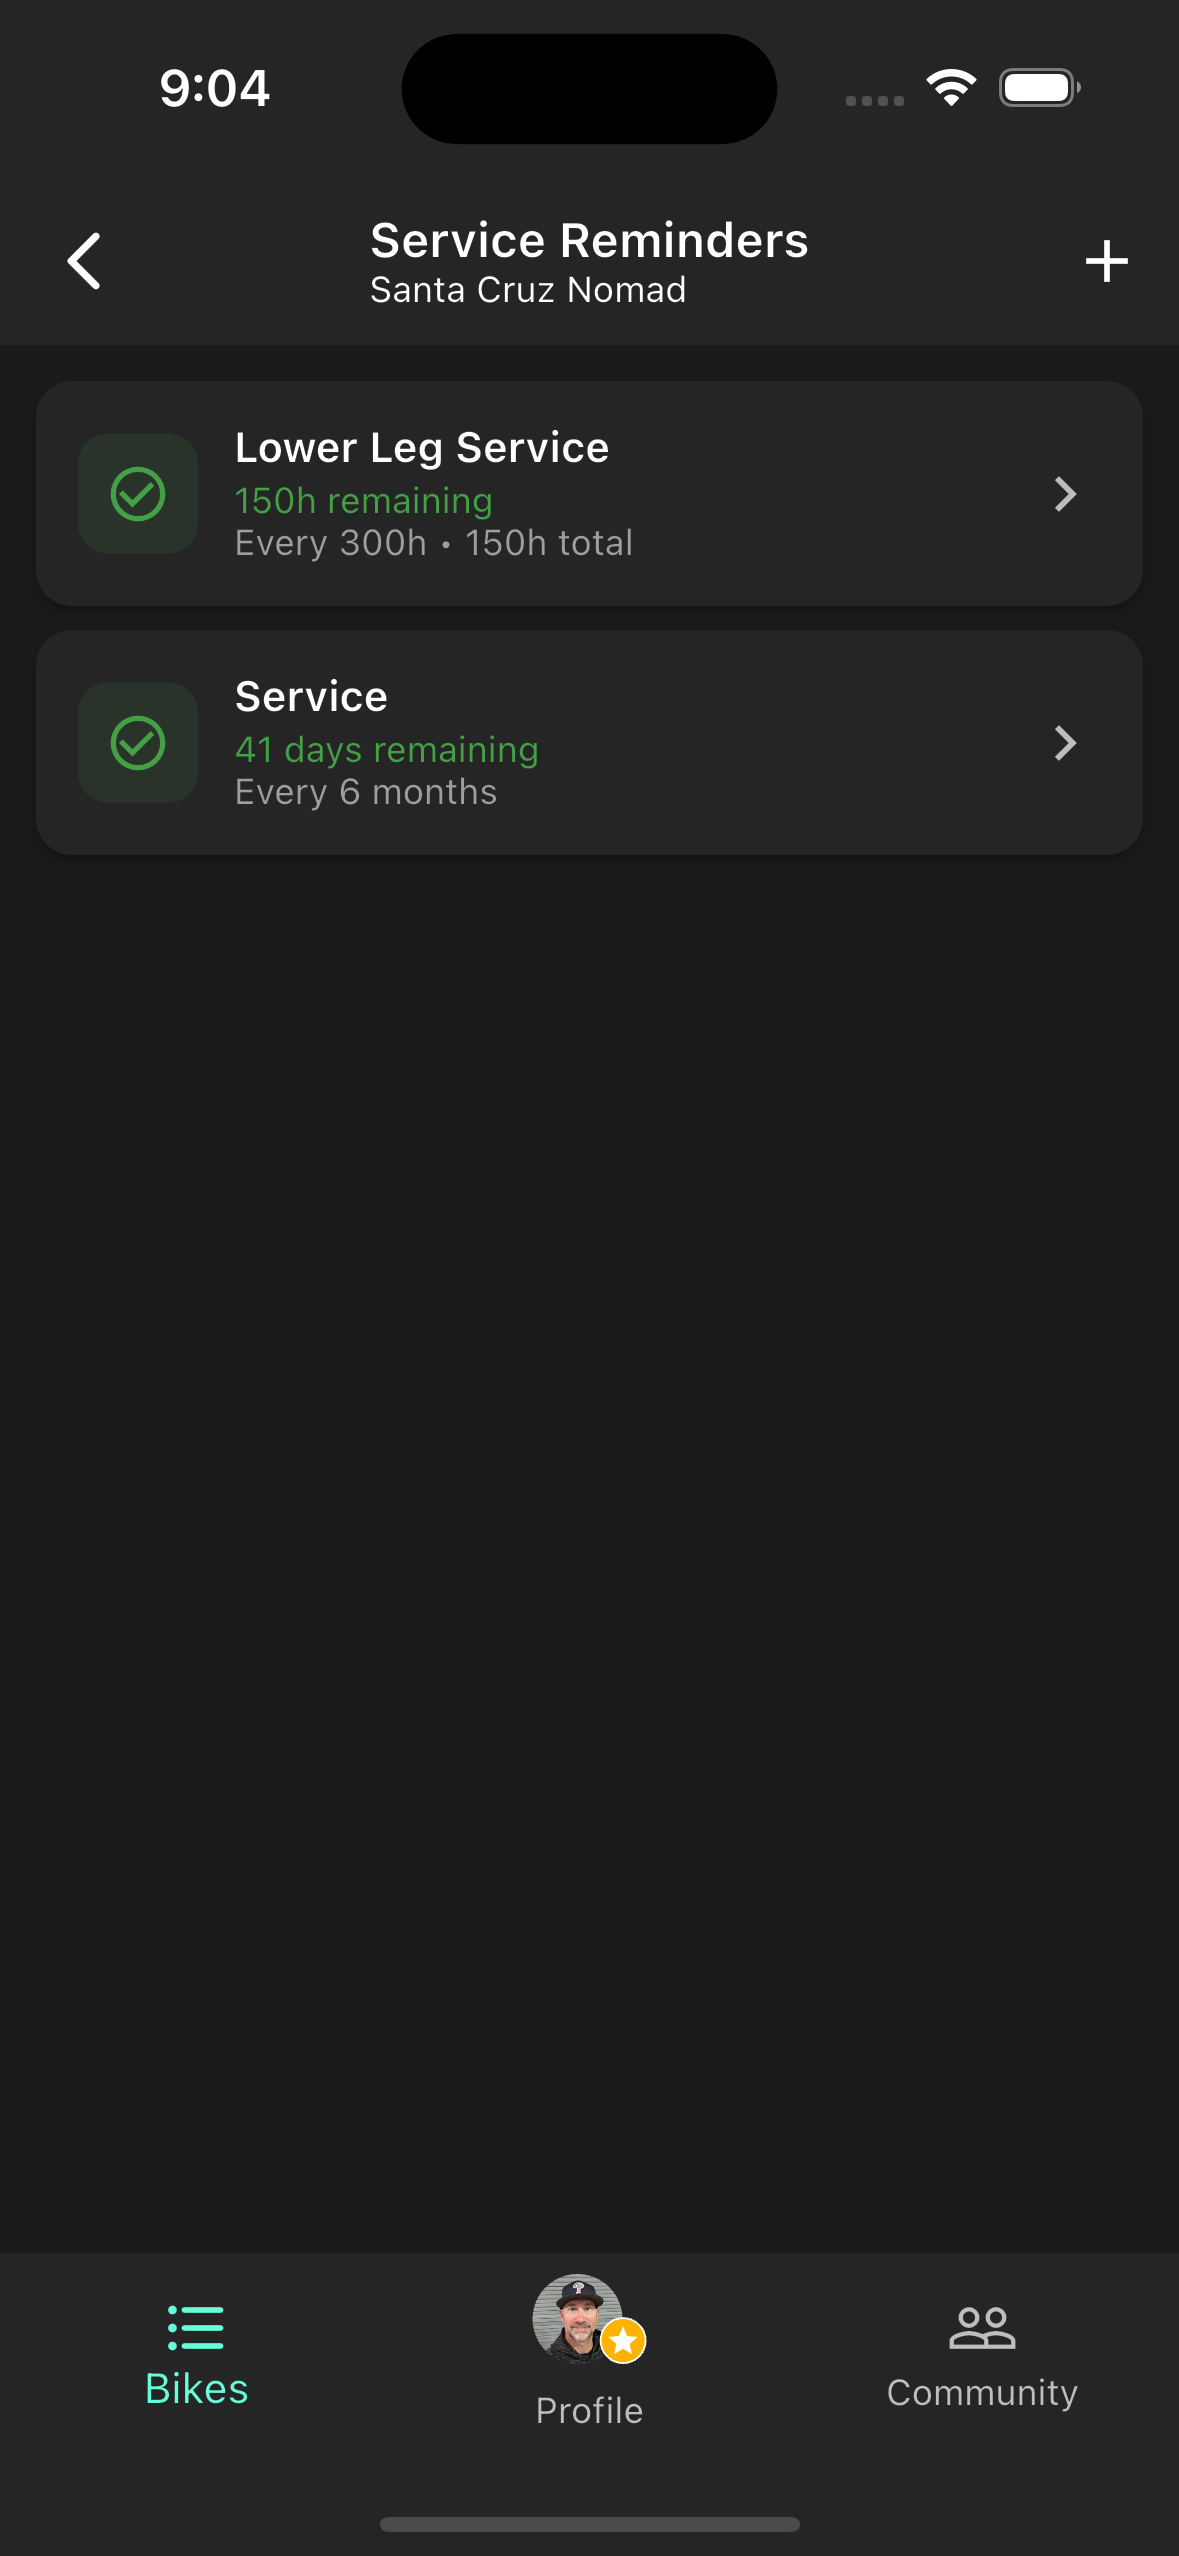
Reminder list
Fork service detail
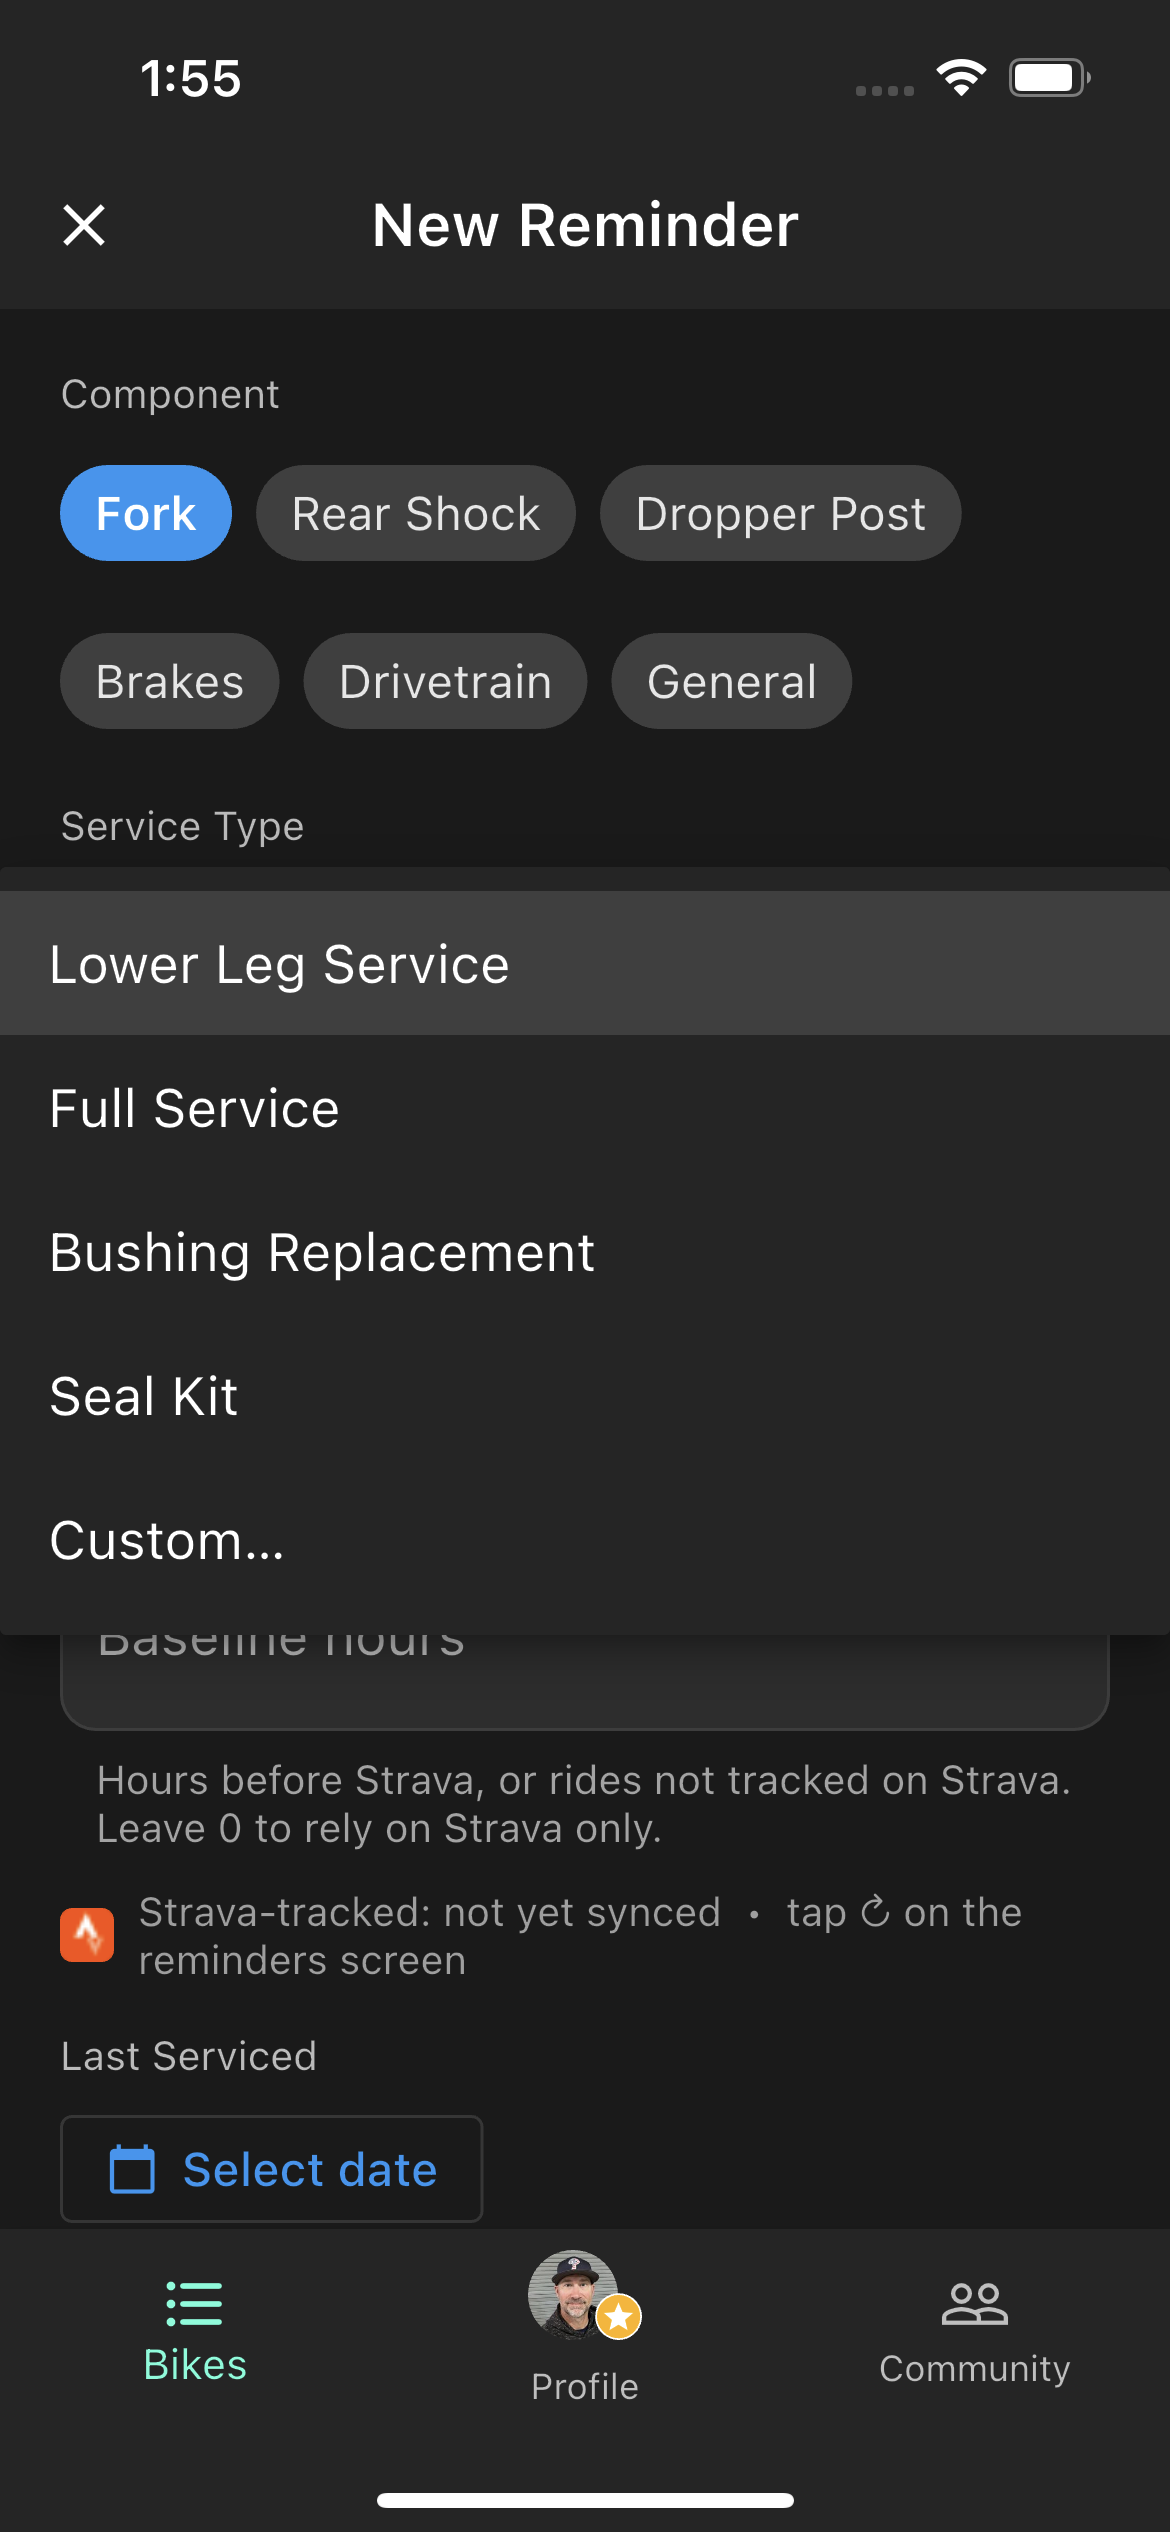
Service type options
Sharing a Setting Pro
Share your suspension settings to the Community so other riders on the same bike and components can benefit from your dialing. From any setting on your bike, tap the share icon to open the Share to Community flow.
Pro only: Sharing requires an active Pro subscription. All users can browse and import community settings for free.
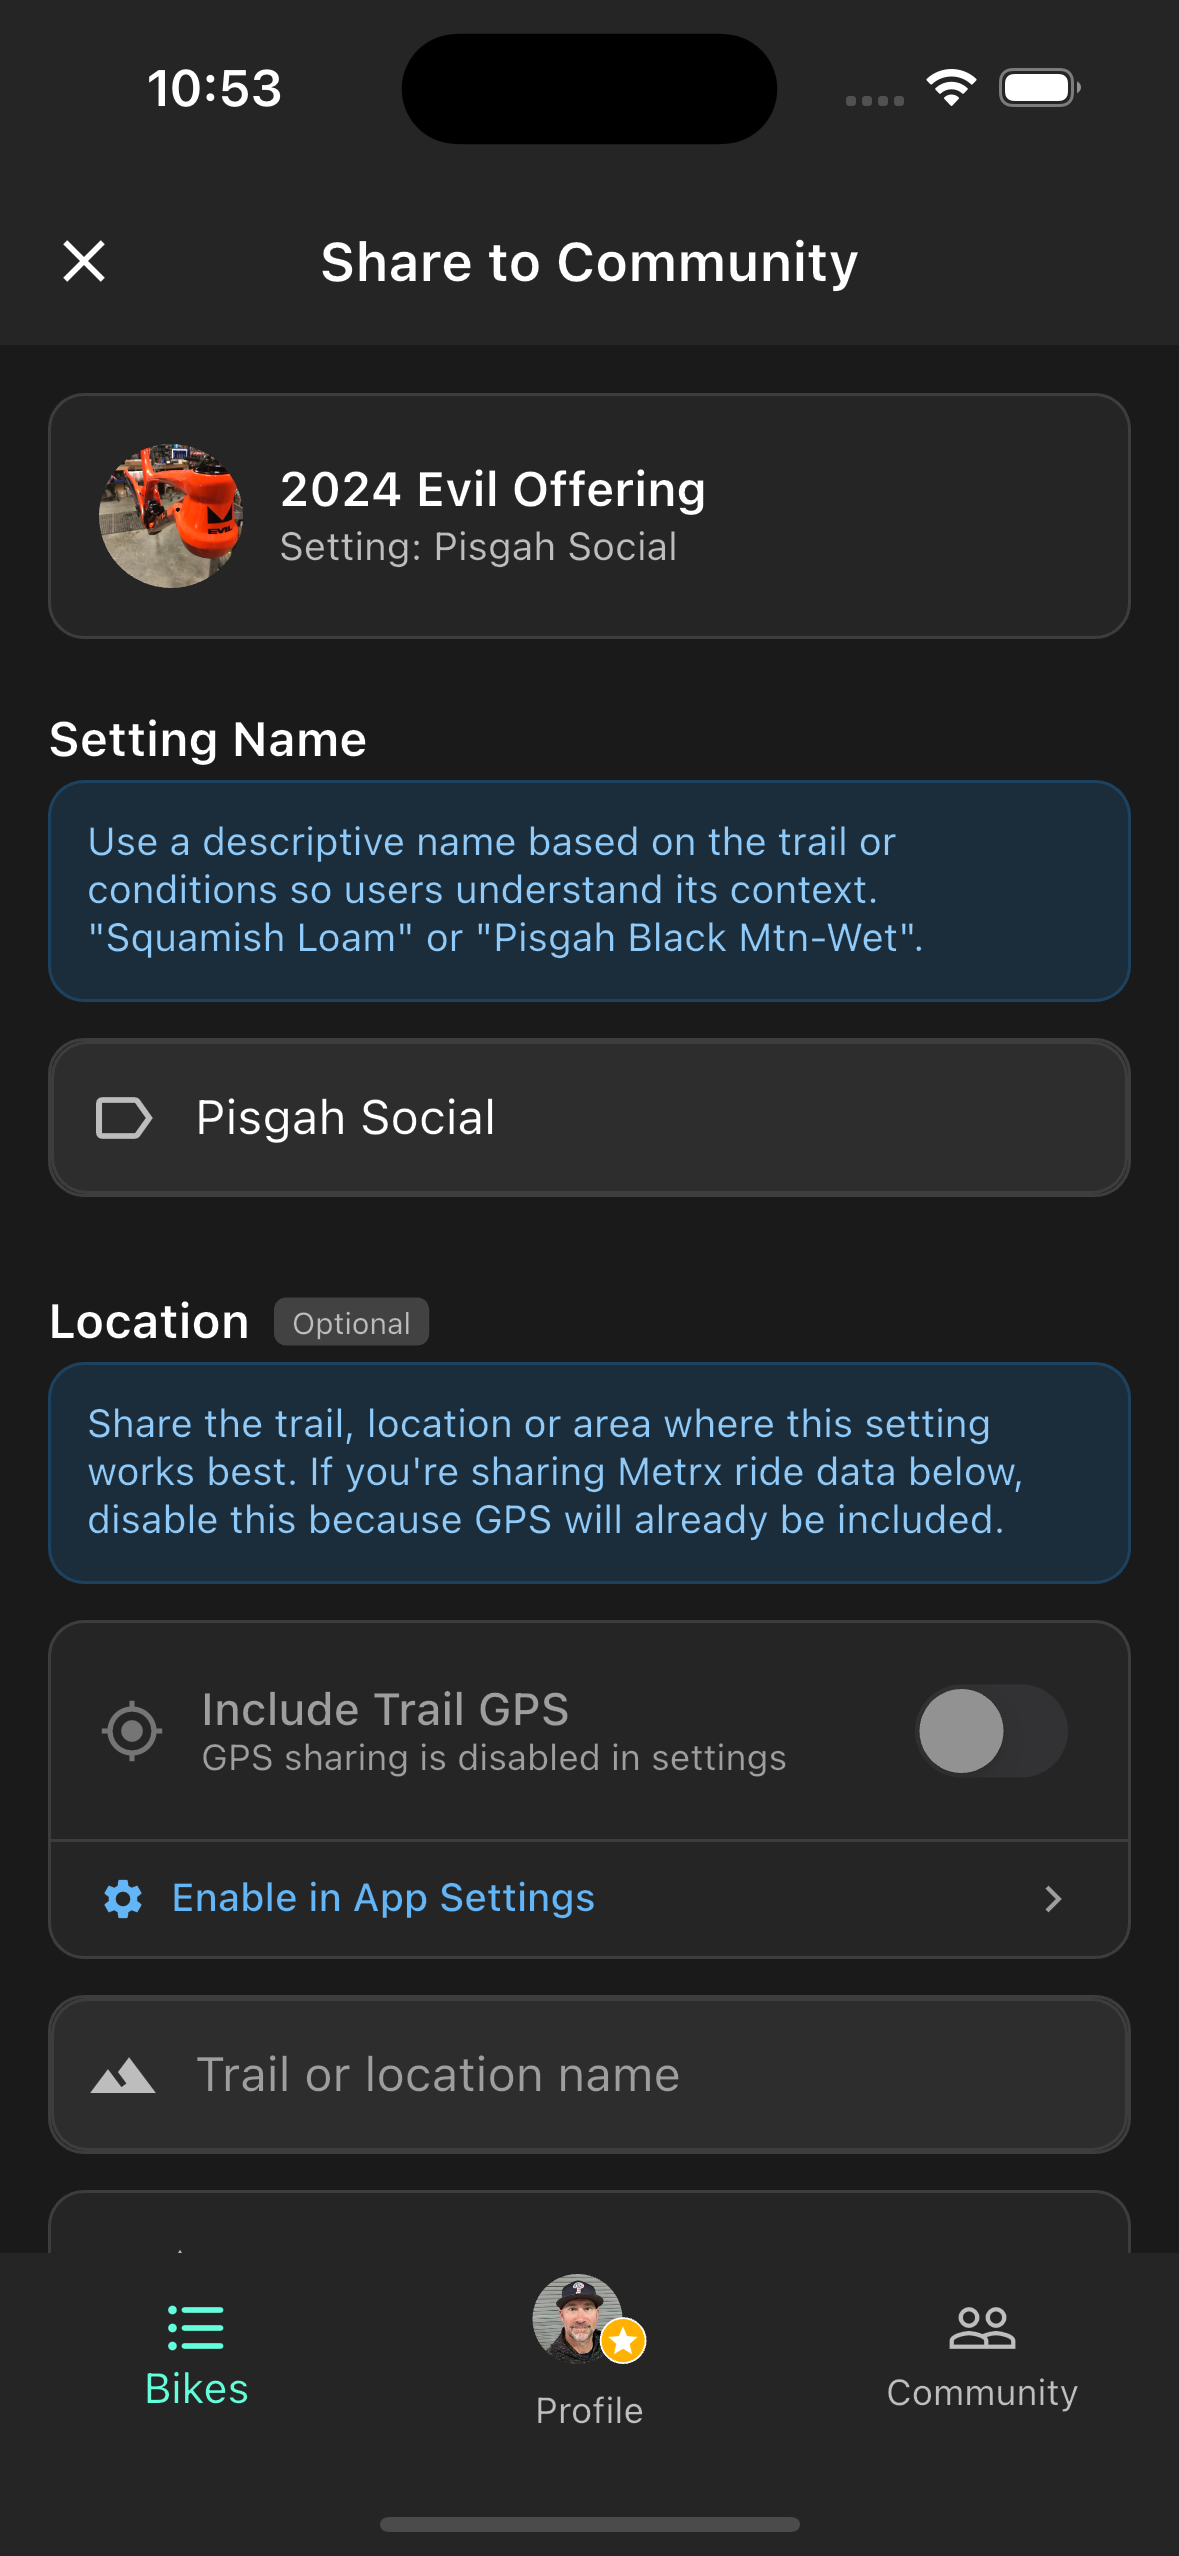
Setting Name
Give your setting a descriptive name that communicates trail or conditions context — something other riders can understand at a glance. Examples: "Squamish Loam" or "Pisgah Black Mtn-Wet". The field pre-fills with your current setting name, but it's worth customizing before sharing.
Location (optional)
Add a trail or location name so riders can find your setting when browsing nearby or searching by location. You can also enable Include Trail GPS to attach your current coordinates — this powers the Community's Nearby filter for other riders.
GPS sharing must first be enabled in App Settings → Share Location with Settings. If that setting is off, a link to enable it appears directly on the share screen.
Note: If you're attaching a Metrx ride recording below, leave GPS off — the ride data already includes full GPS coordinates and attaching both is redundant.
Attach a Metrx Recording Pro
Attaching a Metrx ride recording gives your shared setting real context. Other riders can see your GPS trail map, roughness score, and per-segment breakdown alongside your suspension values — making it clear exactly what conditions and trail that setup was dialed for.
- Only rides recorded with this specific setting appear in the list.
- Each ride shows trail name, distance, duration, and roughness score — pick the most representative run.
- The GPS polyline and segment data remain fully interactive for anyone viewing your shared setting in the Community.
Share to Community
Community setting detail
Community
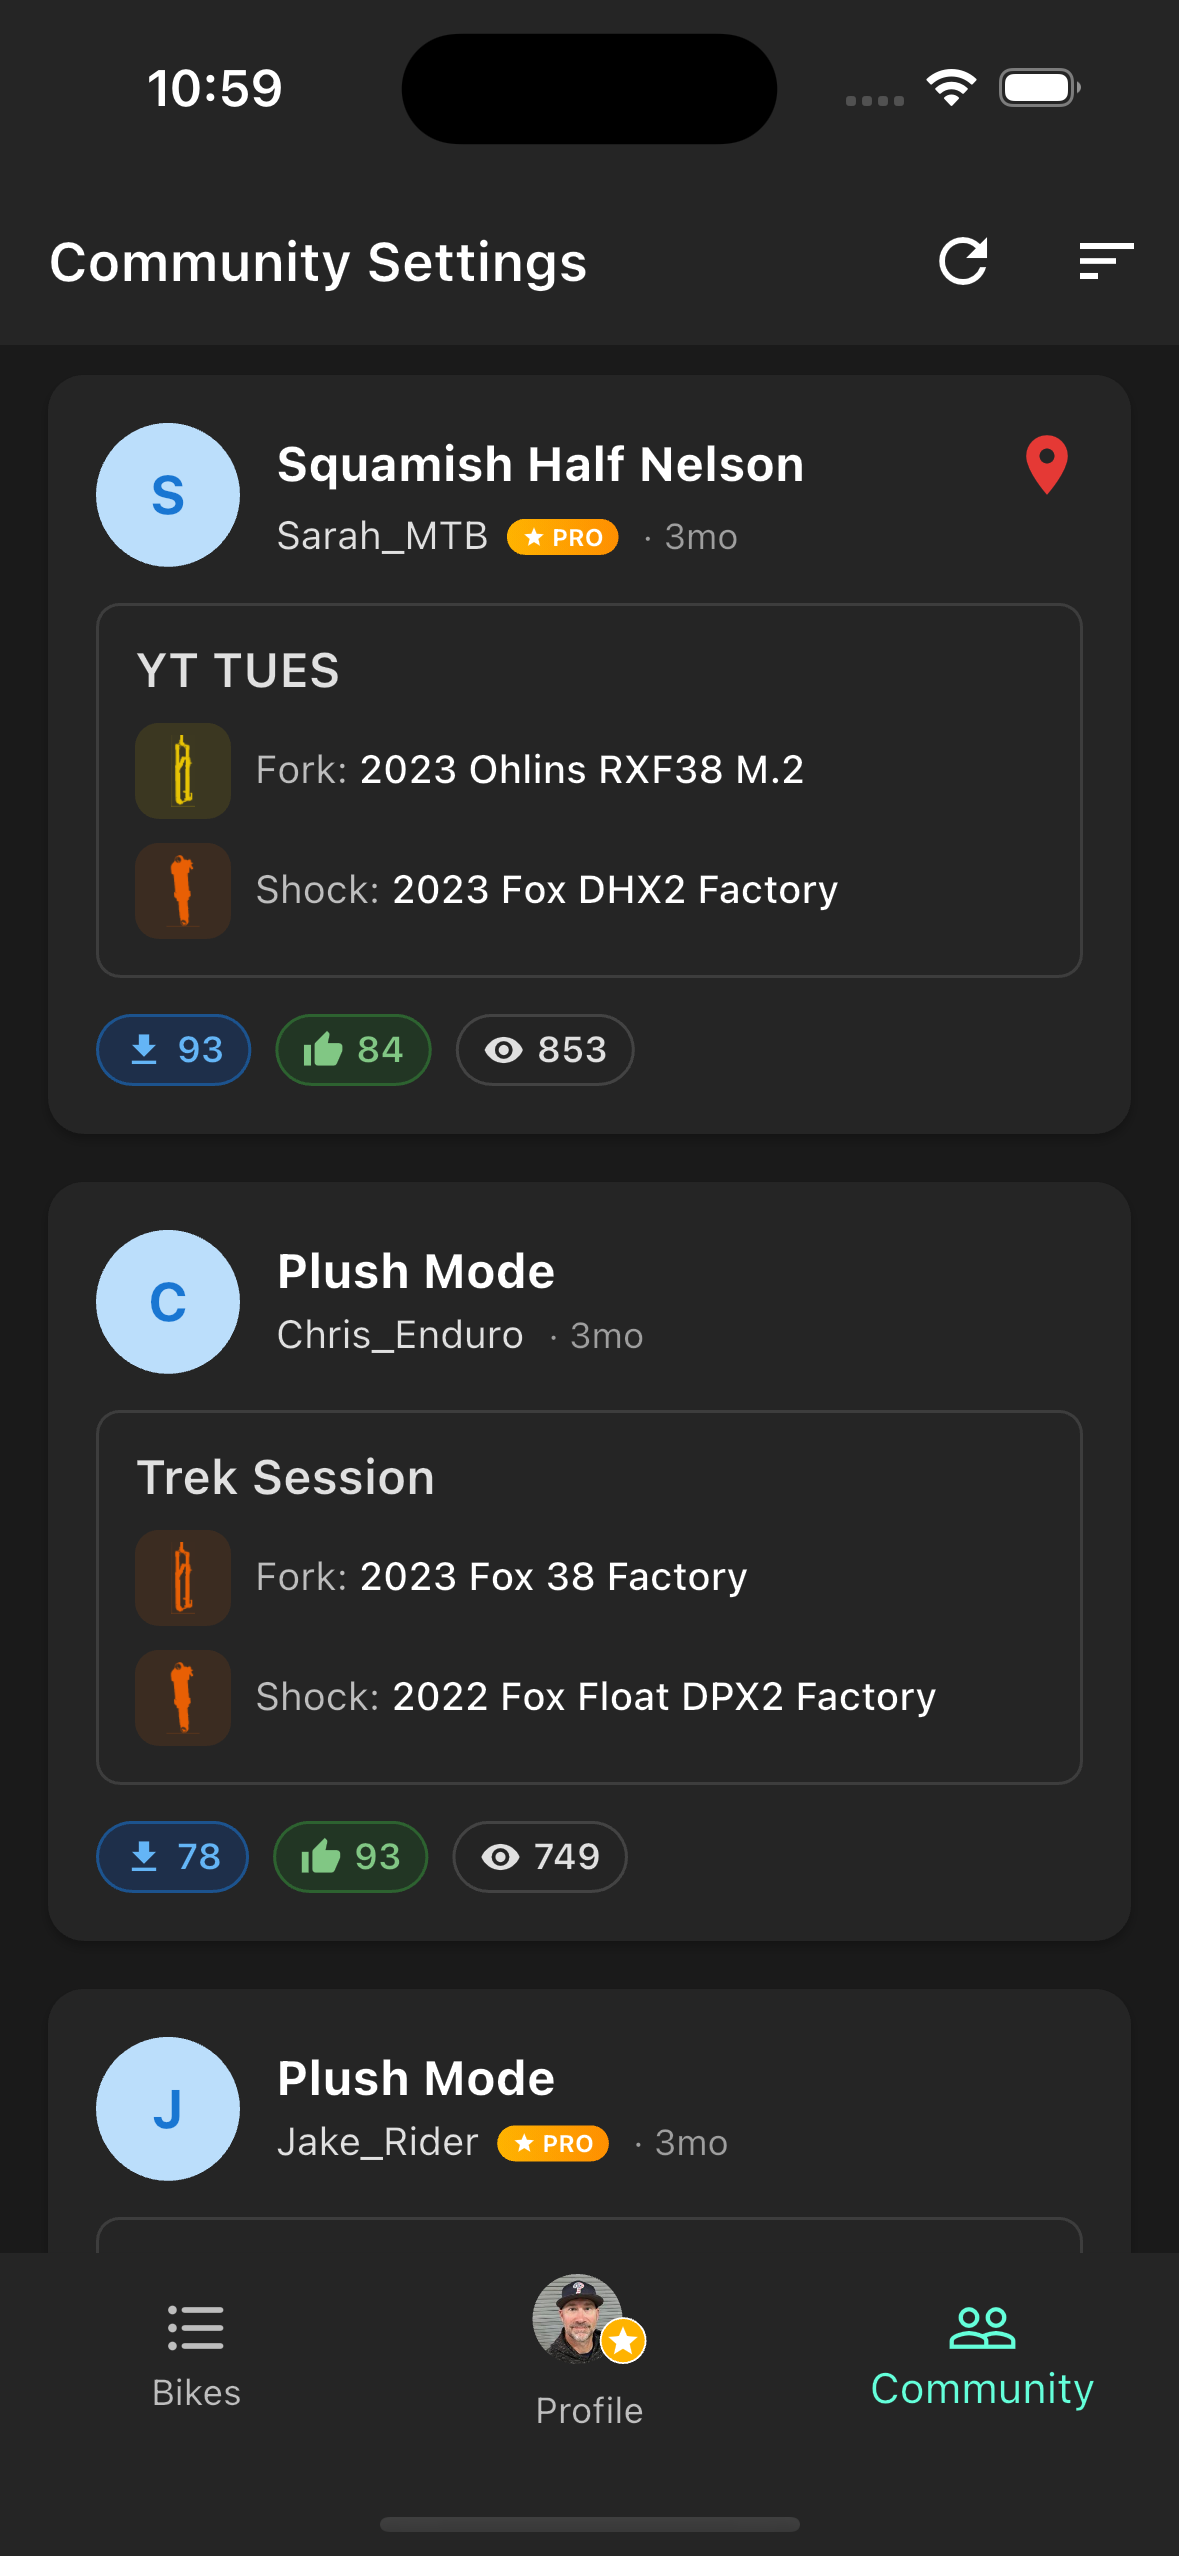
The Community screen lets you browse suspension settings shared by riders worldwide. Filter by your components, search by location, or find settings from riders near your trails. Browsing and importing are available to all users — no Pro subscription required.
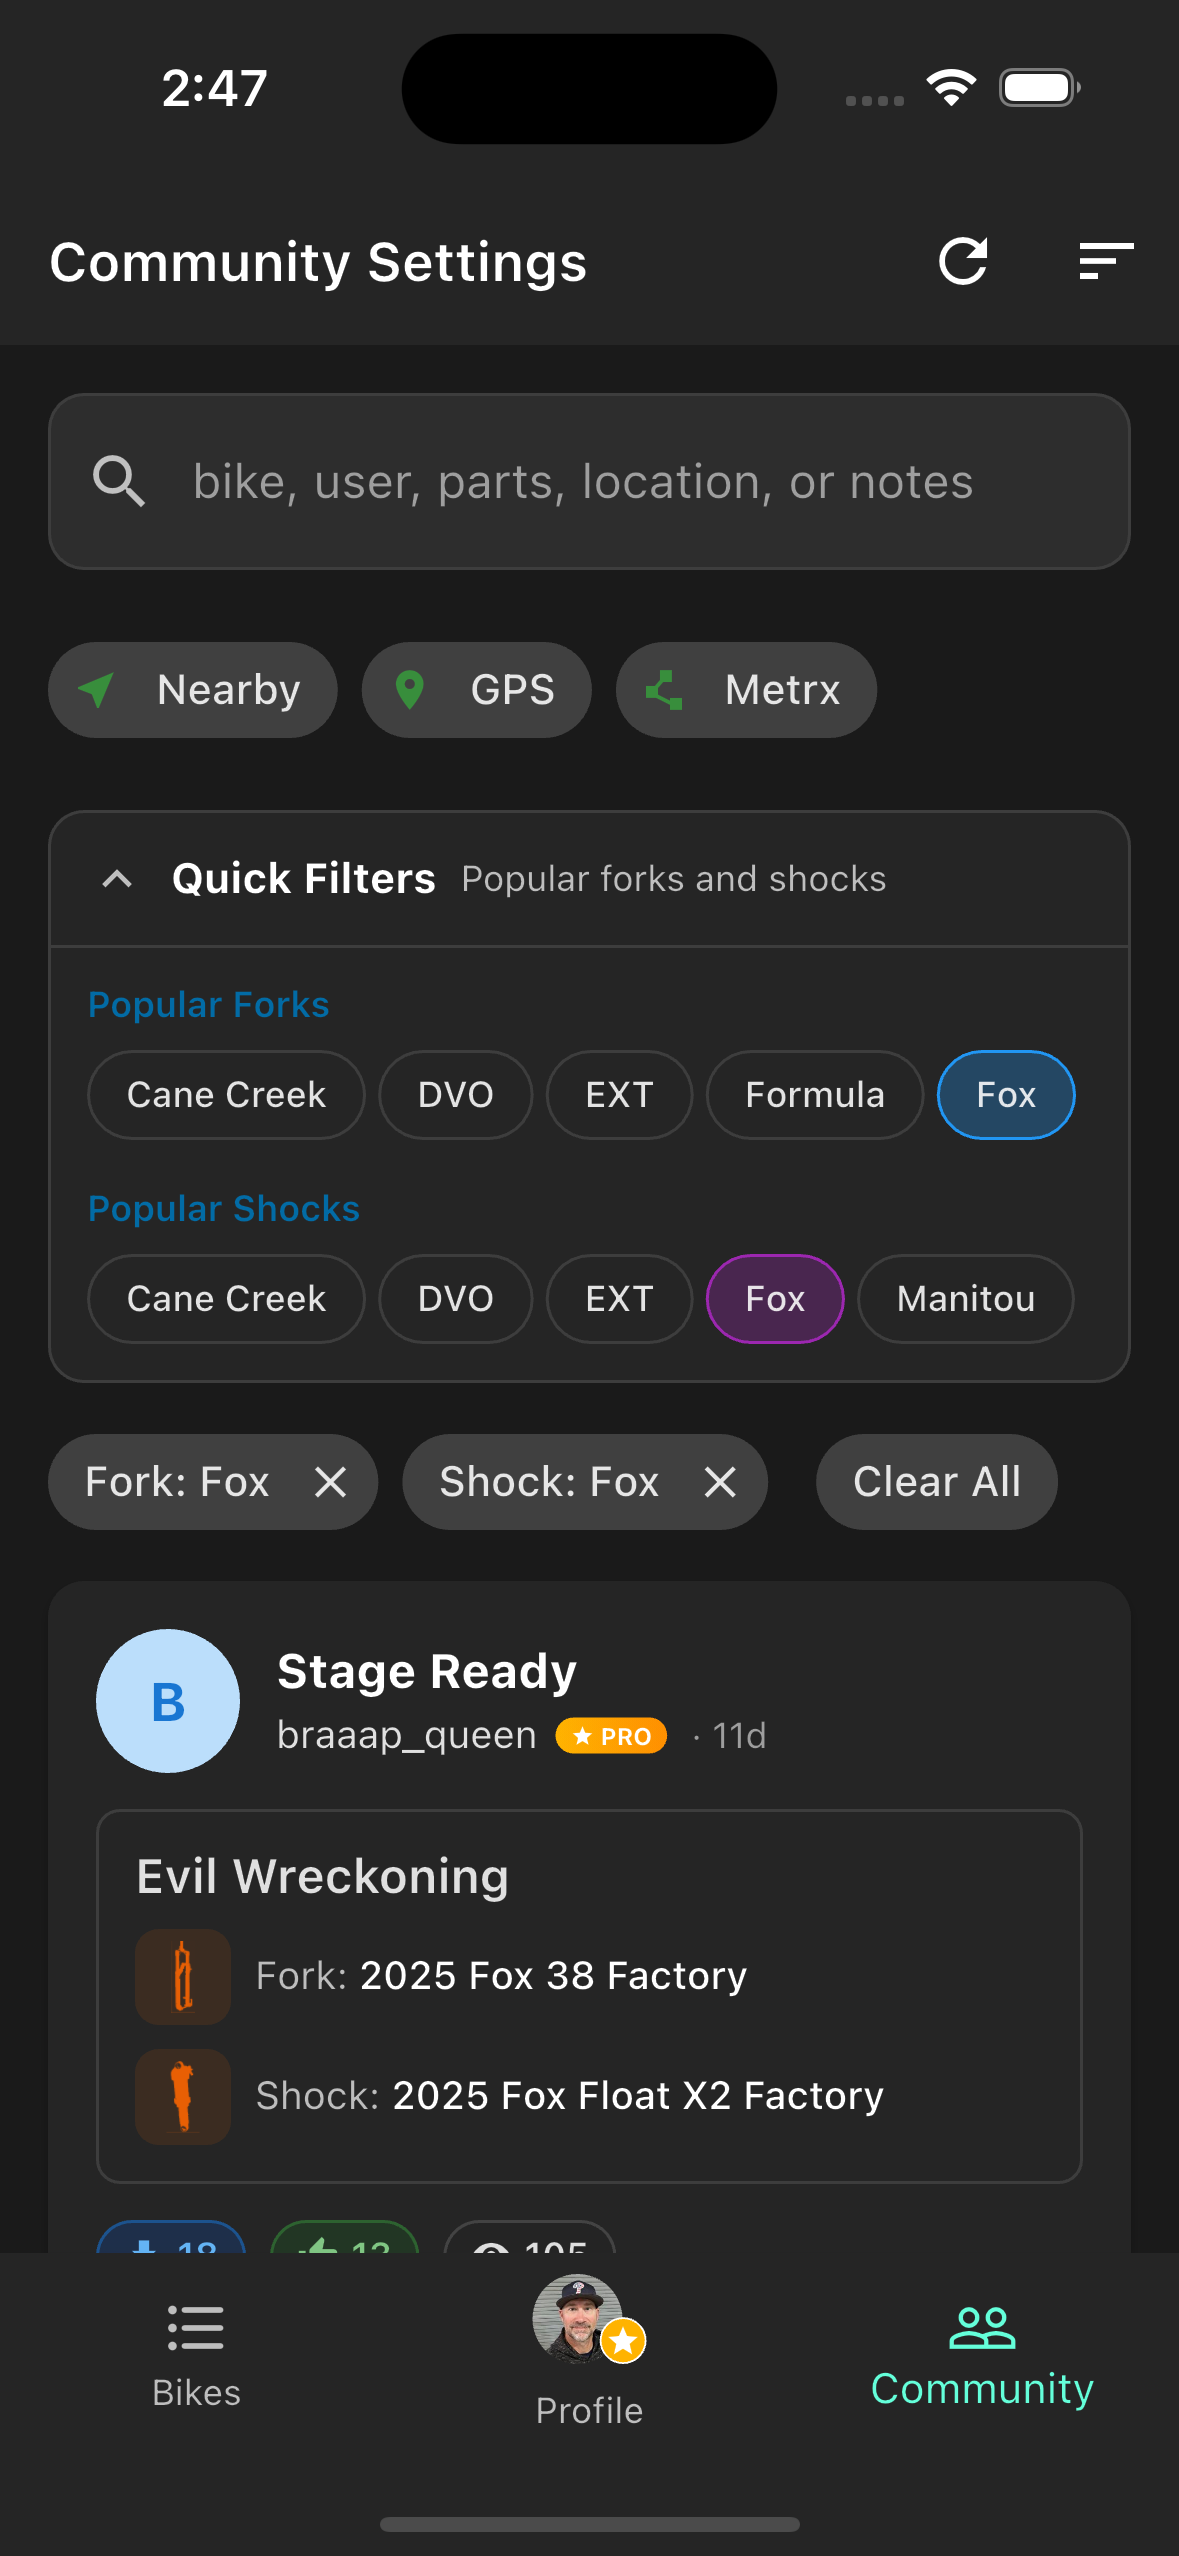
Browsing & Searching
The search bar filters across bike make/model, fork and shock brand, username, location, and notes simultaneously. All search words must match — searching "Fox Pisgah" returns only settings containing both terms somewhere in the record.
Use the Quick Filters below the search bar to narrow by popular fork or shock brands without typing. Sort the list by Most Imported, Most Upvoted, Newest, or Most Viewed using the icon in the top right.
Free accounts browse the top 100 most-imported settings. If your search returns very few results, a prompt appears to search the full database — a Pro feature that expands coverage to 500 settings.
Nearby GPS Filter Pro
Tap the Nearby chip to filter settings by proximity to your current location. The app fetches your GPS coordinates and shows only settings within your chosen radius that include location or ride GPS data.
- Radius options: 5 km, 10 km, 25 km, 50 km, or 100 km (default 50 km). Tap the radius chip to change it after enabling Nearby.
- Sorting: While Nearby is active, results sort by distance — closest first. The sort dropdown is overridden until you disable Nearby.
- Coverage: Only settings shared with GPS coordinates (location pin or attached Metrx ride) appear in Nearby results. Settings without any location data are excluded.
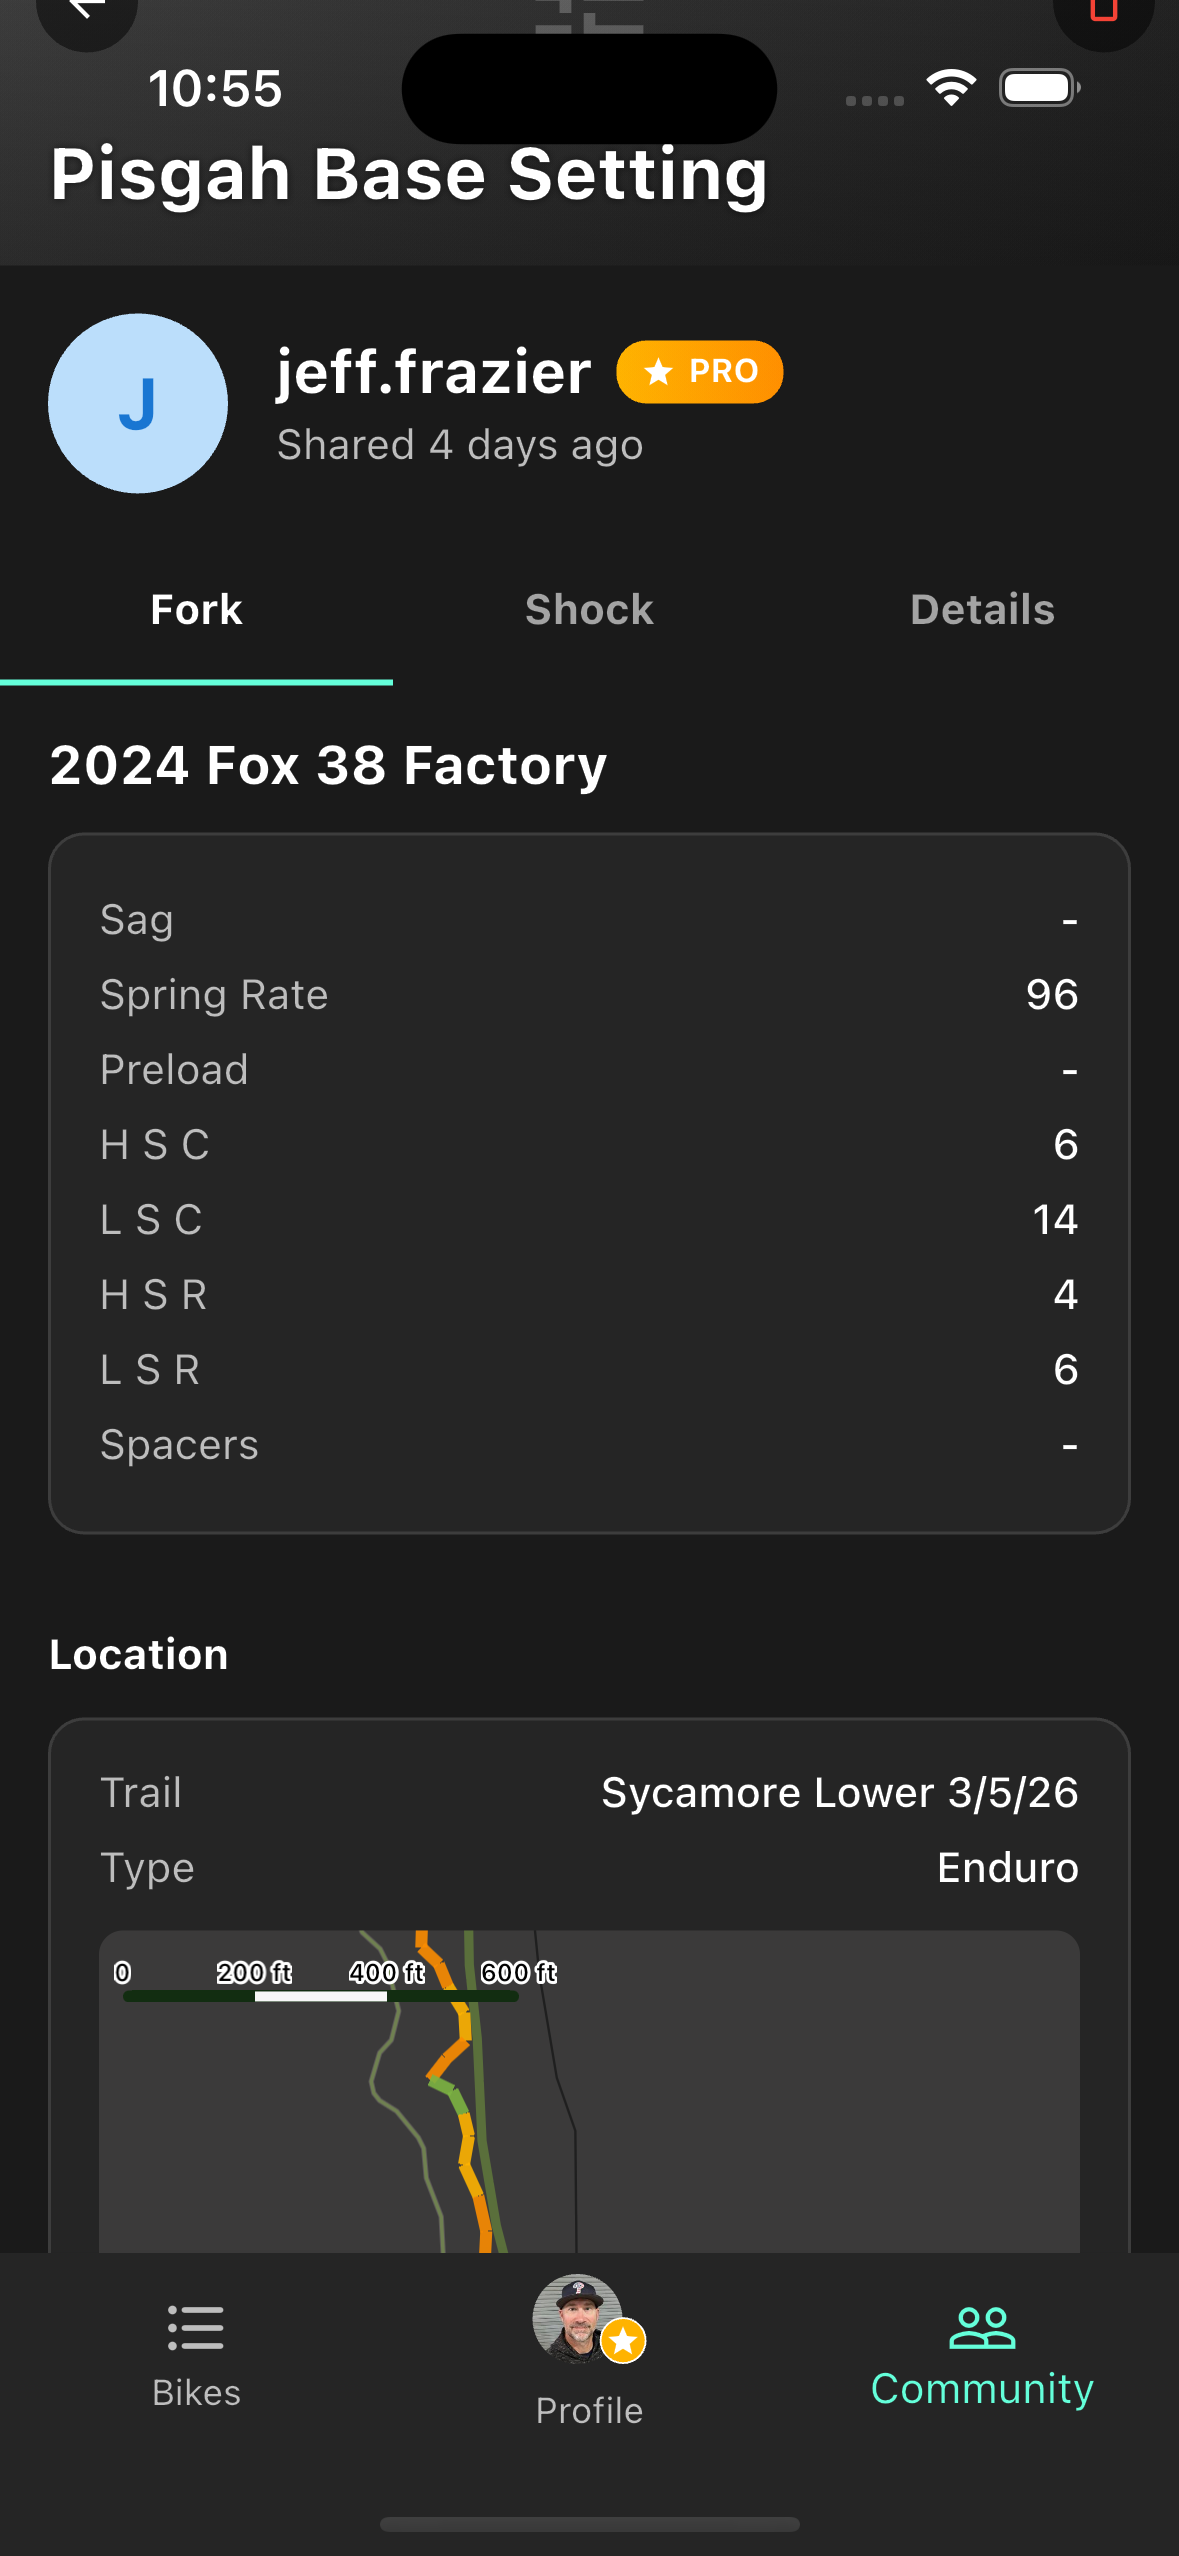
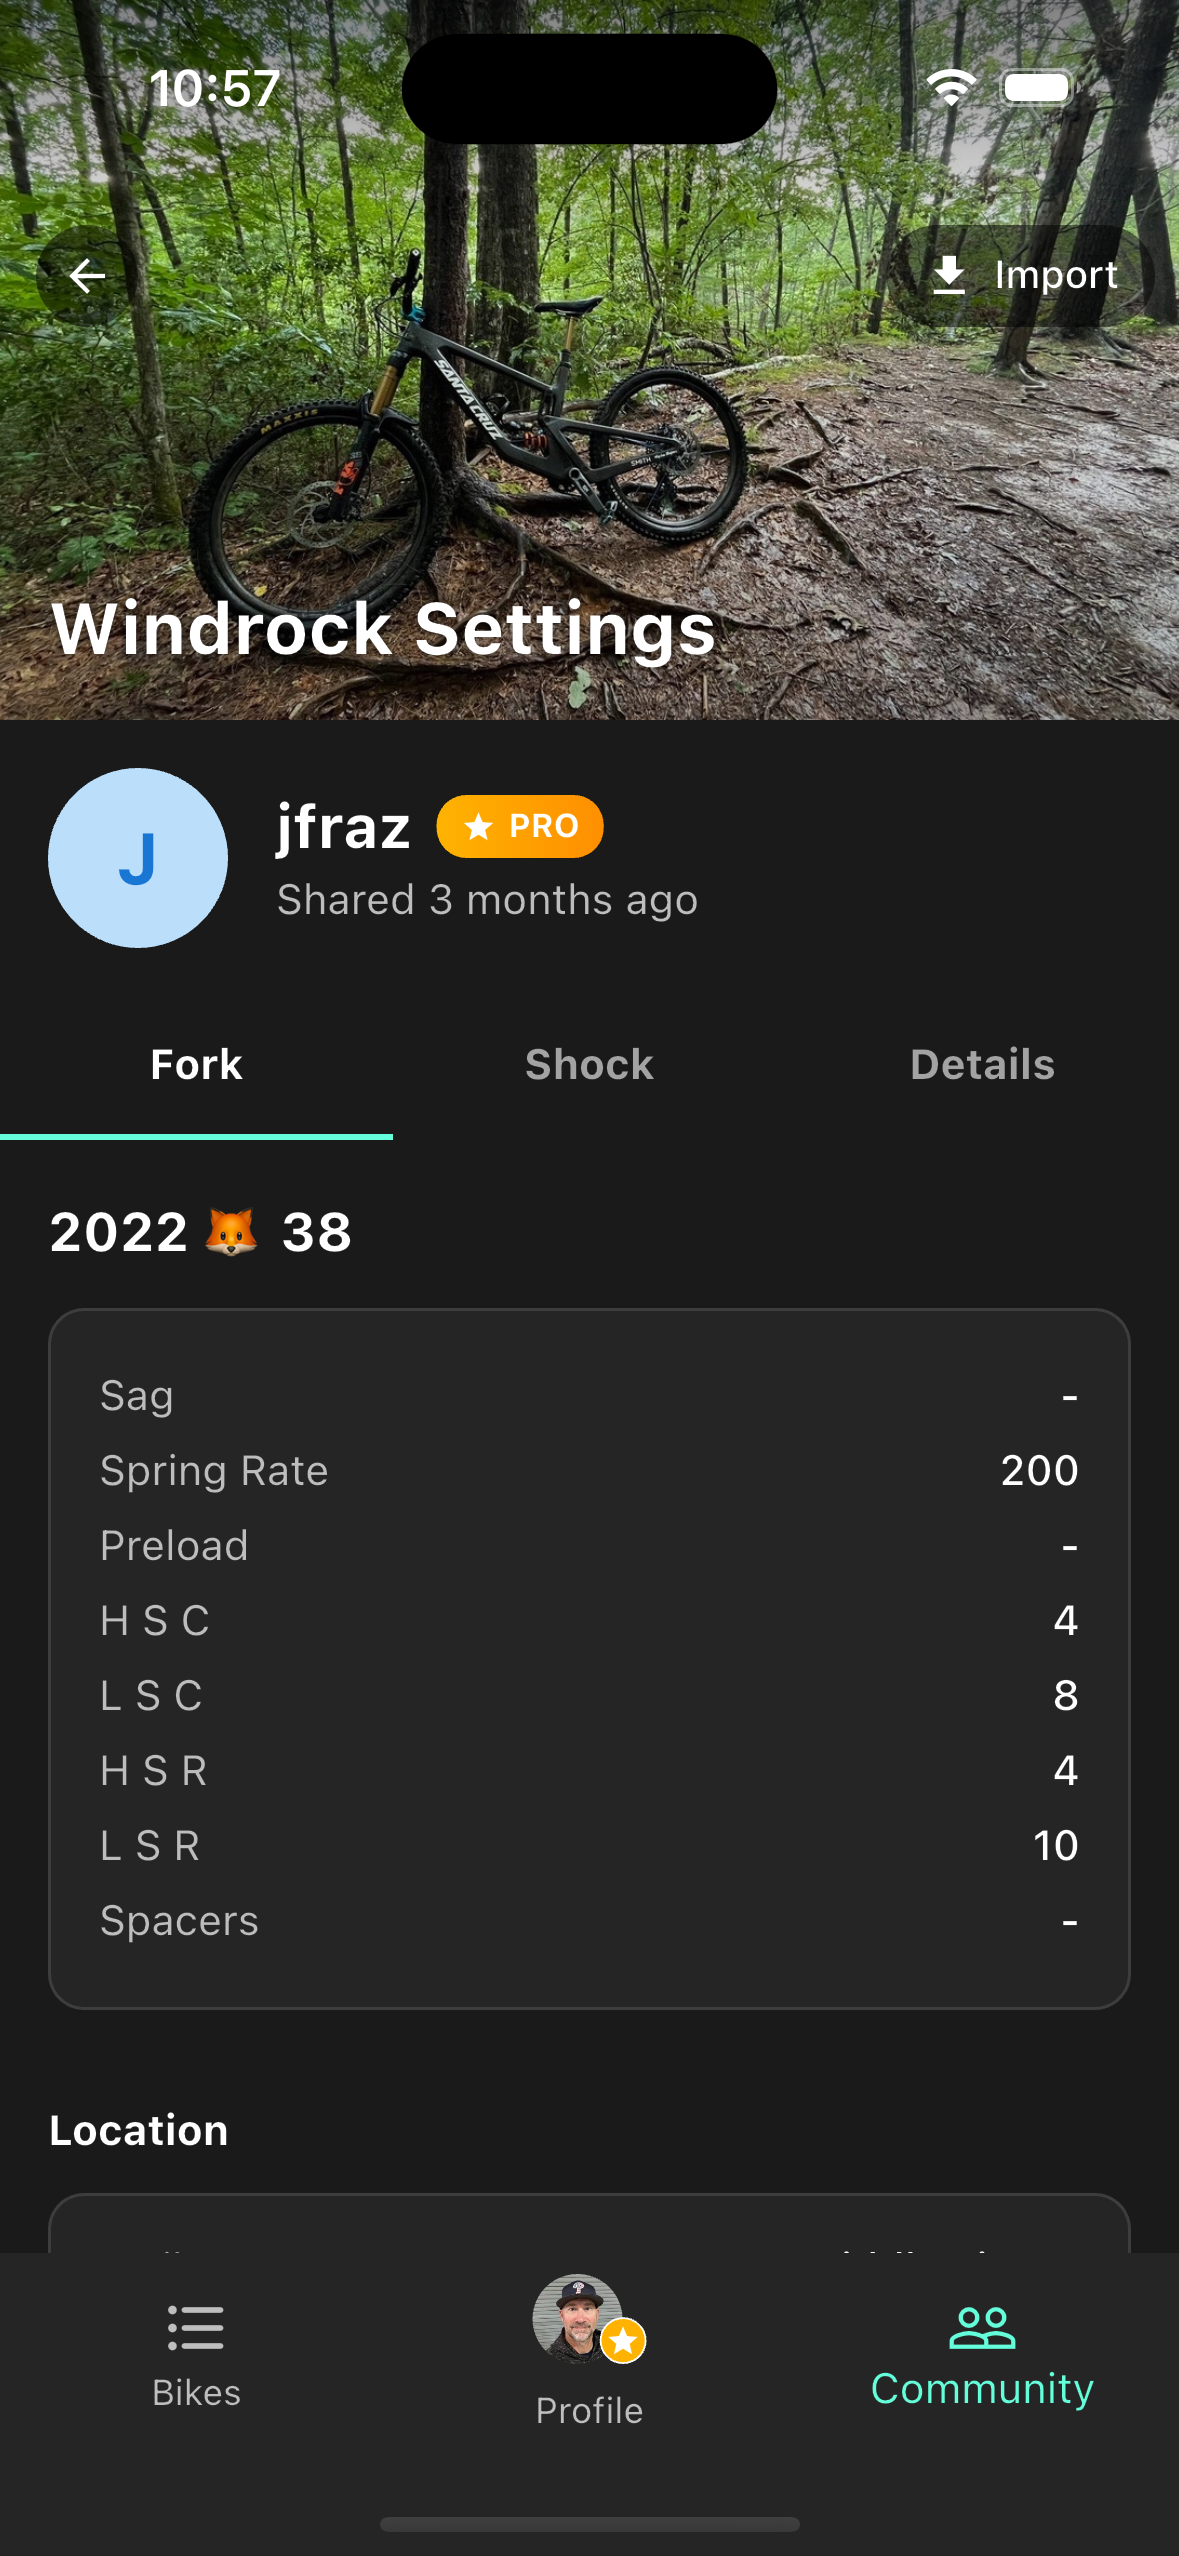
Viewing a Setting
Tap any card to open the full setting detail. Three tabs — Fork, Shock, and Details — show all suspension values, tire pressures, rider weight, and notes.
If the contributor attached a Metrx ride, a map section appears below the tabs with their GPS trail. Tap any segment on the map or in the segment list to see roughness score and speed for that section. This data is visible to all users regardless of subscription.
When you find a setting you want to try, tap Import on the detail screen. See Importing a Setting for the full flow.
Community browser
Quick filters & Nearby
Setting detail
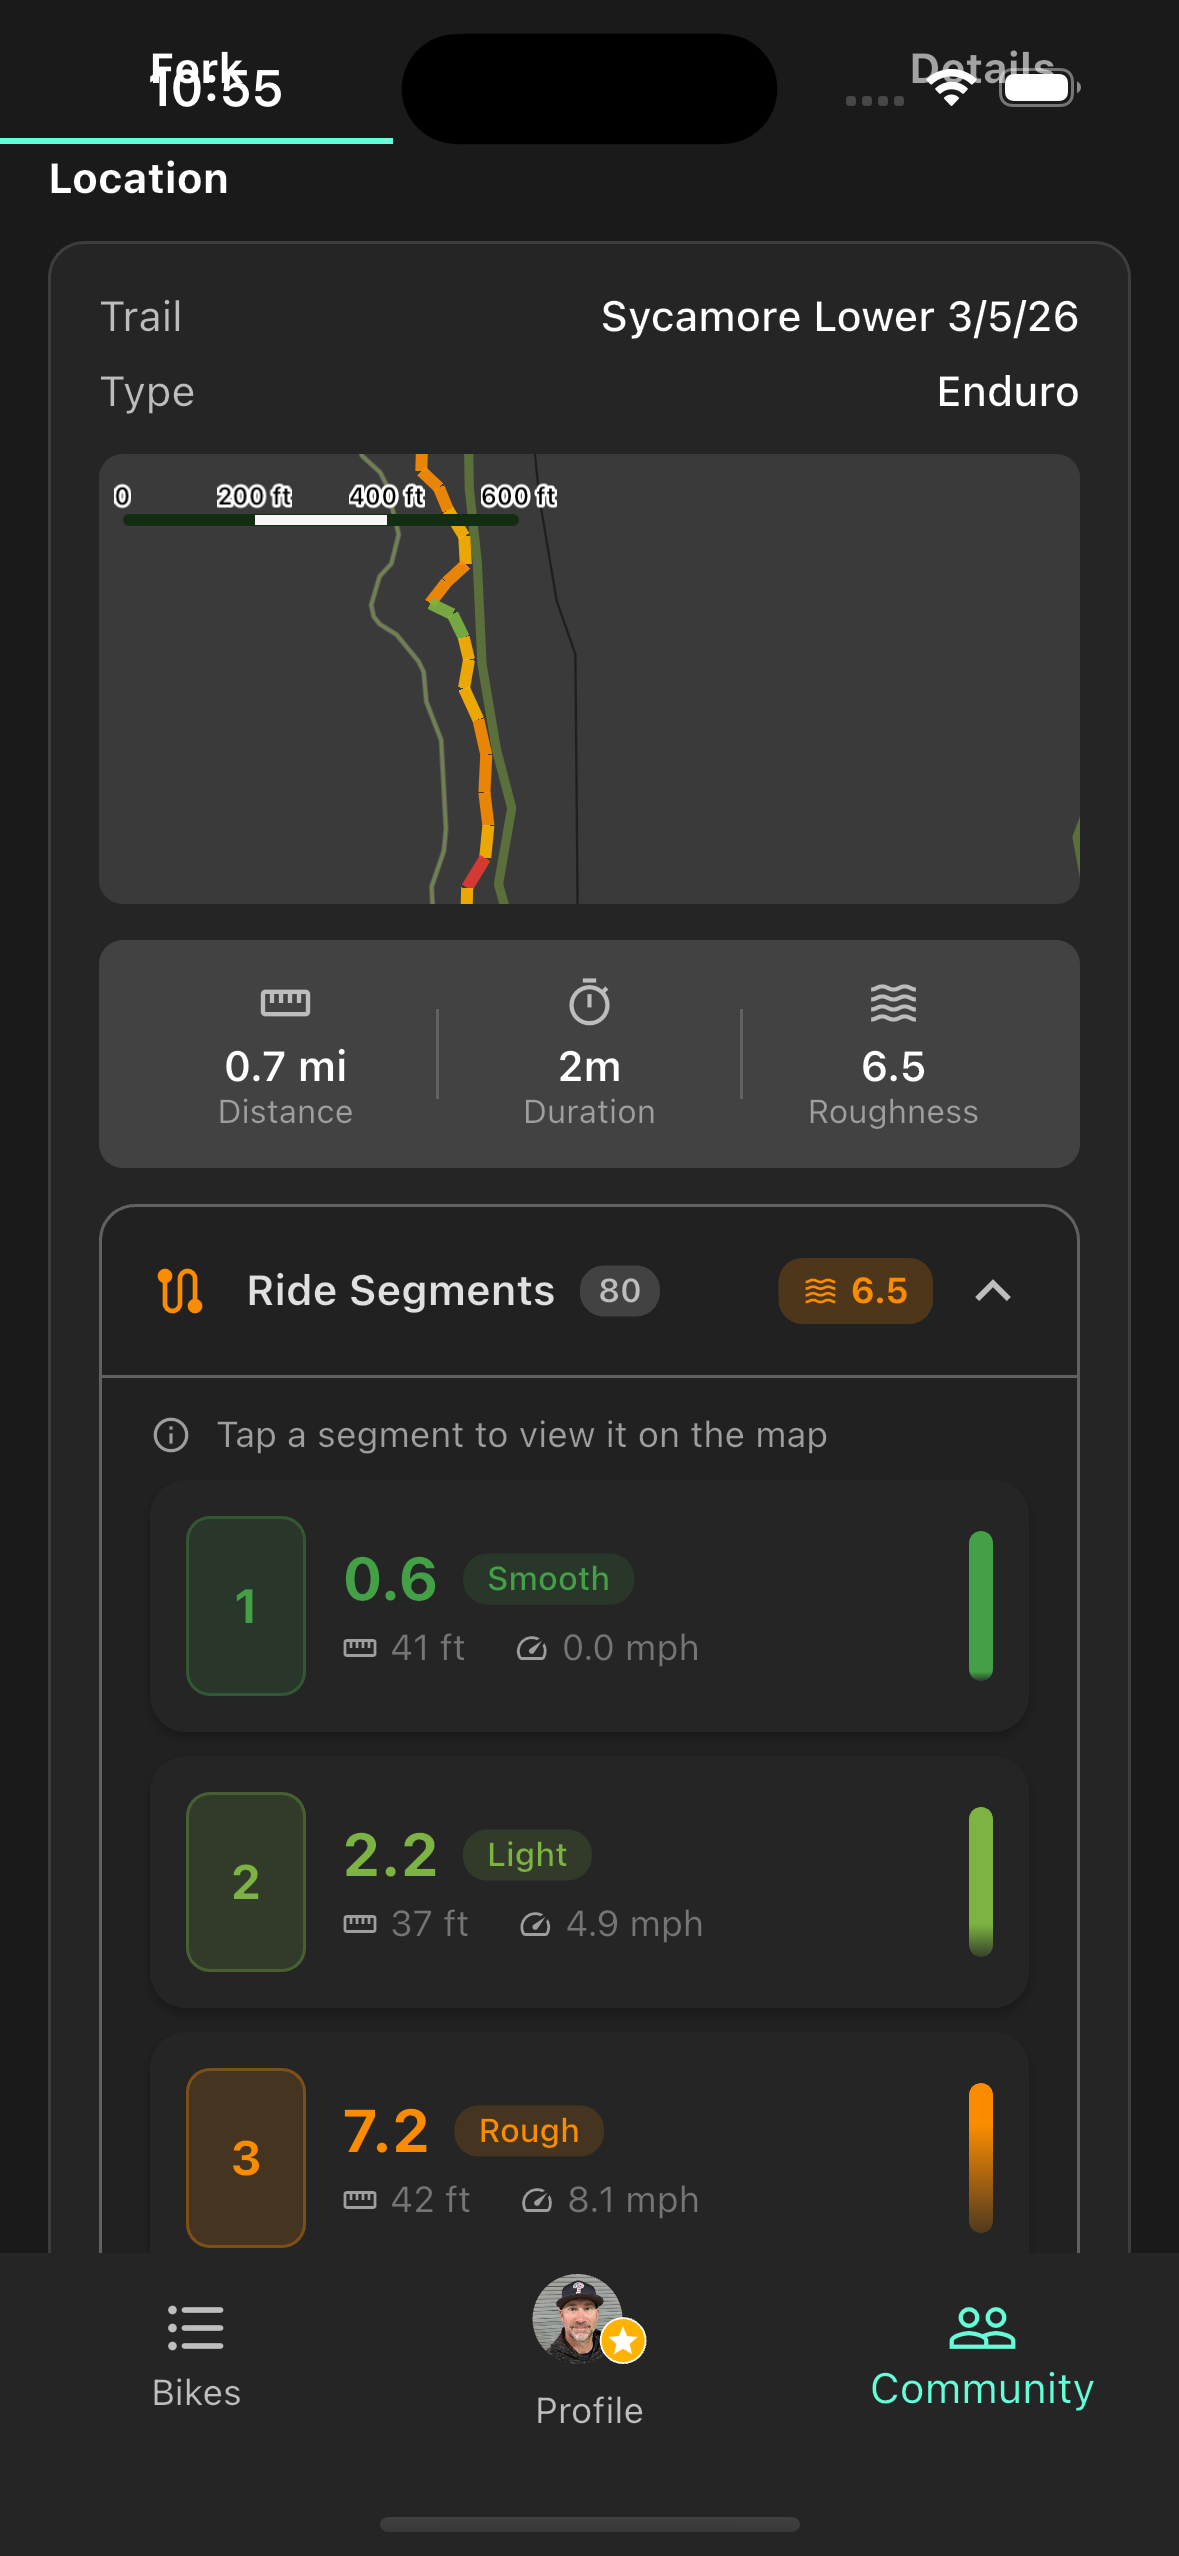
Attached Metrx ride map
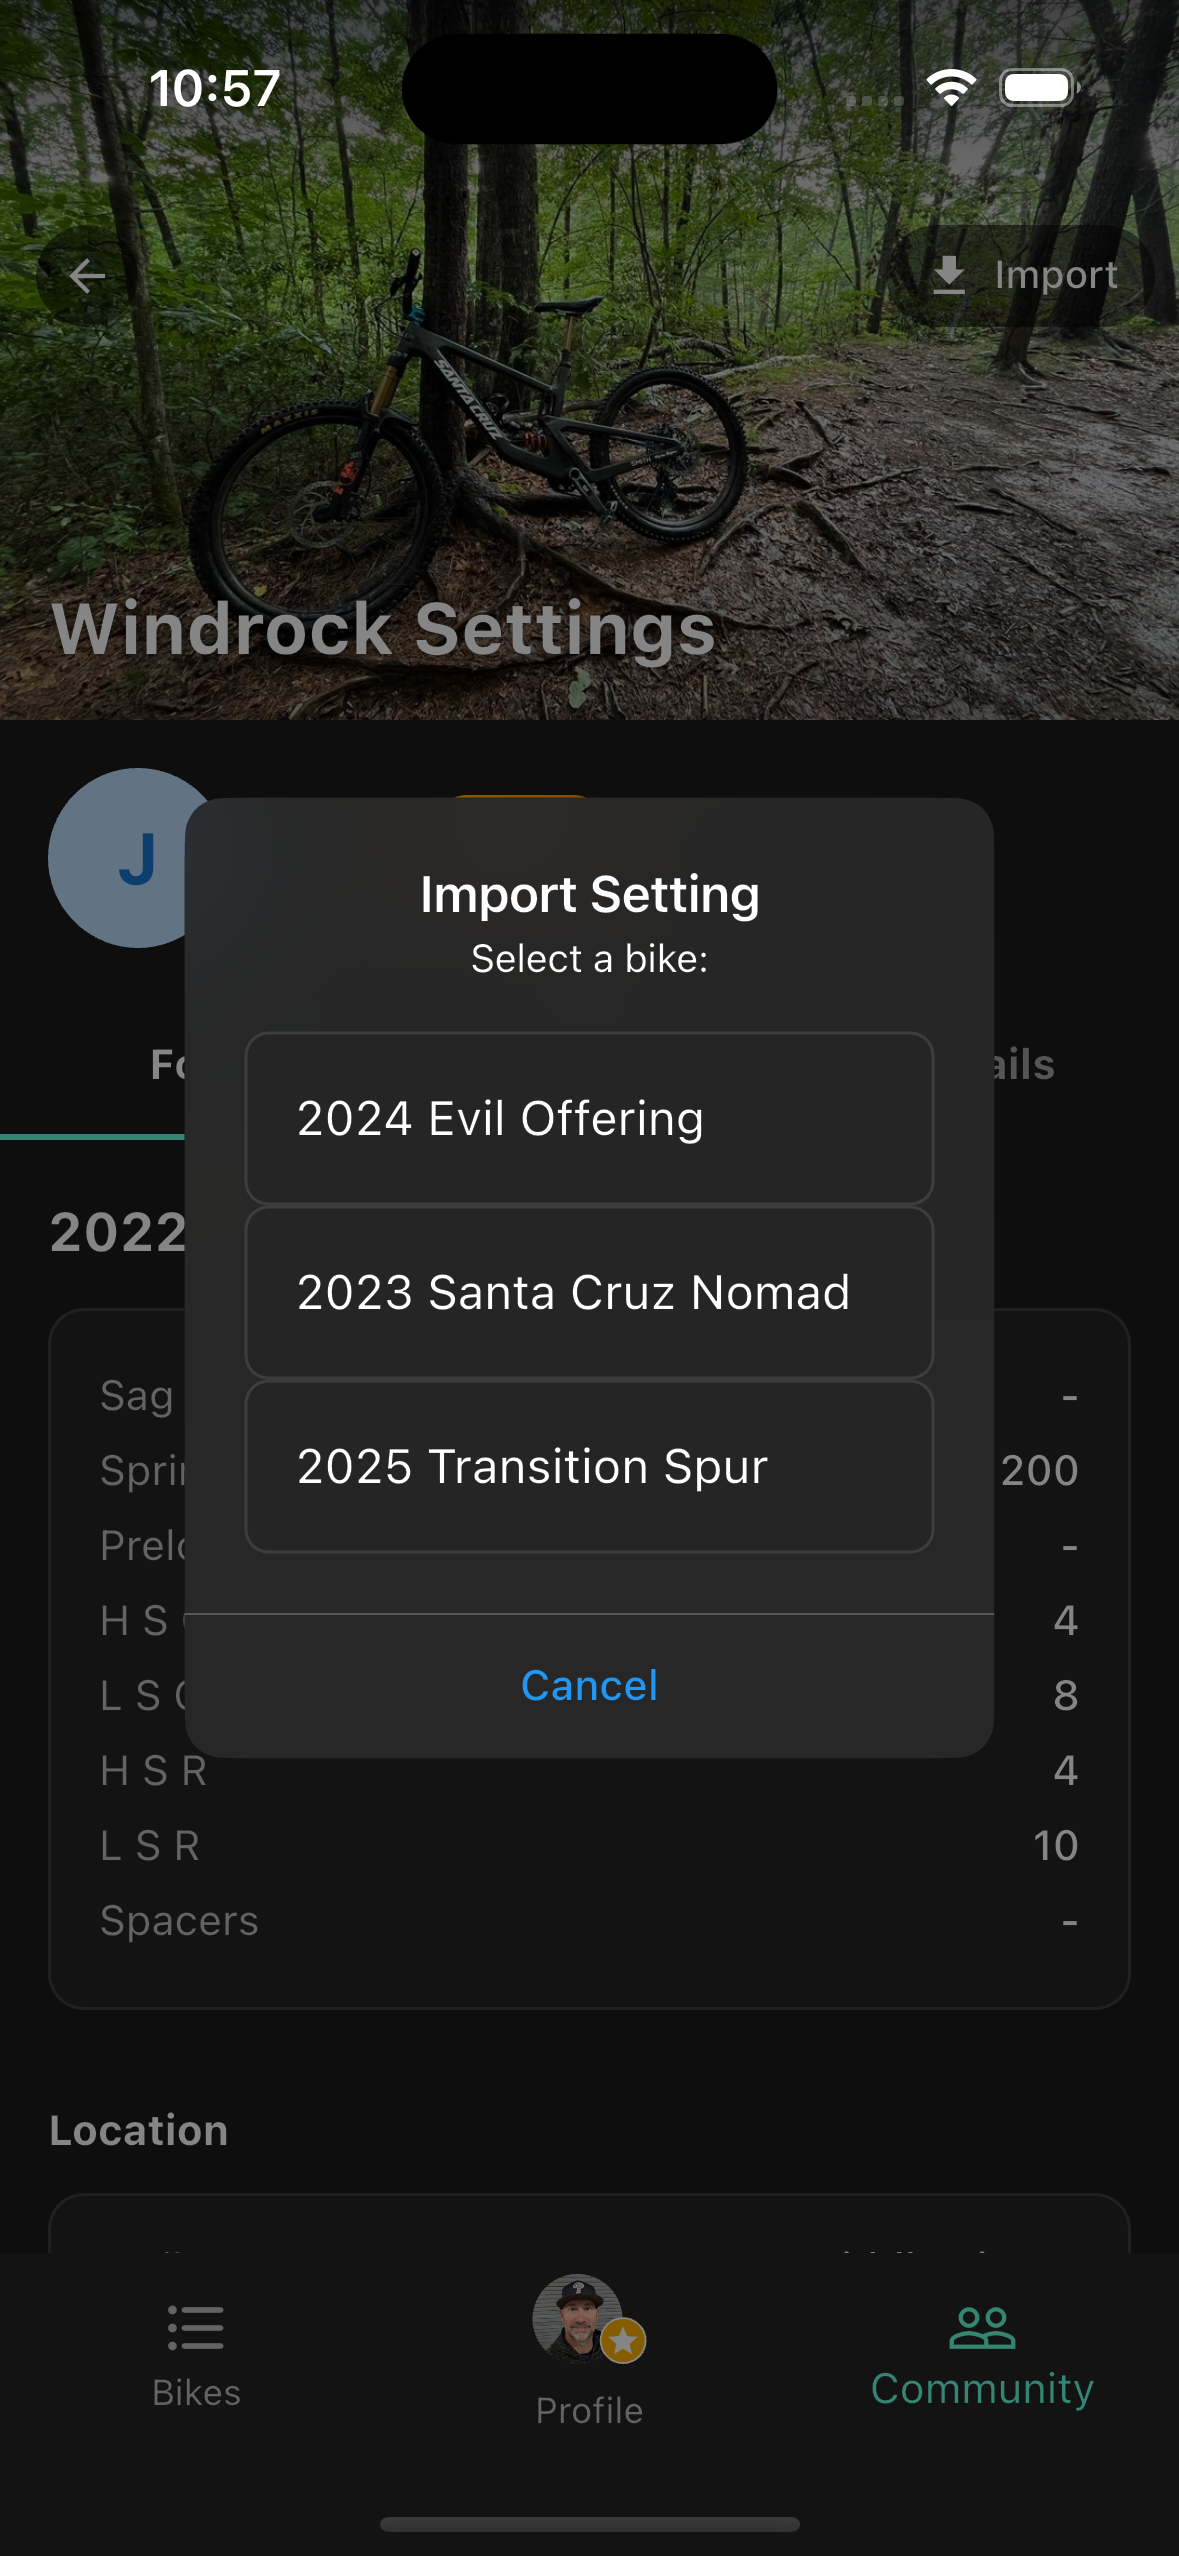
Importing a Setting
When you find a community setting you want to try, importing walks you through a comparison flow so you can see exactly what differs before deciding what to do with it.
Import flow
- Open the Community tab and tap a setting card to view its details.
- Tap Import at the bottom of the detail screen.
- Select which bike you want to import the setting to.
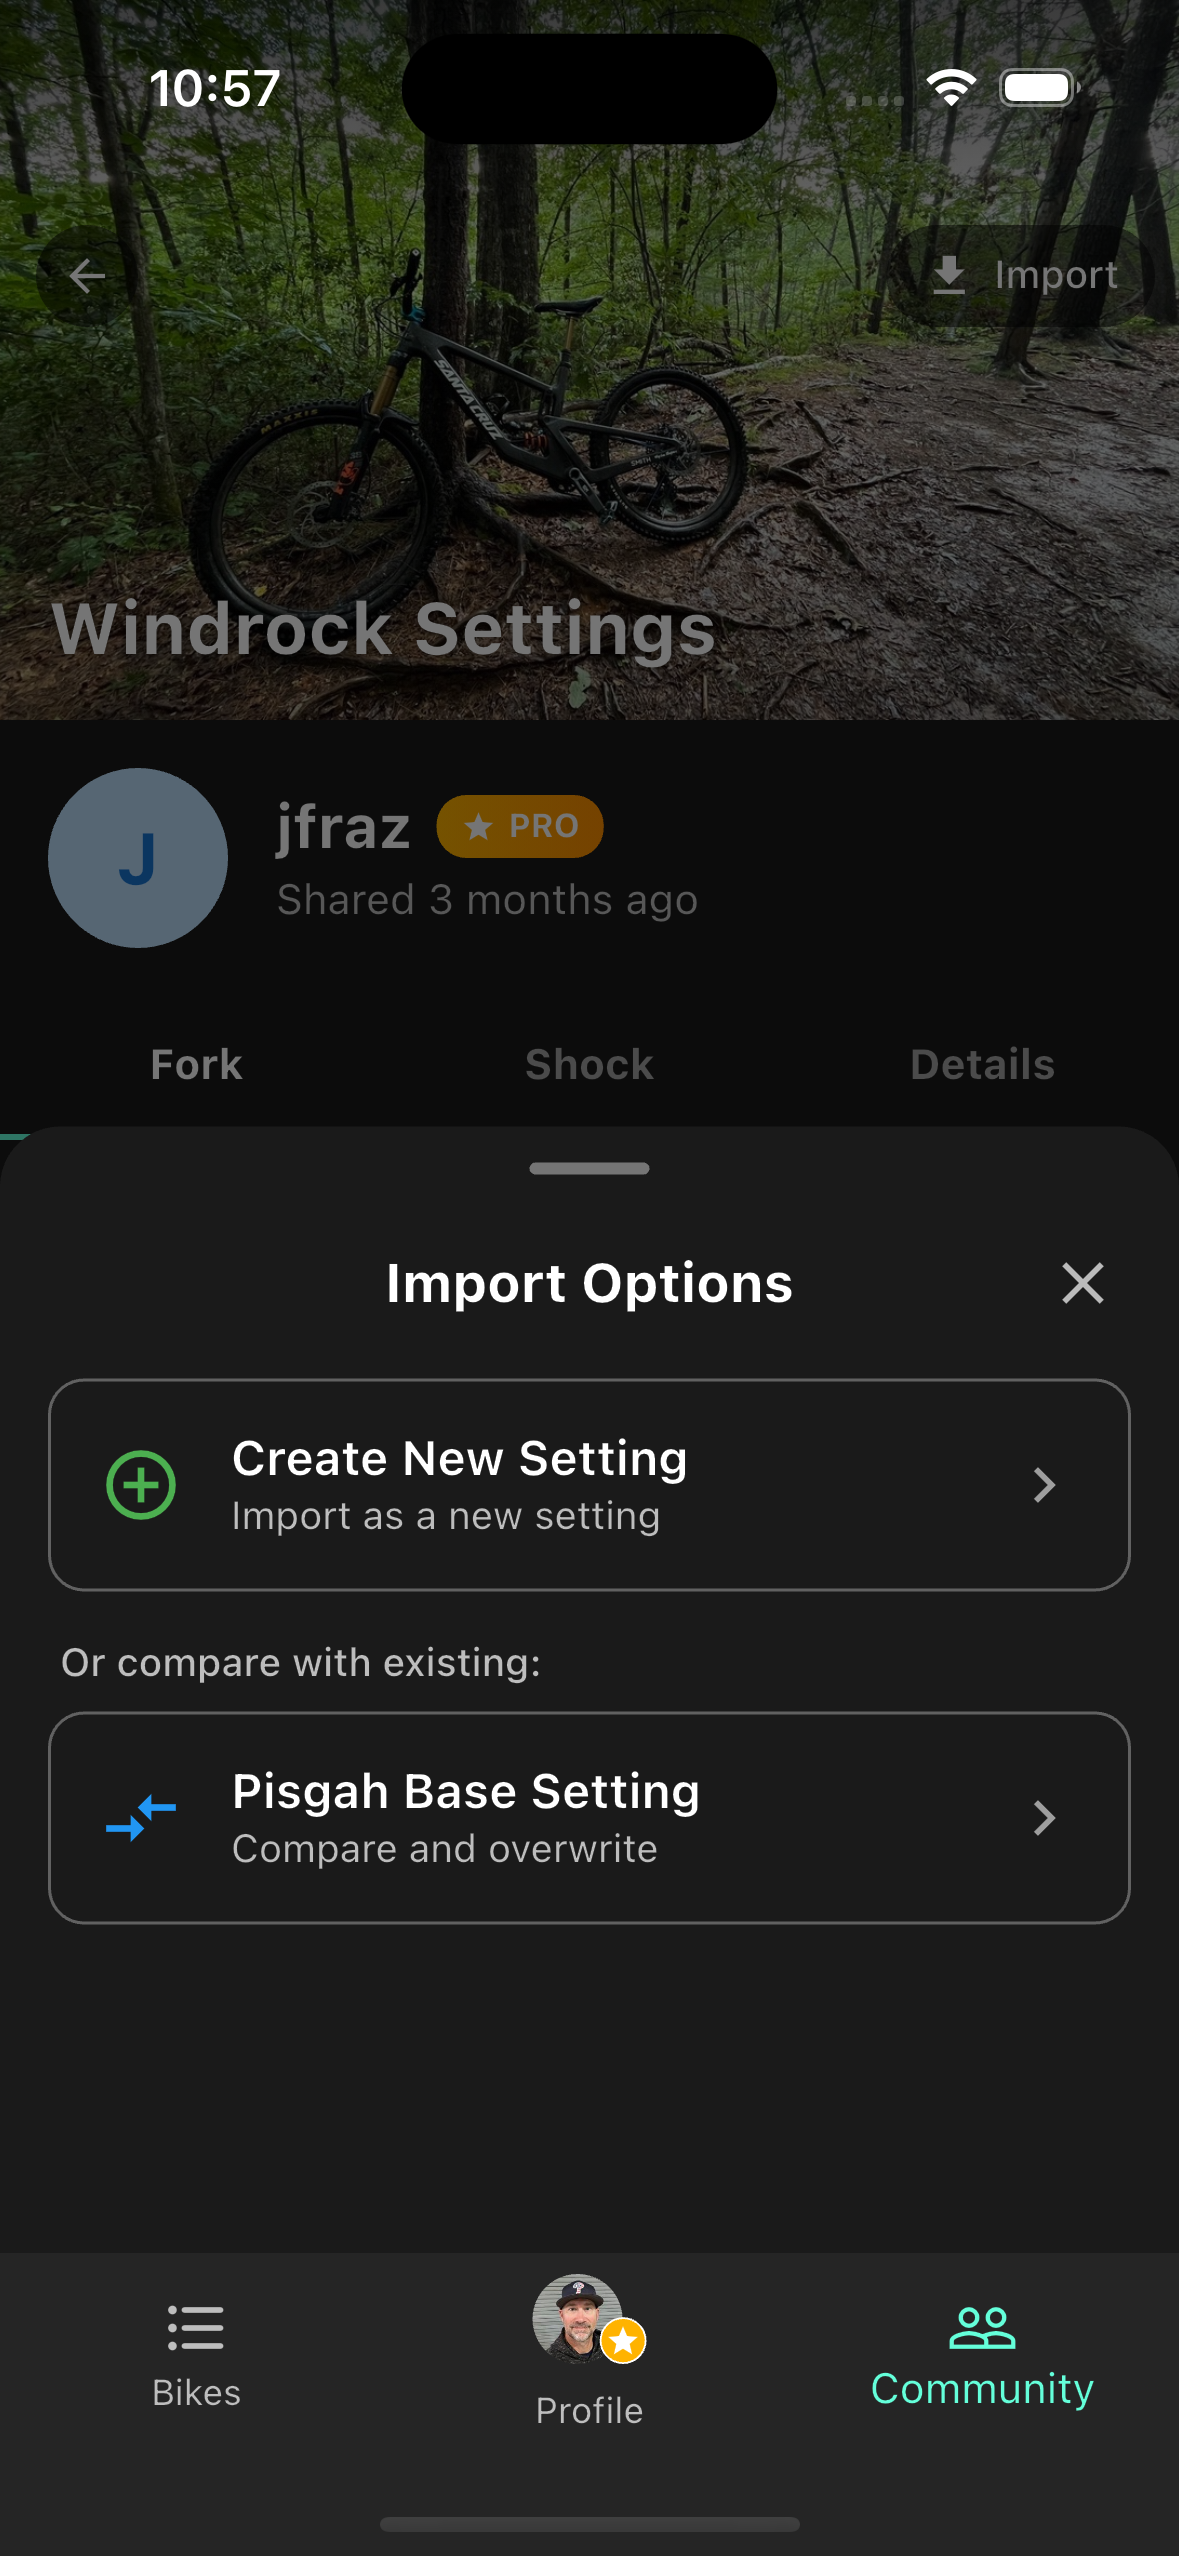
- Choose an action:
- Create New Setting — adds it as a fresh entry without touching any of your existing settings.
- Compare & overwrite — pick any existing setting from your list to compare side-by-side, then decide what to do.
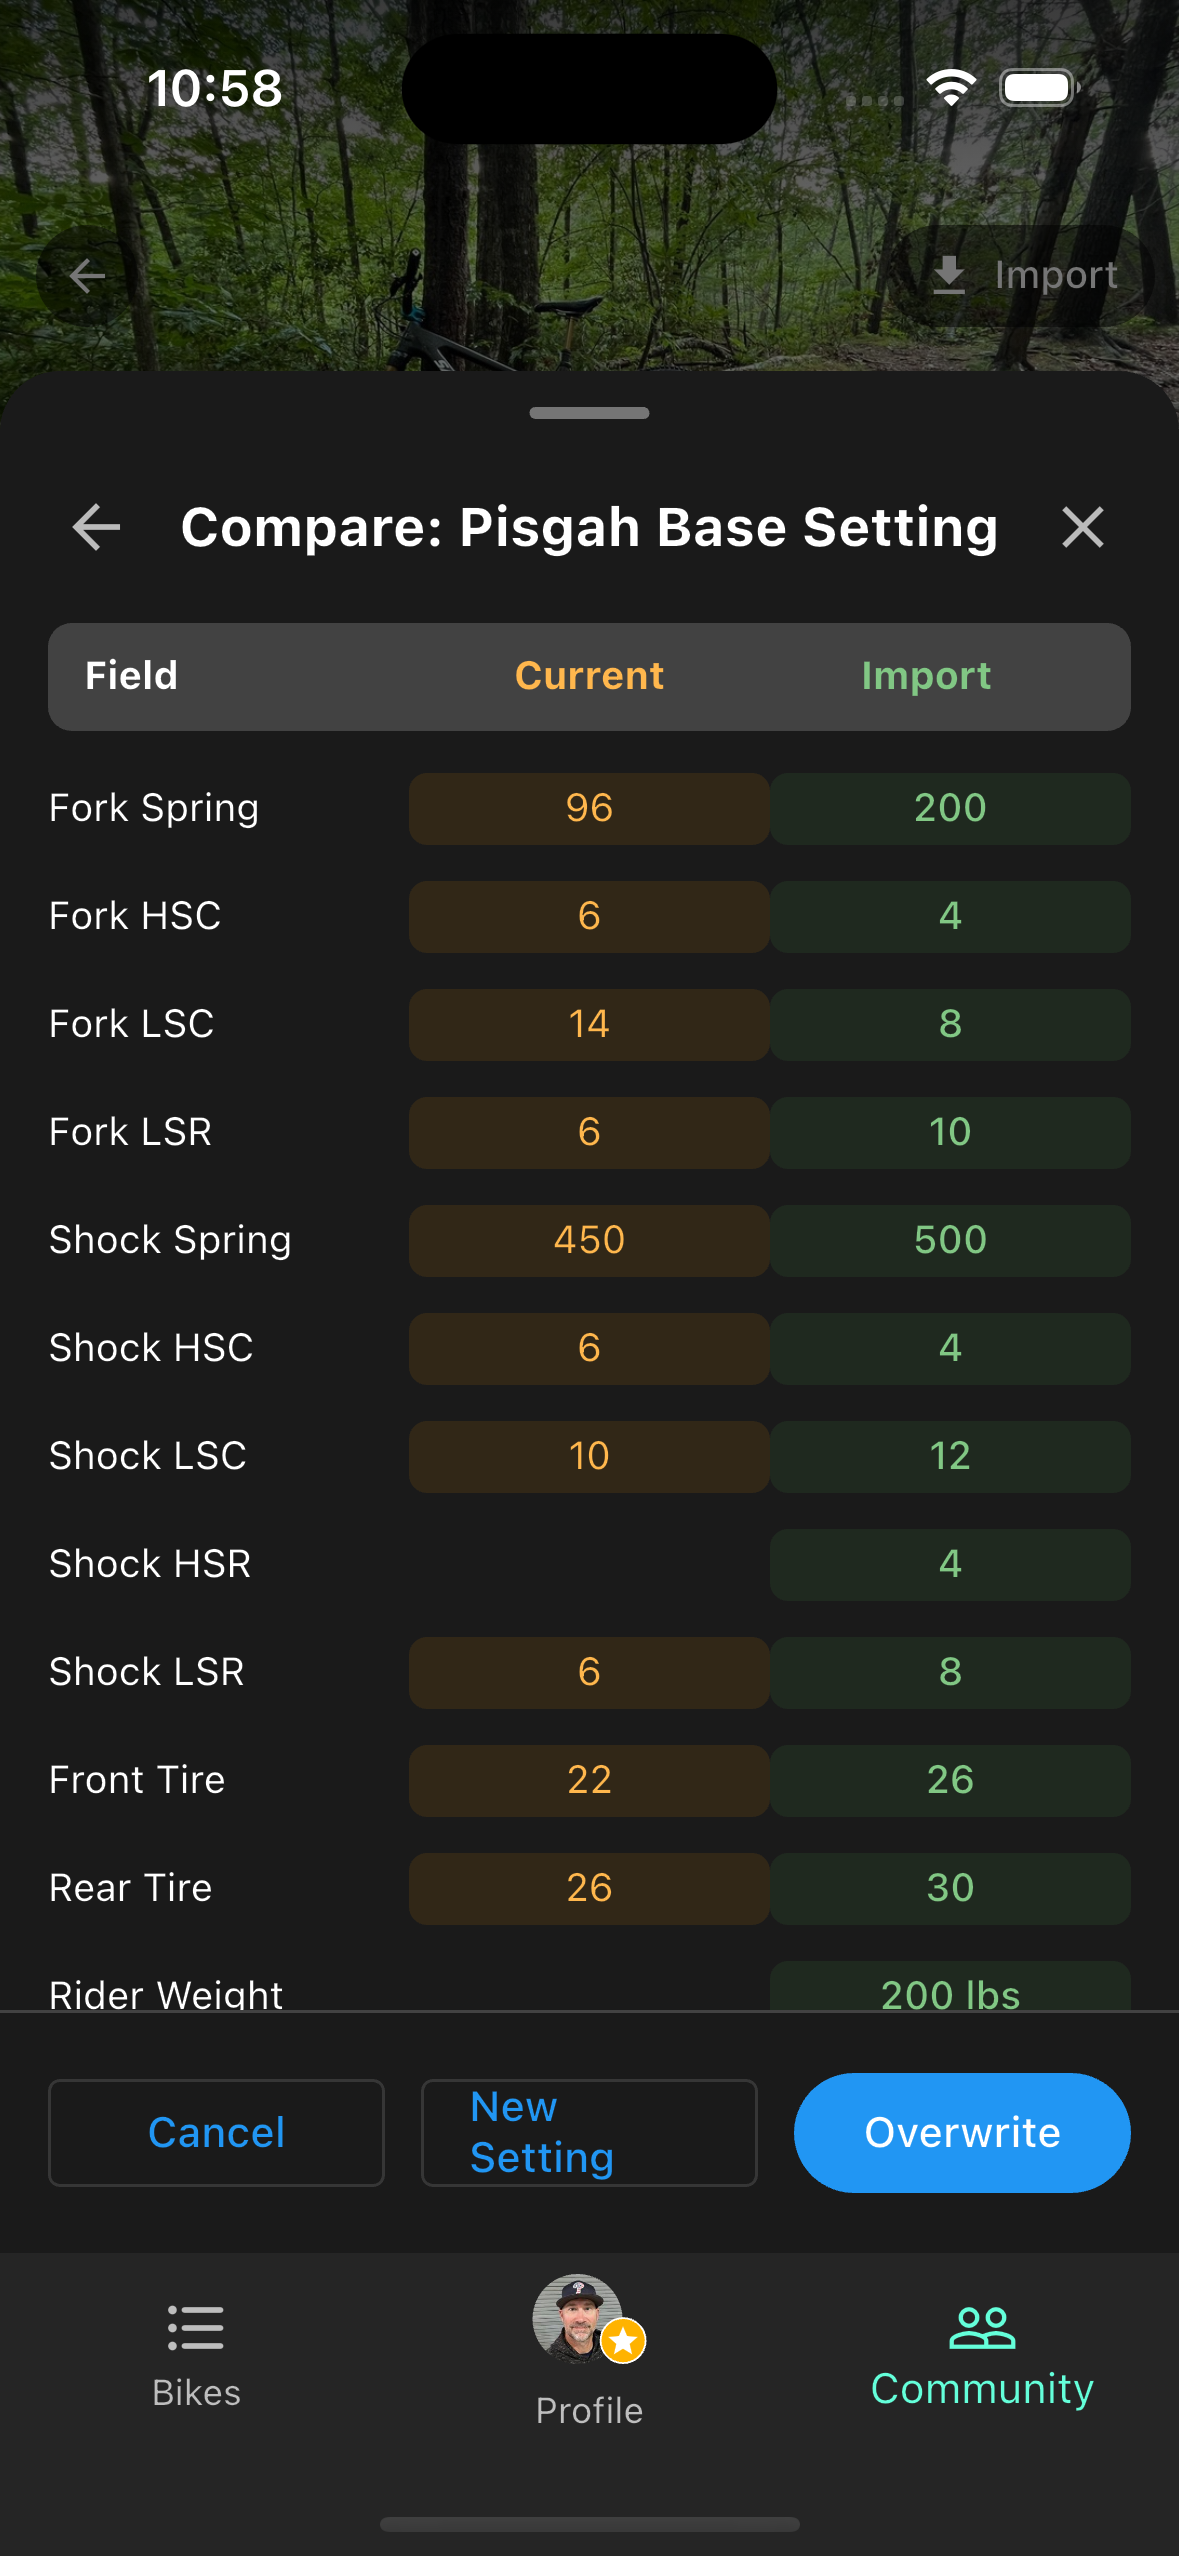
The comparison view
When you choose to compare, the app shows a side-by-side table of every value between your selected setting and the one you're importing. Differing fields are highlighted so you can spot the delta at a glance. Fields with no value on either side show a dash.
Fields compared include fork and shock sag, spring rate, high/low speed compression and rebound, volume spacers, front and rear tire pressures, and rider weight. If both settings are identical, a banner confirms it — no changes needed.
After reviewing, you have three choices: Overwrite your selected setting with the imported values, Import as New to keep both, or Cancel to go back without saving anything.
Tap Import on the detail screen
Choose your bike
Side-by-side comparison
Troubleshooting
Calibration & Recording
Calibration fails or shows "Insufficient samples"
The phone moved during the two-second window, or the sensor sampling rate is being throttled. Make sure the bike is completely still, then try again. If it keeps failing, restart the app and check that Motion & Fitness permission is enabled in your device settings.
"No sensor data received"
The accelerometer permission has been denied. On iOS: Settings → RideMetrx → Motion & Fitness → toggle on. On Android: Settings → Apps → RideMetrx → Permissions → grant Motion permission. Restart the app after changing permissions.
Recording stops mid-ride
The app must stay in the foreground to maintain sensor access and wakelock. If you switch apps or the screen times out despite the wakelock (rare on some Android devices), recording will stop. Keep the app visible and your screen active while riding.
Results show no segments or a blank map
This happens when a ride is very short (under ~50 meters) or GPS had a major dropout. Make sure Location permission is set to "While Using" or "Always," and that you start recording outdoors with a clear sky view. Walk the section first if needed to verify GPS is locking before you ride.
Roughness scores look way too high or too low
Almost always a calibration issue. If the phone moved even slightly during the two-second calibration window, the baseline is off and every score for that ride will be skewed. Remount the phone more securely and recalibrate at the start of your next session. You can also fine-tune accelerometer sensitivity in Metrx Calibration.
A/B Comparison
"No matched segments" when comparing two rides
The two rides don't have enough GPS overlap for the algorithm to match segments. This happens if you ran on different trails, if one ride was very short, or if GPS was unreliable on one of the rides. Both runs need to cover the same general trail section.
Comparison verdict doesn't match what I felt on the bike
Speed has a big effect on roughness scores. If you ran one pass significantly faster or in wetter conditions, the data will reflect that independently of your settings. For clean A/B results, try to match your pace and run both passes in similar conditions.
Strava Integration
Strava shows "Not Connected"
Your OAuth token has expired or you revoked app access in Strava. Tap Connect and go through the authorization flow again — it takes about 30 seconds.
Sync shows 0 hours
The most common cause is that your Strava rides aren't tagged with gear. Open the Strava app, edit a recent activity, and assign it to the correct bike. Then sync again in RideMetrx. Only activities tagged with the mapped gear are counted.
Hours synced but service reminders didn't update
Navigate away from the Service Reminders screen and come back, or pull down to refresh. The sync completes in the background and the UI updates on next load.
Permissions & Account
GPS takes a long time to lock
A GPS cold start (first fix of the day) can take 30–60 seconds, especially if you haven't used GPS recently or you're near buildings. Move to open sky and wait before starting calibration. The live sample counter will climb once GPS is active.
Pro features locked even after subscribing
Log out and back in to force a subscription status refresh. If that doesn't work, go to Profile → Purchases → Restore Purchases. Contact us if the issue persists.
Data disappeared after reinstalling the app
Free account data is stored locally on your device only — uninstalling removes it permanently. Pro accounts sync to the cloud; log back in and your data will restore automatically.